
You may have seen my previous article on Generative Music… In this article I will be expanding on generative forms of music and focusing on other tools you can use in Ableton to create non-predictable patterns. I will be looking deeper into some of Ableton's plugins that have chance parameters, and I will also look into the follow features that bring further unpredictability to your compositions. This example will be more song-driven than the previous article, which focused on ambience. This will give you more of an idea how you can use generative chance forms to create compositions
Step 1 – Choose a Scale
First I want to use a scale, and from that scale I will create MIDI clips representing those notes. To keep it easy I am going to use the C Major scale (C, D, E, F, G). I am creating an Instrument Rack and will use the MIDI clips in this rack to trigger multiple MIDI instruments. On the Instrument Rack, create a MIDI clip. In this MIDI clip draw in a MIDI note on C.

Create additional MIDI clips and add in the MIDI notes for D, E, F, G. In the next section I will show you how to use the follow actions to introduce some randomization into the Ableton piece.

Step 2 – Follow Those Actions
Ableton's Follow Actions are a great way to introduce randomization to your music pieces. With the Follow Actions you can choose how long the MIDI clip will run for, and what it needs to do after it has finished. I have chosen for the clip to run for one bar, and after that to move randomly to another clip. Choose Any from the follow actions and this will randomly choose from other MIDI clips in the channel strip after running for one bar. I have gone to each MIDI clip and made these changes.

Step 3 – Setting up the Instrument Rack
I want to create an Instrument Rack with different synths/sound sources in. These instruments will all be triggered by the same MIDI notes.

Now let's start adding some instruments to the Rack so we can begin hearing the results of the randomization.
First I have added a bell-sounding synth to my Instrument Rack. I have chosen a preset from the Live 7 Legacy Pack (http://www.ableton.com/livepacks). I quite like the bell sound of the Ladylike preset (under the Atmospheric presets in the Live 7 Legacy pack).
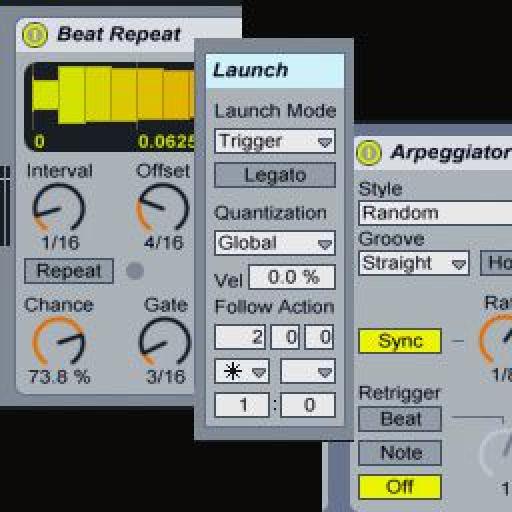
I have also added a Beat Repeat to it. The Beat Repeat has a Chance parameter, which allows you to dial in how much of the effect you wish to leave to chance. I have chosen the Squishy preset, tweaked it a bit, and have then dialed in a Chance factor of 73.8%.

Step 4 – Add in Some Bass
Next up I am adding a bass sound to our Instrument Rack. The nice thing about this is that the Bass will be using the same MIDI notes generated by the synth so both instruments will always be in tune. I have inserted the Bass-Acid instrument into the Instrument Rack (Live Devices > Instruments > Synth Bass > Bass-Acid). I have slightly tweaked the settings (see image below).
Before the Bass Instrument I have added a Note Length MIDI plugin to extend the MIDI note length. I have increased the Length to 60.0s. I have also added an Arpeggiator. Ableton's Arpeggiator is also great as you can randomize the Style in which the notes are generated. Under Style I have chosen Random. I am using a Sync Rate of 1/8 and have increased the Gate to 108%. This creates a busy bass line, but is still in tune with the Bell synth.

I have added a Compressor after the Bass synth to tame the sound, and have used the EQ Eight with a low cut on the bass.

Step 5 – Add Some More Synths to the Rack
Finally I want to add one more synth instrument: The Lead-Biig Saw preset (Live Devices > Instrument Rack > Synth Lead > Lead-Biig Saw).
I have added a Note Length MIDI effect again. I have dialed in a Length of 5.35s and a Gate of 100%. Next I have added a Chord plugin simulate that the instrument is playing more than one single note. On Shift one I have +7 st; on Shift 2, -5 st; and on Shift 3 +12 st. This gives a more stabbing synth sound.

The Auto Pan effect also has some randomization features: I have dialed in the following settings with the Auto Pan (notice the Random icon for randomized panning). After this is an EQ Eight where I have cut out quite a bit of the lower range so that the bass will be more prominent.

I have adjusted the volumes of these three instruments on the Instrument Rack so that they all sit comfortably together.

Step 6 – Follow the Beat
What will really bring this all together now is a beat. I have added 4 of the Breaks Biggie Beats Apple Loops.

I have Warped these loops, and have added in a Follow Action like with the MIDI clips. The drum loop clip will follow onto the next clip after 2 bars, and they are also set to Any for further randomization.

Now listen to the project so far. As you can see quite a bit can be done with a few MIDI clips, some loops, Ableton's effects with chance and random parameters, and the Follow Actions.
I have included a Live Pack of this project I was working on so that you can test out the results for yourself.
Download the Live Pack that accompanies this article HERE
Conclusion
I hoped this has opened your eyes and your ears to more possibilities with Generative Music and Randomization in Ableton. Ableton has a good handful of plugins with random parameters, and the Follow Actions are really handy in helping the music elements jump between varying clips in the project. You may find that through these generative techniques you're able to build interesting arrangements within your projects.
You can also quite easily record these changes into the Arrangement view in Ableton and tweak later. However you choose to work with these techniques, have fun while doing it. Hope this gives you some inspiration for future projects.
Discussion
Want to join the discussion?
Create an account or login to get started!