
A “gated” effect in dance music is when a sound plays as it normally would, but there are missing cuts from it. People today call it Trance Gate since it's so prevalent in Trance music, but this technique is far from new! The classic 60's song Crimson and Clover by Tommy James and the Shondells not only used this effect on the guitar, but heavily on the vocals toward the end. Try not to confuse rhythmic gating with chopping and stuttering... when you gate a piece of audio you're not actually breaking up the sound itself. The sound plays under the silent bits, and unlike chopping, the audio “picks up” where it naturally would if it were never silenced.
In this article, I'm going to show three ways to accomplish this effect. Two of the methods are built right into Logic, and the third requires a free Audio Unit called MIDI Gater by Destroy FX.
Step 1 - (Gating Technique 1) Open your source material
Open a song with some longer synth or guitar chords, strings, or some drawn out ambient type sounds. I'll be using some synth chords.

Step 2 - (Gating Technique 1) Add the Tremolo Effect
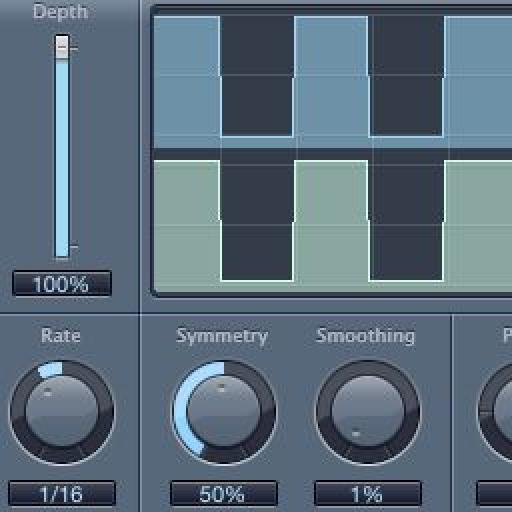
In this first method, simply place the Tremolo effect onto your sound's Channel Strip. It's under the modulation sub menu when choosing effects. Leave the symmetry at 50%, change the Smoothing from 0% to taste, and set the Phase to 0 degrees.

Here are before and after samples:
The Tremolo's Rate controls how fast/slow the gated effect happens so try different values. Try adding automation on the track that swaps out different rates.
Step 3 - (Gating Technique 2) Add the Noise Gate Effect
Now we'll try a method that uses Logic's Noise Gate effect, and an audible source tone that triggers the gate effect. Using this method to gate your sound is more powerful because you can control the length and timing between the cuts. Remove the Tremolo from the Channel Strip, and place a Noise Gate in its place. It's under the Dynamics sub menu.

We'll actually be using the Noise Gate in the reverse way it's traditionally applied. A Noise Gate is normally used to filter out noise from the in-between sections of a recording that should be silent, but aren't. This is common on recorded audio tracks like guitar and vocals. For example, as soon as the singer stops singing, you'll sometimes hear noise from the room, the mic, cables, or any hardware devices the mic was being fed through. The Noise Gate lowers the volume between the recorded vocals when you set the Threshold setting BELOW the volume level of the intended sound, and ABOVE the volume level of the unwanted noise.
In our crazy gated world, we'll be silencing the entire track with the Noise Gate, while letting sound in with a source tone. As soon as the source tone being fed through the noise gate exceeds the Threshold level... the effect is turned OFF, and you hear the audio from the track!
Step 4 - (Gating Technique 2) Create the Gate Source Tone Trigger
Now let's create the source tone for the Noise Gate. Use the key combination Option - Command - N to create a new track, and choose “Software instrument.” Choose the EXS24 sampler. The default EXS24 sound is a simple sine wave sound that has sustain so it's perfect for the side chain source. To assure that the EXS24 stays above the Noise Gate's Threshold level, raise the EXS24's “Level Via Velocity” slider all the way up.

Step 5 - (Gating Technique 2) Output the EXS24 to a Bus
Next, we'll output the EXS24 to a bus so it can be used as a Side Chain within the Noise Gate. Click the EXS24's output menu and select an available bus. We have to do this because currently Logic doesn't allow you to select a virtual instrument as a Side Chain source... but it DOES allow you to select a BUS as the source. A new Auxiliary track with your selected bus appears next to the EXS24 track.

Step 6 - (Gating Technique 2) Turn off the Aux/Bus track's Output
Now, from the Bus/Aux track's Output menu, select No Output. We do this because we don't actually want to hear the sound... remember it's just a source tone to shut off the Noise Gate.

Step 7 - (Gating Technique 2) Choose the EXS24 as the Side Chain Source
Now click back on the channel strip of the sound we want to gate, and open the Noise Gate effect. From the Side Chain menu, select the bus we output the EXS24 to. In my case it's bus 3, because I had already used bus 1 and 2 for something else in my song.

Step 8 - (Gating Technique 2) Play the EXS24 while adjusting Threshold
Play your song now. There should be no sound whatsoever at this point. Continue to let the song play back and leave the Noise Gate effect window opened.
Click back onto the EXS24's track we set up earlier. Start to play a single note (higher notes seem to work better) in a rhythmic way on the keyboard while you adjust the Noise Gate's Threshold setting. Try setting the Threshold to about -11 dB. It's gating! Now record the notes your playing and quantize them for super tight timing...

Here's what it sounds like:
You control the timing by the way you play. If you're not great on keys, just create a new empty MIDI region and draw in the notes.
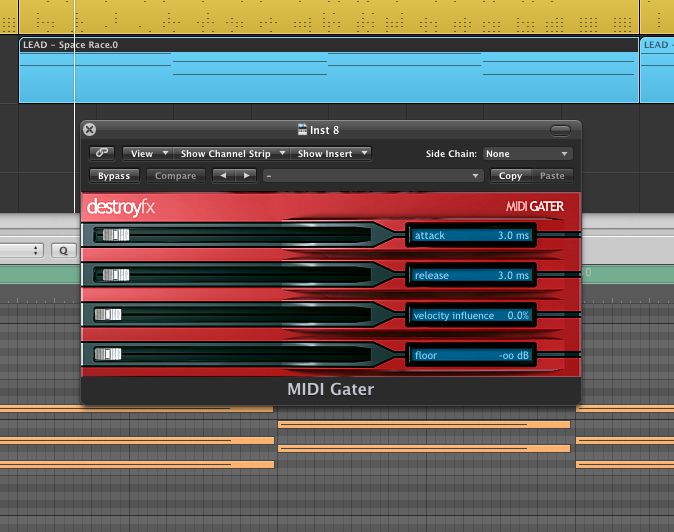
Step 9 - (Gating Technique 3) Install MIDI Gater
Now on to the last method. First, download and install this free Audio Unit called MIDI Gater by Destroy FX and restart Logic. This is an ancient plug-in, but it does what it does perfectly as you'll see. It's not currently 64 bit, but hopefully they'll update it soon.
Step 10 - (Gating Technique 3) Add MIDI Gater to your song
MIDI gater is actually a virtual instrument that plays a side chain source as it's sound. Create a new virtual instrument track and add the MIDI Gater from the AU MIDI-controlled Effects sub menu.
Step 11 - (Gating Technique 3) Output your sound to a Bus
Click back on to the sound you're gating, and remove everything from its channel strip you placed on it from the other gating methods we tried. Now from the output menu, choose an available bus. You only need to do this if the sound you're gating (as in my case) is a virtual instrument. We'll be feeding it through MIDI Gater's Side Chain.

Step 12 - (Gating Technique 3) Turn off the Aux/Bus track's Output
Remember to turn off the Aux/Bus track's output that appears next to the sound your gating. We did this in the second gating technique above also. If you don't do this you won't hear the effect, since the un-gated original sound will play over the gated one.

Step 13 - (Gating Technique 3) Choose the Bus/Track as the Side Chain
Click back onto MIDI Gater's Channel Strip and from it's Side Chain menu, select the bus you just output you're sound to, or if you're gating an audio channel, choose the track from the list.

Start playback, then play any key on your controller. Just like the second gating method, you let the sound play through, by triggering it with a controller, but this method simplifies the technique by using only one plug-in that acts as the gate itself, and the instrument to trigger it.
Whatever method you choose, have fun, and I hope you enjoyed the tip!

Discussion
Adam
Want to join the discussion?
Create an account or login to get started!