The Red 4Pre is the latest addition to Focusrite’s Red series. Its relatively simple front panel conceals a comprehensive complement of I/o and routing options—a total of 58 ins & 64 outs are available when using all the various connections. There’s also advanced Dante networking capability, and dedicated Pro Tools | HD connectivity. Sample Rates up to 192k are supported, and the converters utilize a Focusrite feature called Parallel Path Conversion, which sums two parallel converters for improved signal-to-noise ratio. Combine that with four of Focusrite’s latest mic preamps, and you’ve got a lot of good stuff crammed into a 1-space rack.
So without further ado, let’s take a look at what this box has on tap.
Gozintas/gozoutas
As I mentioned, the total I/o is 58 in/64 out—here’s how that breaks down.
To start with, there are 8 Analog ins/outs. However, only some of these correspond to actual jacks on the front and rear panels—the rest are accessed via standard 25-pin D-Sub connectors on the rear (see Fig 2). Those connectors are for line inputs and outputs. Analog inputs 1-4 can be switched to mic inputs—the 4 XLRs, also on the rear. And Analog ins 1 & 2 can also be switched to Instrument inputs—the two 1/4” jacks on the front panel. (Inputs 5-8 are dedicated Line level ins).
Also on the rear are two dedicated LR Monitor outs (on 1/4” TRS), while the front panel includes two headphone jacks—each of these has its own independent level, mute, and dim controls, accessed by one of the soft knobs on the front (more on those later).
Digital I/o includes standard S/PDIF in & out (RCA), and 16 channels of ADAT I/o (as always, when sample rates higher than 44.1/48k are used with these, the channel count is halved (88.2/96k), and halved again (176.4/192k).
There are two Mini DigiLink connectors, for use specifically with Pro Tools | HD and HDX systems. And there’s also a Loopback Input, which can be used to reroute DAW output back into the DAW (watch out for loops, though!), in case you want to record computer audio or the current monitor mix in the Red 4Pre’s internal mixer.
And there’s more...
BNC connections are available for Word Clock when needed, and two Thunderbolt 2 ports provide hi-speed computer connectivity, allowing for low latency settings (with suitably powerful computer hardware, of course)—if the entire system is up to snuff, the Red 4Pre should be capable of 32-sample buffer settings and under-three-millisecond roundtrip latencies, which is about as good as it gets.
An extra bonus is the inclusion of dual Ethernet ports for connection to a Dante network. For those unfamiliar with Dante, it’s a relatively new but well-established networking protocol (growing in popularity) that routes audio over Ethernet, allowing for long cable runs in large, complex setups. It’s inclusion here would allow the Red 4Pre to be incorporated into larger rigs, and significantly extends the traditional utility of an interface in this range.
Add up all this I/o and you get that 58/64 number, although, as noted, higher simple rates will reduce this, as expected.
On the Face of It
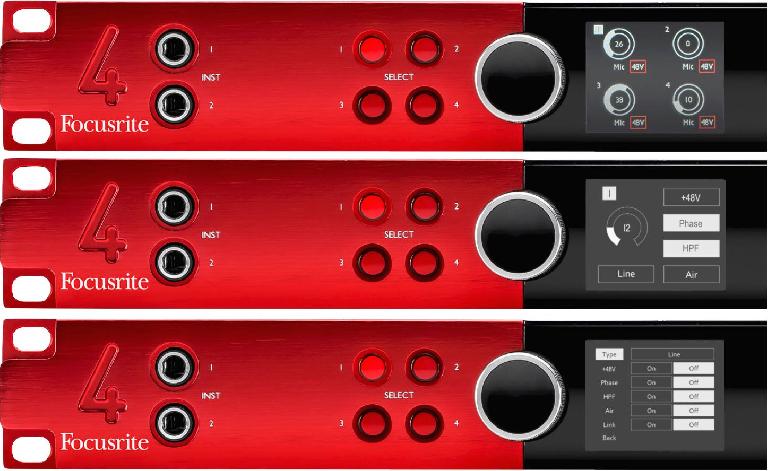
The front panel is dominated by two knobs and three displays, along with the ins & outs I already mentioned. On the left are the two 1/4” Instrument inputs, and on the right are the two Headphone jacks. The two knobs each have 4 associated buttons, and using the three displays in the center, allow for front-panel control of just about all the basic settings (routing and setup for the internal mixer must be done with the associated Focusrite Control utility—more on that in a minute).
Each knob is a combined rotary encoder and (center) button. The left knob (Input Encoder) is used to select the first four Analog inputs and make the various preamp settings, when applicable.
An overview screen shows the current settings for each of the onboard mic preamps. Each button brings up a Focus screen for that preamp, where you can see all the relevant settings and adjust the preamp Gain. Pressing & holding a button calls up the Configuration menu for that channel, where you can use the knob and it’s center button to make the various settings. Besides selecting the input for that channel (1&2: Mic, Line, or Instrument; 3&4: Mic or Line), these include Phantom Power, Phase Flip, HPF, and Stereo Link.
A little AIR
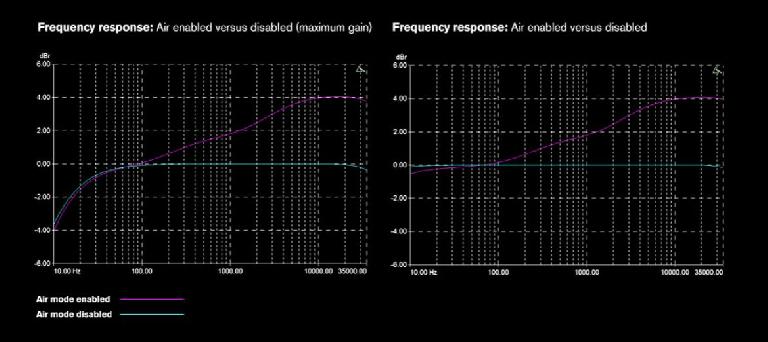
There’s also an option called AIR, which relates to the onboard preamps, which have been dubbed “Red Evolution” preamps. Focusrite is famous for their signature ISA mic preamps (originally designed by Rupert Neve), and while the onboard preamps here are not that classic circuit, they do emulate the sound of those iconic devices. The ISA preamp is a transformer-based design, and the transformer is responsible for much of the original’s distinctive character. Red 4Pre’s preamps are a transformerless design, but the AIR feature emulates the sound-shaping effect of the originals’ transformer circuitry. The AIR option enables a purely analog circuit tweak that combines a change in Impedance, gain, and passive frequency-shaping to emulate the transformer’s contribution to the classic ISA design.
As you can see from the graph, this produces a gradual high-end “tilt” and added “air” asn slightly tightens the bass—to my ears this extra brightness sounded good on acoustic guitar, and should be equally sweet for other instruments and vocals that could benefit from a little enhanced top end.
Output Encoder
The knob on the right side is the “Output Encoder”.
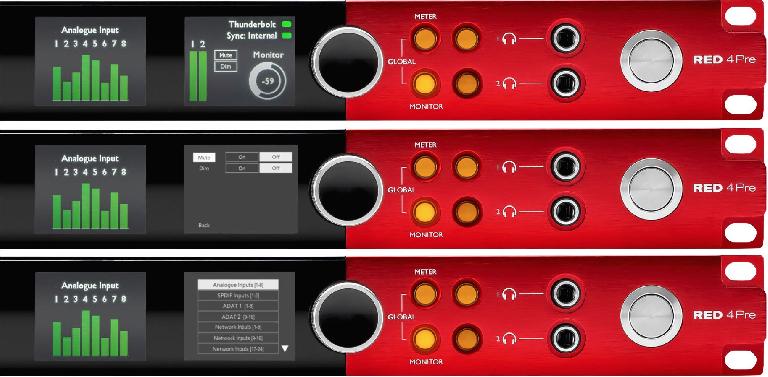
The first (top left) of its four associated buttons—labelled Meter—calls up a menu for selecting which outputs are shown in the center Metering display (see Fig 6). The other three buttons display the Monitor settings for the LR output and the two headphone jacks. The monitor level can be dialed up here, and just as with the input displays, a long click calls up a Configuration menu where you can set Mute and Dim (On/Off) functions.
Holding the Meter button and the Monitor button below it together gets you into Global mode, where you can make several settings. The unit can be switched between regular Thunderbolt hookup and dedicated Pro Tools |HD hookup (via the DigiLink connectors). You can also set sync (internal, Word Clock, Dante, etc.), determine whether Phantom Power settings will be retained (along with all the other settings), and set up a Routing option specifically for Dante hookup.
Software
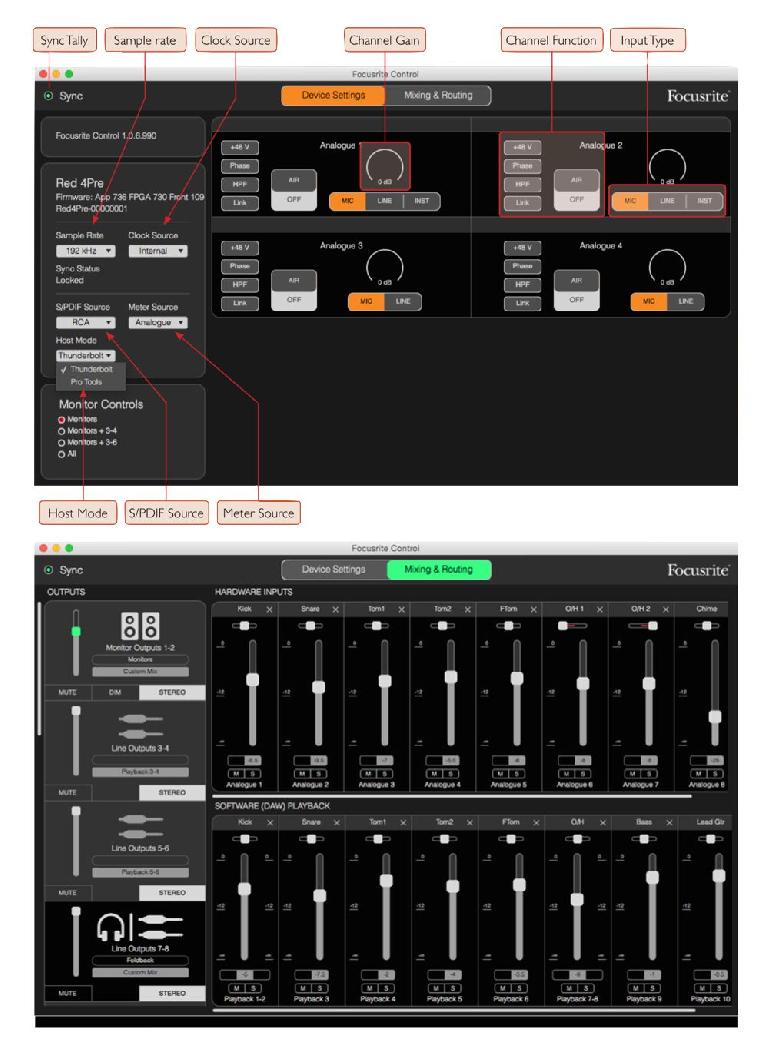
All these settings can also be accessed remotely from the computer, via the included Focusrite Control utility.
This application is where you must go to set up internal mixes with the onboard digital mixer. As with most multichannel interfaces, this can be used to set up tracking/headphone monitor mixes, and the Red 4Pre will retain your mixer configuration even when disconnected from the computer, for standalone mixer operation.
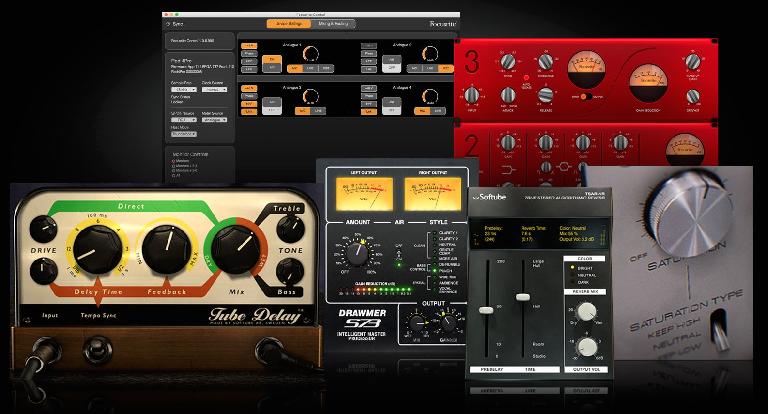
As a bonus, besides the Focusrite Control utility, Red 4Pre also comes with a collection of processing plug-ins, which includes the Red suite (modeled versions of Focusrite’s Red 2 & 3 EQ and Compressor hardware), and the Softube Time & Tone Bundle (incorporating their Drawmer S73 Intelligent Master Processor, TSAR-1R Reverb, Tube Delay, and Saturation Knob).
The Final Word
All in all, the Red 4Pre is a powerful, high-resolution audio interface that can serve in many scenarios, from simple hi-speed low-latency Thunderbolt DAW interface, to dedicated Pro Tools | HD I/o box, to part of a larger Dante audio-over-Ethernet network. The convenience of being able to make most settings from either the front panel directly or the associated utility is a big plus—I found that even with only two encoder knobs, front-panel setup is quick & efficient, and those onboard and remote configuration options will help it fit in in any situation. The four onboard preamps provide the kind of sound that Focusrite is famous for, and the hi-speed Thunderbolt connectivity should allow for the kind of ultra-low-latency performance that’s needed in today’s session work.
The Red 4Pre is not cheap, but with all its connectivity, it still provides good bang for the buck, and, like with all Focusrite gear, you can’t go wrong when it comes to the sound.
Price: $2499.99 (street)
Pros: Hi-speed Thunderbolt 2 connectivity for low-latency performance; comprehensive & advanced I/o; excellent sound quality
Cons: Some analog I/o requires breakout D-Sub connections; only 4 mic preamps
Web: https://us.focusrite.com/thunderbolt-audio-interfaces/red-4pre


 © 2024 Ask.Audio
A NonLinear Educating Company
Discussion
Want to join the discussion?
Create an account or login to get started!