
Max For Live's Buffer Shuffler device is a great tool that can be used to manipulate your audio in interesting ways. It can reverse, pitch, and stutter the audio for creative effects. Let's take a look at how audio can be loaded into the Buffer Shuffler and manipulated.
Step 1 – Loading Audio into the Buffer
On any audio track insert the Buffer Shuffler. The interface can look a bit daunting but don't worry, the different areas and effects are going to be covered. What you need to know first is that the audio needs to be placed in the buffer before it can be manipulated. So the buffer is like a storage space for the audio. Once the audio is placed in the buffer, the effect uses this as a reference. The audio needs to go through one playback pass for it to load into the buffer, so keep this in mind when playing back your audio. Only after the second pass of the audio will you hear the effects. So the best way to use the Buffer Shuffler is to set up some loop points and then playback the track, when it goes through the second pass the Buffer Shuffler will kick in.
Step 2 – Step Sequencing Your Audio
When the audio has been loaded into the Buffer Shuffler, the audio snippet is divided into steps. By default, it's set to 8 steps horizontally across. But this can be changed with the Steps dial from 2 steps all the way up to 32 steps, or click on the 32, 18, 8 steps presets to jump it to those step values.

Different shuffler effects can be applied to each 'step' of the audio. The steps also run 8 steps up vertically. To hear how the steps have been loaded into the buffer, set each step to the same vertical step. You can swipe across with your mouse pointer to change the step position. Now play back and hear how the first audio snippet saved in the buffer is applied to the other steps.

Draw in some other pattern on the step grid to get different patterns. This works quite well with drum loops. You can load the loop into the buffer and then change up the beat by editing the step pattern.

Another way to get some interesting patterns is to click on the Dice button under the step pattern and it will generate random step patterns for you. You also have different Dice modes to choose from, and if things get a bit out of control you can always reset the pattern back to its original state with the reset button

The green arrows below each step help indicate the direction of the step. Click on it once to reverse the step direction, or click on it again to mute that step. So you can quickly go through the steps and change up the way it originally sounded by reversing and muting different steps in the pattern. These arrows can also be randomized as they have their own randomize, dice and reset buttons.

What's also neat is that you can save multiple patterns by switching between the patterns on the right. So work on a pattern and it will be saved to Pattern 1. Now choose another pattern and draw in different steps. You can have a choice of up to 8 different patterns.

Step 3 – Gated Stutter Effects with the Buffer Shuffler
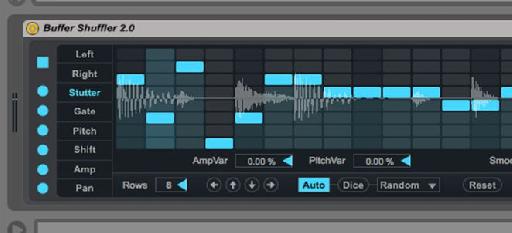
On the left you have different parameters you can choose from to manipulate your buffered audio. Let's try out some of the stutter and gate options. Click on Stutter to select the stutter option.

Clicking on the 'Audio' button next to the Steps and Rules buttons will display the waveform on the step pattern editor. This is a great way to see where the transients of the audio are in relation to the steps. For example, by displaying the audio on the step pattern you can see where big transients are in a drum loop, and then you can go in and process the main transients in the audio file. Now click on the Stutter to bring up the stutter options.

The stutter option adds a form of granular processing on the audio steps. The higher the vertical step, the higher the granulation on that audio step. At the same time, this granulation on the audio slightly alters the pitch and amplification of the audio. So choose which steps you want to stutter. And you can edit the range of Amplification and Pitch variance range by adjusting the respective dialog boxes under step pattern editor.

For more of a stutter effect, let's add in some gating. Click on the Gate option. With the steps all set to the top height no gating is applied, but as you reduce their height the gating starts to kick in. You'll hear how the tail ends on each step start getting cut off the lower you go. Right at the bottom it will gate out the step completely. Try a different step size for a more dramatic gated effect. Try it out with a 16 step pattern. This can really give you some interesting gated stutter effects on your audio.

Step 4 – Pitched Audio Steps
To further enhance this buffered audio let's add in some pitch modifications. Click on the Pitch option, and draw some pitch steps on the same steps that you gated and stuttered. The Min and Max dialog boxes will determine the range of the pitch. In the center the pitch is not altered, but if you step it up it gets pitched up, and if you step it down the pitch gets lowered, giving you some extra flexibility with the audio processing.
Conclusion
That's how to use the Buffer Shuffler to manipulate your audio loops. The audio is loaded into the buffer and then can be manipulated with the Buffer Shuffler options. You can really get some interesting pitched and gated stutter effects through this device. Try it out with your audio and see what happens!
Check out the following tutorials for more examples on Ableton and the Max For Live pack:
https://www.macprovideo.com/tutorial/max-for-live-fx-explored
https://www.macprovideo.com/tutorial/live-9-400-max-for-live-for-musicians
Discussion
Want to join the discussion?
Create an account or login to get started!