
Those who know, know that there are some amazing synths inside of FL Studio. And, the rest of the world is starting to be clued in, since Image-Line has begun making regular and much more deliberate steps toward the Apple platform.
One synth, in particular, that has caught my attention has been Harmor. In this tutorial, I thought it would be nice to get to know an incredibly powerful, additive synthesizer. Before we begin, I'd like to point out that Harmor, though imposing at first, really is a synth that can quickly provide you certain mainstay sounds that we're all looking for. So, let's go ahead and make a really simple bass patch, together. And, let's discover some of the amazing features in Harmor, at the same time!
Step 1: Pluck and Unison
Make a lot of plucky bass synths? Well, if that's the case, you're going to love Pluck. Let me briefly show you how easy you can make a bass synth with it that has balls.

Choose the default patch for Harmor. When building with any synth, I always recommend starting with the default patch, so you don't have another sound designers work interfering with yours!

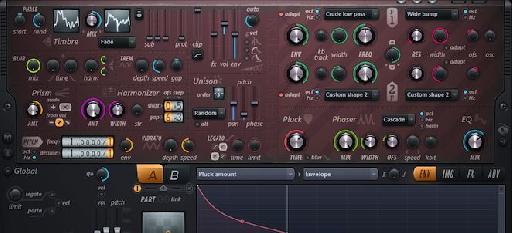
Now, let's go ahead and set up our burgeoning bass patch as monophonic, so we can ham-handedly play our basslines later, and never worry about note overlap! To do this, go ahead and enable Legato, from the Global Section of Harmor.

Next, taking the current patch down one octave would be a wonderful way to set yourself up for some low bass notes, as soon as you load the patch. Use the Pitch Knob in the Global Section to lower the default pitch.

Okay, here's where things start to get interesting. Let's raise the Unison order. Each time you increase the order, with Unison, Harmor doubles, triples, or quadruples (and more!), the voices that are currently being played. With the Pitch, Pan and Phase sliders, you're able to take the added voices out of Pitch, Pan, and Phase. Detuning, in this sense is awesome, as it gives us that added fatness. Let's increase the order to 5.

You can already hear a big difference, right? Now, let's go ahead and pull the Pan slider back. Granted, this setting makes it feel like the bass is thicker, and wider. But, we want to feel this hard middle, so that it pushes deep over those club speakers, and gives room for other sounds in the mix.

Usually, this is the part where you'll start applying your lowpass filter and then modulating the filter with a filter envelope so that it snaps open and closes fast. This gives you that snappy, plucky bass part that is heard so often in many pop songs. Thankfully, with Pluck, we can bypass this whole step. We can slowly lower the Pluck, Time knob. Notice that the more it lowers, the more both a low pass filter and a heavy hint of filter envelope is added. And, at the same time, you haven't touched either the filter, or the filter envelope. What gives?

Pluck, in unto itself, is a decay related filter. Because it operates separately from the main filter, you can use it either to save some time, or in addition to the main filters for increased sculpting.
But, what if you want to sculpt the shape of the 'pluck', like you would a filter envelope?Cause, obviously one is being used, somewhere, right? Well, Image-Line thought of this, too. There just happens to be an envelope control for this exact function. If you click on the Edit Target drop-down menu in the Envelope Controls section, you can select Pluck Shape as your envelope target, and actually edit its curve to make it where there's a steeper decay, etc.

Step 2: Envelope Controls
In addition to the Pluck Editor, for a bass patch, it might be nice to sculpt the amplitude of a bass patch, as well. Why have any extra release, that could eat up some processing power, when we don't have to, right?
In the Edit Target drop-down menu, I'll select Volume...

Now, I'll enable the ADSR modifier for this envelope...

Once activated, I can begin using the more traditional Attack, Decay and Release knobs to fine-tune my bass. You'll notice that by activating this button, we now have a much slower attack for the bass. I'll roll this all the way back...

Now, the attack is back to being punchy again, but the release is a little unnecessary and makes the bass a little too 'Enya' for my ears. I'll pull this back to around 8 o'clock.

At this point, feel free to adjust the Decay and Sustain to your preference. In the meantime, we need to make this bass a full-fledged bass, by adding in some Sub!
Step 3: Sub
The Sub section of Harmor is what will ultimately give the final beef to our viking sword of sound. I'll go ahead and raise the first slider on the left which adds a sub-harmonic tone, one octave below the root note that I am playing. I would advise slowly raising this slider till you get to a point where it feels good.

Can you feel that bass, now? I built this on a pair of Sennheisers, sitting in a chair with my laptop. Though this defies explanation, I felt like the chair was vibrating when that low, sub tone backed up my bass. Very cool!
Going Forward...
Harmor is an amazingly powerful synth that goes so far beyond what has been described in this article. However, baby steps, I feel are a great way to understand the more subtle mechanics of a synthesizer. And, while there are many more features in Harmor, you now have a greater understanding about a few. Moving forward with this patch, I'd suggest adding on some effects. Maybe a little distortion, a little delay? Check out the FX section!

Discussion
Want to join the discussion?
Create an account or login to get started!