
Cubase has some excellent tools for generating and processing drum sounds. When it comes to putting together the drum track for an EDM project, you can use all sorts of techniques to make things sound larger than life.
Creative compression, transient design, ambience, layering and heavy saturation are all valid techniques for fattening up your drums. Let's see what happens when you use them all at once… All you'll need to follow along is Cubase 7.5 and the downloadable content it comes with.
Step 1 - Laying Foundations
EDM is a pretty wide genre, and the technique for making a solid drum track can be translated to any style. We'll be working with a dubstep style beat here, but you can use this method across the board. Let's kick off by selecting our first sound source and putting together a basic pattern.
 Groove Agent was used as the main sound source here.")
Groove Agent was used as the main sound source here.
In this case the drum sounds are coming from the new Groove Agent SE4 drum machine. The kit is also one of the bundled dubstep presets. A simple pattern was programmed and quantized, and the only processing applied at this point was a simple brickwall limiter on the master output to ensure no clipping was taking place.
 A limiter is used on the master out to avoid overs and push the volume.")
A limiter is used on the master out to avoid overs and push the volume.
(Audio 1)—The foundation of our drum part:
Let's move on by adding some layers to beef the whole thing up…
Step 2 - Push The Timing
A good way to add more energy and punch to a drum track is by adding layers. Layering key parts like the kick and snare tends to work best. As we only have kick and snare so far in our pattern, it's the obvious route here.
Let's start by adding a clap sample to a few select snare hits. This was just played in manually at first using a MIDI keyboard. The clap was then mixed and few more were added in the key editor. This not only enhances the snare but adds an accent to the hits you select.
A good way to create contrast between the original snare hit and your new layer is to alter their timing very slightly. Shifting the new clap by just a few ticks will really help separate the two sounds.
 The clap with pushed timing.")
The clap with pushed timing.
(Audio 2)—Here you can hear the new clap in the mix:
By panning the two sounds, you can also create a wider stereo image. I was happy with the result without any extra panning applied but the option is there if you want it.
Step 3 - Deep Layers
Adding layers in the low frequency is also an ideal way to give you a fuller drum sound. If you are using a kick drum that is perhaps a little boxy or contains higher fundamental frequencies, you can compliment this by using a deeper kick. An 808 style kick drum is employed here to do just that.
The snare and clap were syncopated (to an extent) but the new kick drum is actually placed both on and in between beats. This adds a new depth to the drum mix and the groove. Two birds… one stone. We'll add one more layer and then add some processing.
 The new deeper kick is loaded into Groove Agent.")
The new deeper kick is loaded into Groove Agent.
(Audio 3) The new kick is mixed with the original loop:
Step 4 - Ambient Decoration
The whole loop is starting to sound pretty solid with good low end extension, but what it needs now is some high frequency content and a little space. The answer to both these issues is hi-hats and some percussion. To get the job done here, I opted for a loop. This is actually the only 'Non Cubase' bit of content in this tutorial as it was taken from my own loop library.
 The new high end loop in place.")
The new high end loop in place.
Once the part was imported it was treated to some short, wide reverb. This came courtesy of Cubase's 'Roomworks' reverb processor. This is actually a very usable rreverb plug-in with very little CPU hit. The reverb both opened up the stereo image and introduced some space to the mix.
 The Roomworks plug-in used to add ambience.")
The Roomworks plug-in used to add ambience.
(Audio 4) The percussion loop with reverb added:
Step 5 - Parallel Dimension
The loop is pretty much done now, but it needs some processing. Cubase has all sorts of new processors one of which is the Tube Compressor, a solid compressor with a warm analog tone and more importantly a mix control which allows on the fly parallel treatment.
 Some parallel compression is added courtesy of Cubase's Valve Compressor.")
Some parallel compression is added courtesy of Cubase's Tube Compressor.
(Audio 5) The compression in the mix:
This compressor was placed on a new group which was fed with all of our drum parts. Once activated, I dialed in around 4-5 dB of compression and a decent amount of tube drive. This effect was then mixed in at around 30% so the original dynamics were retained. This whole process adds harmonics and perceived volume.
Step 6 - Spit And Polish
The final treatment here involved re-introducing some of the high end that was lost during compression. I also wanted to make things a little punchier. This meant two processors and a tweak to the final limiter.
First up, here is a transient design plug-in called the Envelope Shaper. This is another Steinberg offering that comes with Cubase and it works much like the SPL Transient Designer or Native Instruments Transient Master. The purpose of this plug-in is to add emphasis to the attack and release phase of a sound. Of course it can also do the opposite, but here we are purely using additive processing.
Some gentle attack is added which gives every drum hit a little extra snap. The release was also pushed to enhance the sustain of the kicks and snares. This enhancement is subtle but makes the whole loop sound a little more upfront.
 The final mix and effects.")
The final mix and effects.
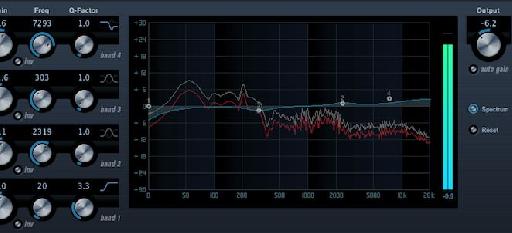
Finally, Cubase's Studio EQ is used to boost the highs that were lost during compression. When this was completed the individual parts were re-balanced and the limiter on the master output re-calibrated.
(Audio 6) The transient design, EQ and limiting are tweaked:
The result of all this is a full-on EDM drum loop that has deep lows, punchy snares and bright high end. You can repeat this process with just about any style and any collection of drum hits. This workflow can help you put together decent sounding loops in just a few moves. Try it yourself.

Discussion
Funny enough, when comparing Audio 4 with Audio 6, Audio 4 sounds louder to me, but Audio 6 sounds far more polished and glue-ed, thus better.
Robbie Vanhaze.
Want to join the discussion?
Create an account or login to get started!