
With groundbreaking plug-ins coming out, like BreakTweaker and Ultraloop, that utilize automation, LFOs, pitching and effects automation for percussive, melodic and rhythmic creation, it's easy to want to blow some serious money. However, if you think about it and understand the basics of what's taking place in some of these amazing new plug-ins, it won't take you long to remember that all of those, and sometimes more options, are available in DAWs, right now!
Reason is one of those DAWs that is perfectly capable of dishing out the same slick effects and editing oddities, especially with its awesome automation lanes and parallel channels. In this tutorial, we're going to go through some of these features with an emphasis on building an arrangement for electronic music from a single tone, similarly to the Alligator in Reason, but on a bigger scale. Let me show you what I mean! Go ahead and set your tempo to 150, and let's get going!
Step 1 - Lay the Ground Work
Before we do anything crazy, we need some tone to build from. I'm going to use a Thor that's bumping a basic square wave oscillator. To achieve this tone, make sure to turn the Pulse Width knob to the square symbol. I would also suggest turning the Octave down, once, or twice. Working with a deeper tone will ensure some bigger overall results.

Now, in the sequencer, take the Snap up to Bar and draw in some whole notes over four measures.

Step 2 - Go Parallel
Okay, the fun begins. Right-click on the Thor 1 Mix device Fader and select Edit Automation. This will create a lane for the Thor 1 Mixer channel, as a device, in the Sequencer. We want to be able to manipulate the Volume, Pan, and so on, but we don't want to mess with the tone of Thor. By automating the mixer, we leave the tone intact and open up some more possibilities, in terms of parallel compression.

In the sequencer, I'll use the Command-E shortcut to go to Edit Mode. Here, I'll draw in an automation pattern, while the Thor sequence loops for four measures repeatedly, until I get a nice sounding bass pattern made up of Thor tones and Fader automation…

To get really intricate and rhythmic, I changed the Snap value to 1/16. You can go to an even higher resolution later, but for the moment, a lower value helps you paint more broadly, so to speak. Try experimenting.

An easy way to achieve a tight bass pattern is to set your loop points up for the first measure and then work your way out, measure by measure. By staying in loop mode, it's easier to dial the pattern in over time in incremental amounts. You can also just copy the pattern over a few measures, if you like.

If you'd like to go with some dubstep wobbles, draw multiple jagged peaks or small triangular hills, like a triangle wave or a sawtooth.

Now, let's get some filtering going on this! I could absolutely use Thor's filters, but again, I want the synth tone untainted. Another way of easily filtering, without bringing in more stuff and complicating things, would be to use the Reason Mixer's Low Pass Filter. And, it's so easy to apply here in the sequencer. I'll use the Track Parameter Automation menu to locate and find the LPF Frequency and bring it up as a lane.

Remember, the LPF needs to be enabled, so don't forget to bring up LPF ON/OFF and set to the ON position. Once the LPF is enabled, I can actually draw in what frequency sounds good for the beginning of the measure. I can even draw in some cool, crazy filter automation in rhythm.

Step 3 - What About Another Parallel Channel?
We could keep building this bass pattern for hours, but why don't we add another instrument in and build on the arrangement? Actually, rather than adding an instrument, let's add a parallel channel, by right-clicking on the Thor 1 Mix device and selecting 'Create Parallel Channel'.

I'll mute the Thor 1 Mix channel, so that I can hear the raw, new parallel channel that was just added.

It sounds just like the first channel we worked with, exactly. Almost like we're starting all over again. For this channel, we're going to do something a little different, though. I'll draw a big, chunky kick drum-ish pattern within the Level lane that I created of my new parallel channel.

Once I have a pattern I like, I create a Pulveriser, as an insert for P1 (Parallel Channel 1) Thor 1.

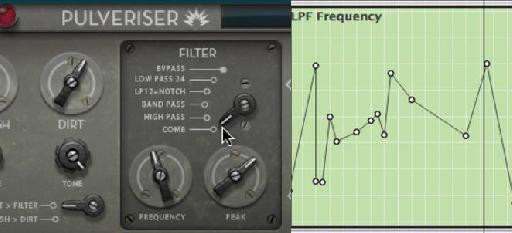
I set the Pulverizer up to not only Squash (compress) my Parallel Channel, so that it will stand out more, but also to further differentiate the parallel channel from the original channel. After raising the Squash and Dirt to moderate levels (the Dirt is to add a hair of distortion, adjust to taste), I set the Filter of the Pulveriser to Comb.

With the Filter Frequency reduced, I enable Tremor, the LFO of Pulveriser so that I can modulate the combing filter frequency. This gives the simple pattern a bigger, growly-er feel.

Try some different waveforms, until you find a texture you really like.
Where to go from here...
From here, I would add on another parallel channel, and maybe even pitch shift it down, after doing some additional modulation. Or, maybe use a Level lane, on another parallel channel to sculpt a channel with a slower attack, and add some reverb to give it a pad-like feel. There are tons of ways you can go. And, remember, it's all to easy to automate the effects coming on, off and being modulated all over the place… Just like in one of those new fangled plug-ins.

Discussion
Want to join the discussion?
Create an account or login to get started!