
Years ago, I was sat at a table in a restaurant in San Francisco and listened to Richard Devine. He was talking about his old days of circuit bending and hardware restoration with a dear friend of his. Unfortunately, I never had a friend like his that had that kind of knowledge, in regard to hardware restoration, or augmentation. But, as he talked, I secretly wished, like any other hardware junky, that I knew how to create, build, or even augment hardware of my own. I've remembered that moment for years, and to be honest, it lit a passion in me to find some way to break in to creating hardware of my own...
The moment came...
Recently, I became aware of Livid Instruments, a company in Austin Texas, responsible for the OHM64, Code, and other amazingly sturdy, and just plain awesome MIDI controllers. As I learned more about what they offered, in terms of controllers, I discovered the DIY division of Livid, also known as Livid Builder. This is a dream for guys like me that haven't had any background in do-it-yourself hardware because, not only all the part that you'll need are available, but detailed guides in putting these devices together yourself are also there.
As I scanned over their Builder webpage, I knew that the moment had come... It was time for me to build my own controller. And, that's exactly what I did!
In this article, I'd like to tell you about my experience in building my own MIDI controller, and the invaluable system and help that Livid Instruments have set up to make it possible for you, if you want, to try this out for yourself.
Getting All Together
It's not an exaggeration at all, when I say that I knew absolutely nothing about what I was doing. And, as I looked through the Livid Instruments store, I realized that I was definitely getting in over my head. I'll admit that the first night that I looked at what was available on the store, capacitors, diodes, LEDs, Omni Boards, my eyes glazed over and I put my laptop down rather quickly. But, the next day, I discovered the very handy, and well put together Livid Wiki. Pretty much every device that you could build is lovingly photographed with detailed explanations of what parts you'll need to put one together.
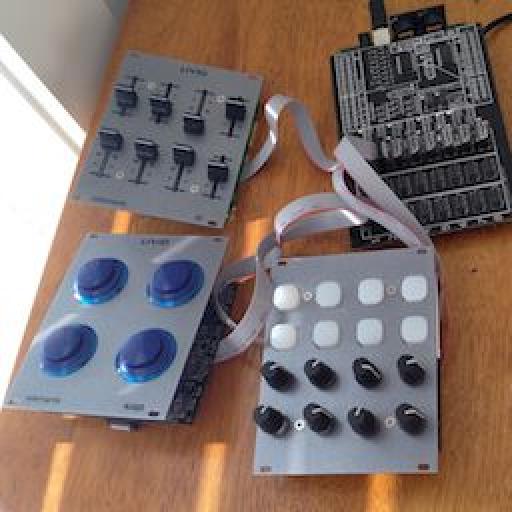
I decided on a device called the 8K8B, which stands for 8 knobs and 8 buttons. My reasoning was that I'd like to be able to turn the knobs in my Ableton Mixer, pan pots, auxes, volumes, as well as have toggle buttons for tracks, mutes, etc.

After looking at the Livid Wiki and pressing the 'Add Parts to Cart' button, all the parts were automatically gathered from me on the Livid Shop. This was so much better than me having to figure this out on my own. Granted, I added a few more devices out of need (you need a Brain V2, in order to use this device), but here's what I ended up with:
- An Omni Board (the board, on which to build my device) - $15
- A Brain V2 - $189
- 1 10uf Capacitors - $0.77
- 8 Rotary potentiometers - $1.99 ea.
- 2 strips of Omni keypads - $4.99 ea.
- 1 4x2 spacer for Omni Keypads - $5.99
- 1 01uf capacitor - $0.25
- 8 single diodes - $0.15 ea.
- 3 Omni pin headers - $0.79 ea.
- 8 rotary knobs - $0.99 ea.
- 8 High efficiency LEDs - $0.35 ea.
- 10 Pin Ribbon Cable - $4.99
During my online journey, I also discovered Livid Elements, which are pre-made devices, also built off of the Omni Boards Livid offers. And, they also work with the Brain V2, which is essentially the motherboard that ties everything together.
I also wound up picking up the 4AB, which is a module with 4 arcade buttons. Being a gamer as well, I had to have this. Using arcade buttons to trigger stutter edit? Hell, yes! I also opted to pick up the 8F, as well. This Elements module is made up of 8 faders. This would be handy for all of those synth sliders and actual mixer faders... Or, whatever else I could think of, right?

During the time I was waiting on the parts to arrive, I opted to read up as much as I could on soldering. I came to find out that there are several YouTube videos that are very well made on this subject of soldering. I also began gathering items that I would need for building my 8K8B element, like:
- A soldering iron
- Solder
- A magic hand type device with a magnifying glass
The videos that I found on YouTube were very explicit in terms of what soldering iron I should pick up, solder, and so on.
Building the Device
Within a few days, all of my parts arrived...

I couldn't wait to begin! As the wiki page for the 8K8B instructed, I started by adding my LEDs. These slid in very easily, and took very little time to solder on. If you're new, I would still advise buying a couple of extra LEDs, just in case you make a mistake.

When the LEDs were complete, I moved on to the diodes and capacitors. The capacitors, (the yellow and orangish devices) were very easy to install and solder in. The diodes proved to be a little tricky, as they were very small and easy to break. Order extra, if you get my drift.

From there came the potentiometers. Getting close!!

Needless to say, my excitement was building! After a few breaks, some burned fingers and a back that was a little stiff, my 8K8B was complete.
Face Plate
When you make your own devices from Livid Builder, they don't currently offer faceplates. I wound up having to build my own faceplate through the services of frontpanelexpress.com. This was much easier than I expected, as they have their own downloadable software (Mac and PC) that allows you to draw out the faceplate that you want, then upload it to them. It took me a little time, but the finished result was great, when I eventually got it in the mail...

Finally, it was time to put it all together and give it a spin.
My 8K8B in Action
With my device put together, it was now time to pull out the old Brain V2, and see what worked, and what didn't. To do this, I had to download the Brain V2 configure software. This is proprietary software for Livid devices that not only helps you configure your knobs, buttons and so on, but it also lets you test them, as well.

To be honest, the first time around, I had some LEDs and buttons that did not work. After sending in a few pictures to Livid, who were extremely helpful, it was pointed out to me that I'd been a little messy with my solder. When I removed some of the excess solder from the contacts, lo and behold, everything functioned perfectly. I hadn't even configured everything within the Brain V2 configure software, and I was already controlling knobs, and so on in Reason.
Life was good! Well, with one exception... I still had no case to hold all my Elements, Brain V2 board.
Conclusion... For the moment.
In the next article, I'd like to tell you about what I ended up using for an enclosure, or case for the rest of my Elements, Brain V2 board, and so on. And, I'd like to talk more about using the Livid software to configure my custom designed, Livid device, made by me.
Continue your MIDI Building journey in Part 2 here.
Check out Livid Builder on the Livid Instruments website here.

Discussion
G
Want to join the discussion?
Create an account or login to get started!