
I absolutely love Deadmau5. Especially his "4x4=12" album. He is an amazing producer who knows how to create big grooves and has excellent buildup sections. What I have noticed is that he uses note pitching techniques to create his insane buildups.
I'm going to show you how to use Apple's AUPitch plugin to create this effect. Best of all the AUPitch plug-in comes with every Mac. My DAW of choice is Logic, but you can use any other DAW and get the same results.
Step 1 - Create the Drum and Bass Pattern
I have created a simple "4 to the floor" standard house beat pattern using the Ultrabeat Paris House Remix drumkit. The bass is a simple saw wave sample from an EXS24 Instrument. The patterns for both are pretty simple. Deadmau5 definitely knows that less is more. The impact in his tracks is created by this approach.

The Drum pattern.

The Bass Pattern.
Here is the audio of the Drum and Bass:
Step 2 - Write a Simple Synth Riff
Next up is the synth we are going to pitch. I have used the EXS24 with the Simple Saw preset and programmed a simple triplet pattern. You'll want the synth line to sit differently to the drum and bass pattern to create interest and space.

The synth triplet pattern.

The EXS24 preset.
At the moment the synth sounds quite, well um…simple. To beef it up, I've added a Channel EQ, Compressor, Low Cut, Tape Delay to add some more space, the AUPitch plugin, and a bit of Overdrive. I also added a reverb send, which I will automate later for the build up.

The synth's channel strip.
Audio for Synth:
Step 3 - Pitch that Synth
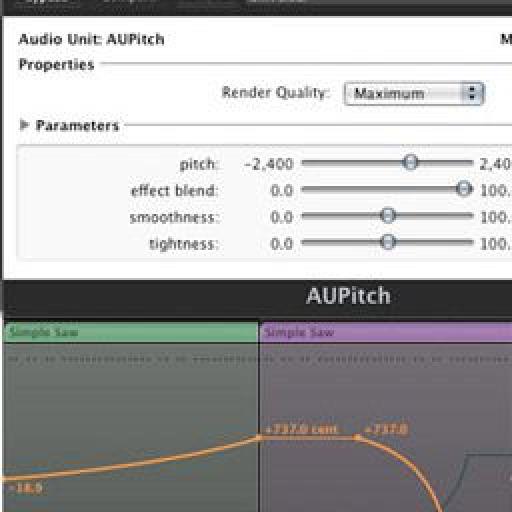
This is where the Apple AUPitch plugin is going to come in handy. This comes free with every Mac. In the 'Inserts' section of the channel strip, you can find it under Audio Units > Apple > AUPitch.
The only control I am going to change the value of is the pitch control. With automation, this is going to fine-tune the pitch up very slightly over a period of time. In this example it is going to be over 4 bars. Pitch control is measured in cents and there are 100 cents per semitone (half-step). From this you can calculate how much you want to tune the pitch up by: over the 4 bars I have automated it from roughly 0 to +737 cents, which is approximately 7 semitones up from my original note.

Pitch Automation.
What is great about this technique is that you cannot quite place the note value but you can notice the build up of the pitch. With the pitch increasing in a microtonal value over a period of 4 bars it does not feel as if any notes clash or feel dissonant at all. The reverb send is also automated to push the synth around the stereo field.

The reverb automation.
Here is what the synth sounds like after it has been pitched:
Step 4 - Build It!
Take a listen to the Deadmau5-like 45-second track I have arranged. I have the 4-bar buildup. I then drop out the bass while keeping the synth going, and have filtered out the high end on the kick. Then I bring back the high end on the kick and drop the pitch down drastically on the synth until it's almost silent. I then reintroduce the beginning riff and beat again till the end. Quite cool, hey? So, go Deadmau5 it up!
And here it is:
If you'd like to follow along with my example, here is a screenshot of the Pitch Automation data:

The final pitch automation.
The Reverb Automation Data:
The final reverb automation data.
And the Volume Automation Data:

The final volume automation.
Conclusion
In Electronic Music, it is all about building the track up and then dropping into the big sections. Apple has included some handy free tools with their operating system, so don't forget to check them out at times; you never know when they may be just what you need for your project.
For more information on Electronic Music Production, check out Olav Basoski's macProVideo tutorials:
Logic 404 - Mixing Electronica
Logic 406 - Olav's Electronica Workflow
Live 8 402 - Designing Sounds for Dance Music
Discussion
Great tip Gary thanks mate!
Hamish
Want to join the discussion?
Create an account or login to get started!