특수 효과를 만들 내가 좋아하는 방법 중 하나는 반대로 지연 및 reverbs를 사용하는 것입니다. 이것은 이상한 작은 선물을 생산하는 좋은 방법이며, 사운드 디자인의 세계를 입력하는 좋은 방법입니다. 초심자라도 여기에 행동에받을 수 있습니다.
IM은이 튜토리얼에 대한 Propellerheads 기록을 사용하지만 기본적으로 다시 오디오를 재생하는 능력과 모든 갈가 마귀를 사용할 수 지연과 reverb 효과 플러그인을 제공합니다. 물론 그럼 놀라워 ... 지구상의 거의 모든 갈가 마귀!
01 - 프로세스에 어떤 오디오를 선택
First up you’ll need to focus on a specific audio part to process. Here I am using a vocal clip as I find that these effects work very well with vocals. My part is in total isolation so everything is nice and clear but of course if you are working on a project you can complete this process on one part amongst many.
With your audio selected make sure it’s solo’d and playing in total isolation. Now is a good time to check your audio for any faults, clicks, pops or overs. The last thing you need here are any imperfections being amplified by the processing... So make sure your audio is super clean.
잘 치료되지 오디오가 격리되어
The vocal we are going to process is isolated:
[오디오 ID = "6187"]
02 - 오디오 반대
Next open your audio file in your DAW’s audio editor. Record now features a more fully featured editor and has quite a few options for processing, one of which is the reverse function and this is exactly what we are after here!
오디오 반대합니다
Once the audio is reversed play it back to check everything is present and correct. Also double check your levels at this point and ensure that you are working with plenty of headroom, you’re going to need it when the processing is applied.
우리 반전 오디오 준비
The vocal is reversed:
[오디오 ID = "6185"]
03 - Reverb 또는 지연 적용
For the purpose of this tutorial I have decided to show the effect with both delay and reverb, so I have set up two send / returns in Record’s mixer. I have used Record’s excellent RV7000 Advanced Reverb to produce a very large reverb and a dedicated delay based Combinator to pump out a tape Echo pre-set in the other.
반환 효과가 추가됩니다

효과는 기록 믹서에 보냅니다
The reversed audio with reverb added:
[오디오 ID = "6186"]
... 그리고 스테레오 지연 :
[오디오 ID = "6188"]
이 두 효과 설정으로 난 그들 모두 우리의 반대 목소리를 보낼 수있었습니다. 당신은 아래의 클립들을 수있는 우리가지고 효과는 이미 매우 특별하다. 지금까지 우리는 과정을 중간에 관한이며, 우리가 완료되기 전에 가서 몇 가지 단계를했습니다.
04 - 수출 효과 만
We need to export the results of our processing, and there are really two ways to go about this. You can export the whole thing, in other words the audio and effect, or you can export just the effects.
In this case I exported just the effects stream as I’m a firm believer that this method gives you much more control over the finished product and a more balanced sound in general.
Record offers some really great features for exporting very specific parts of your mix (an area from which other DAWs could learn a thing or two!). Once you have accessed the ‘Bounce mixer channels’ area you can actually home right in on the specific effects devices and just render their outputs.
기록은 완벽하게 수출 창 기능
With the isolated effects exported they are ready to be brought back into the project and mixed with the original dry parts to create the final effect.
The reverb effect in isolation:
[오디오 ID = "6190"]
[오디오 ID = "6189"]
05 - 다시 가져올 결과, 편집, 동기화 및 믹스
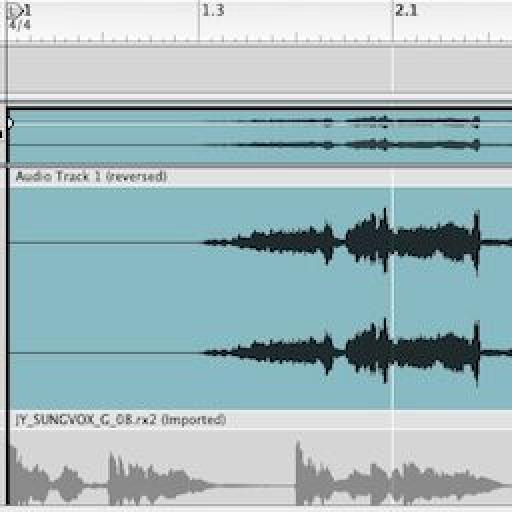
The bounced fx streams can now be imported into a couple of new audio tracks. Once this is complete you can go ahead and reverse all of the audio so everything is technically playing in it’s original state.
트랙을 반대하고 정렬
The newly imported (and reversed) effects audio will now need to be moved around so that it works nicely with the original dry parts. To do this I would strongly advise you to switch off any snap mode. This will allow you to be extremely accurate with the placement and give you a better chance of getting things right.
I generally use any obvious transients to get things in line. Although the effects have often masked much of the dynamic signature you should find this pretty straight forward and the effect files are usually pretty forgiving, so you don’t have to be mathematically correct here!
모든 트랙은 이제 정렬됩니다
Once the files are all in place you can mix their levels to strike a good balance between the dry and effected files. What you should be left with is a great reverse reverb (or delay) effect. As you have all the files you also have complete control over levels, pan and any further processing you might want to apply.

모든 소리는 이제 좋은 전반적인 균형을 만드는 혼합
The reverse reverb effect is mixed with the original vocal:
[오디오 ID = "6191"]
그리고 지연 효과도 혼합됩니다
[오디오 ID = "6192"]
06 - 추가 편집 및 재활용
Although the effects already sound great you can always take things a step further if you like. You can cut your effected files up, reverse sections, add automation and even more effects processing if you like. All this can be done without effecting the original files.
일부 자동화가 지연 오디오에 추가됩니다
In this case I’ve automated the pan on the delay channel and added some modulation effects to the reverb. The result is a trippy collage of sound that really enhances the vocal phrase. Now go and create your own reverse effects and see what you can create!
추가 효과는 또한 반대 reverb에 추가됩니다
The final result with the extra effects and automation:
[오디오 ID = "6193"]


 © 2024 Ask.Audio
A NonLinear Educating Company
Discussion
Want to join the discussion?
Create an account or login to get started!