
FL Studio is very flexible in the way it handles its channels and tracks. What I really like is the functionality to group channels together. This way you can group similar instruments to build up a layered instrument. Let's take a look at how this is done, and how it can be beneficial to your music productions.
Step 1 '" Creating a Layer
Let's use drums as an example. I like to layer up similar drum sounds to build up a fuller sounding drum kit. For example, I'll layer up 3 kicks to get a more rounded kick sound. The only problem with this is that if I place a separate kick on a different channel, I'll have to repeat the programming channels for each kick so that each kick is playing the same pattern. An easier way is to group these drums into a layer so that you only have to work with the layer, not each separate channel. First create a layer, by navigating to Channels > Add One > Layer.

Step 2 '" Adding The Channels to the Layer
Now to add the channels to the layer, first you need to select the channels you want to add. You do this by clicking the button on the right of the channel name. It'll light up green showing that the channel is selected. But if you want to select multiple channels you'll first need to double-click the Layer to open up its Channel Settings window. Now select the first channel, and then hold down Shift and click on the others you want to select.

On the Layer Channel Settings window click on Set Children. Under the Layering drop down menu choose Group Children, and then for the Filter give it a name such as Kicks.

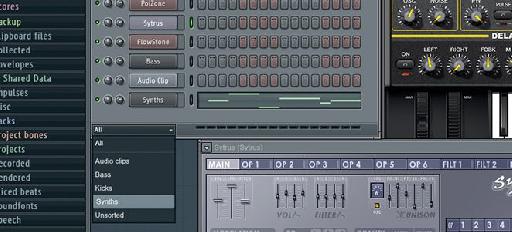
If you click on the drop-down filter menu, you can jump between the different filters set up in your song.

Step 3 '" Program a Pattern in the Layer
Go back to your All filter and program in a pattern on the layer channel. When you play back, you'll see how the layer pattern triggers the different kick channels that you have grouped together. You can also rename this Layer so that it's easy to see what types of instruments are grouped together in it.

Step 4 '" Showing or Deleting Groups
When you start building up complex songs with a variety of instruments grouped together in different filters, you can easily forgot what channels you included in the filter. Make sure you have the Unsorted filter shown. Then open up the Channel settings for the Layer, and click on Show children, and it'll show you the selected channels on the Step Sequencer.
If you need to remove a filter group, click on the filter drop-down menu. Choose the filter. Then right-click on the filter name and choose Delete Filter Group.

Conclusion
Grouping your similar instruments together can help streamline the production process. Try this method out; you can group synths together to build up a layered instrument, or even group your drum or bass parts together to help when programming in your patterns in the step sequencer. For further FL Studio tips and tricks check out the following tutorials:
https://www.askvideo.com/course/fl-studio-101-introducing-fl-studio
https://www.askvideo.com/course/harmor-synthesis-on-steroids
Discussion
Want to join the discussion?
Create an account or login to get started!