
Part 1 of this series is here:
http://www.askaudiomag.com/articles/making-dubstep-in-logic-pro-xs-ultrabeat-part-1
Step 1: Understanding Tuplets
It's very common in Dubstep music to use 24th and 12th notes to add a triplet feel after a “quadruplet” section like “1-2-3-4, 1-2-3, 1-2-3.” Musically this is called a “tuplet.” Some people think they've switched from 4/4 to 3/4 for this, but this is not the case. Think beats instead of bars. There are four beats in a measure/bar, but each beat is being divided by either four segments (four 16th notes), three segments (three 12th notes), or six segments (six 24th notes). There's more, but in this article we'll only be using those. When you move between these different rhythms in Dubstep, it creates a more interesting beat that seems like it's ever changing and evolving rhythmically. The screen shot below shows four, three, and six divisions per beat...

Step 2: Tuplet Pattern (3 divisions per beat)
Switch now to the second pattern, by clicking and selecting it from the pattern select menu, and Control-click to erase it like we did in Step 5 of part 1. Change the resolution from 1/16 to 1/12. Also change the Length to 24. This will assure that there is still only eight beats (two bars) in the pattern. As we did in pattern 1, add the kick to beats 1 and 5, and the snare to beats 3 and 7. Add your Ride/Crash onto every beat again, but now try adding triggers to some of the other sounds. The Growl sound we dragged in from the other kit works great for this, or try some of the other drum sounds. Trigger the first pattern now by pressing C-1 on your controller, then trigger C#-1 right after it. Try playing the two in different ways, or restart a single pattern by hitting the same key in fast succession. Don't worry if your timing is not perfect as your triggering these... after you record, you can quantize to a high value like 1/4 or 1/8 notes to lock them to the beat.

Step 3: Tuplet Pattern (6 divisions per beat)
Now onto the 3rd pattern. Choose it from the pattern list again, erase it, and select 1/24 as the resolution and 24 as the length. Because there is now 6 divisions between each beat, Ultrabeat can only play back a single bar at this resolution. At 1/24 resolution, 6 divisions per beat times 8 beats would have required 48 trigger positions. There are only 32 trigger positions in Ultrabeat. Since there is only one bar in this pattern, put your kick on 1 and your snare on 3. Add your hats and snares, and experiment with some of the other sounds in the kit. Again, try triggering the patterns with your controller (C -1, C# -1, and D -1). At this point you might start to see how fun and powerful this can be.

Step 4: The Bass Line
Now the real fun begins. Select your first pattern 1. In lane 10, there's a very cool sound called oddly enough “Perc 3.” This is actually a great sounding bass tone, we'll be using in our groove. Let's make it sound even better though. Click on lane 10 to select the sound, and make sure you're out of full view so you can see the synthesizer parameters. We'll want to play the sound while we're adjusting it, so temporarily take UB out of pattern mode, then press A1 on your MIDI controller to hear it.
Let's get this sound into the filter. First turn on the filter (the large center circle) by clicking its name. This is a sample that is being triggered through OSC2 at the bottom. Click the small filter input button so the oscillator enters the filter. It will turn into a small bright red arrow pointing into the filter when you do this. Click the Crush button to turn it on and adjust the drive. We want to filter after the distortion so click the arrow in the center of the filter to flip its position. When it's pointing up the signal is processed first in the distortion, then through the filter. Adjust the “cut” knob to around the 1 o'clock position.

Now let's add a little LFO shaping to this sound. Directly below the cutoff knob, choose LFO1 as the mod source. After you select this, you'll notice a small blue handle on the outer ring of the cutoff appears. Grab it and raise it as far as it will go (around the 5 o'clock position). It's already sounding really cool, but let's change the shape on on LFO1 and rate. On LFO1, turn the rate knob to 1/4, then adjust the slider below the waveform so it's a sine wave. You should now have a great sounding bass with a bit of a wobble feel.

Step 5: Add the Bass sound to your patterns
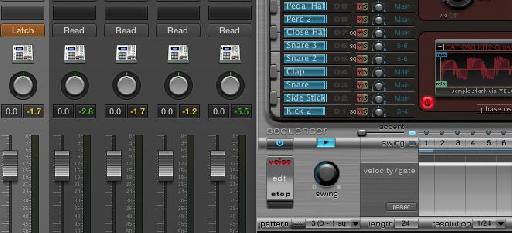
Click back into full view and make sure pattern mode is back on. Add some triggers to the Perc 3 lane, then trigger the pattern to hear it. Remember to drag out the length of some of your triggers since this sound's envelope is set to sustain for as long as the note is held. Here's my bass triggers for pattern 1. Check out the various lengths and velocities in the velocity/gate area at the bottom:

Bring up the other 2 patterns we created and add some triggers to those too. If you position your notes as I did in pattern 3 (see image below) you'll get that classic triplet dubstep feel.

Step 6: Record/Arrange the Patterns
Now let's start to put these patterns together. Practice playing them how you like, then record them. If you'd rather draw them in, create a new empty MIDI region and draw in long notes on C-1, C#-1 and D-1. Remember C-1 and C#-1 can be held out for two bars, but D-1 is only one bar in length. Try playing or drawing in broken notes, or leave gaps at the ends for short drop outs. If you've played them in as I did, make sure to quantize them so they start perfectly on a beat. Remember too that you're not limited to just these three patterns! You can right-click on the pattern select menu and “copy/paste” patterns to available pattern slots. This is a great way to make beat variations. When I build a full drum section for a song, I'll sometimes use all 24 available pattern slots! The screen shot below shows only three patterns...

Depending on where you positioned your triggers and how you recorded the pattern triggers, your groove should sound something like this:
Step 7: Add a Vowel Sound to the Bass
This groove is sounding pretty good right now, but it could be better! We've all heard those Dubstep bass sounds that “talk.” Let's make our bass sound a little more chatty. Switch out of full view and click the lane 10 Perc 3 sound again. Click Band 1 and Band 2 to enable the two built-in EQs. Set both bands gain (the round knobs) to around +10 dB. Set the Hz parameter to 820 on the top Band 2, and to 2900 on the bottom Band 1. The “Q” on both bands should be set to 7.

Push Ultrabeat up and to the right of your display, but make sure the two band EQs are visible. Logic Pro X has a cool new feature called Smart Controls. These are great quick access virtual controls that can be assigned to nearly any parameter inside Ultrabeat. Click the Smart Control button at the top left of the button bar/transport to enable them, or use the Logic Pro X default key commands “B.” A mini UltraBeat assigned to a few common parameters will appear. Click the “i” button in the bar above the controls, then click the top right Smart Control knob to select it. This opens a small inspector where you can assign Ultrabeat's parameters. Click the Learn button to the right of Parameter Mapping, then in Ultrabeat, nudge the EQ Band 2's Hz control slightly up, then set it back to 820. Back onto the Screen Control now, click the disclosure triangle next to Parameter Mapping and you'll see the assigned parameter. Click on the assigned parameter and a window will appear. Select “Add Mapping”, then select Unmapped and nudge EQ Band 1's filter the same way as above and reset its value. You just assigned two parameters to a single smart control! You can even assign a physical knob on your controller here under the External Assignment area.

Enable automation on Ultrabeat's channel, press play and get funky with that knob! Here's what I came up with:
Step 8: Output Your Sounds to Individual Tracks for Processing
Remember we chose the multiple-outs version of the plug-in? Choose separate outputs for sounds you'd like to process with effects individually like the kick and snare. You do this from UltraBeat's “Out” column. Normally all the lanes show “Main.” Change the lane of the kick sound to 3-4, the snare to 5-6, and any other sound you'd like to process individually. Now back in the mixer, press the small + button to create the separate tracks and start adding effects like reverb, delay and compression.

Here's a quick mix of the sounds with a few effects:
Tips:
Use lane 25 in Ultrabeat to play a sound across the keys. It starts at C3 and up. Change the pitch of the sounds you use to match the key you're in. You can use EXS24 sounds when merging sounds like in step 3 of part 1. Just navigate to the Sampler Instruments folder.
Hope you enjoyed the article as much I did writing it!

Discussion
Want to join the discussion?
Create an account or login to get started!