
You've heard them in countless dance tracks… filter sweeps slowly rising from the depths, all the highs being filtered out so there's nothing left but deep frequencies, or even slowly thinning-out the weight of a song to create more impact when the drop hits. DJs do this with ease because the consoles they use have built-in EQs. When producing, blanket filtering like this is usually done over a completed two channel mix, but what if you want to achieve this effect while still in the project itself? In this article, I'll show you how you can easily create this same effect while producing, but with more options than most DJs since you can selectively choose which tracks in the song to filter.
Select Tracks Currently Set to “Stereo Output”
First open a song you want to process. Press the X key to open the mixer. Look at the Output row… any track that shows its output as “Stereo Out” needs to be re-routed. All others should be left as is. Go track by track in the mixer and select each one that is set to Stereo Out by holding the Command key down while clicking on the them. Clicking either the track's name at the bottom, or the track's icon are the best ways to select the them.

Re-Route Selected Tracks to an Empty Bus
Once all tracks are selected, click and hold on one of the outputs (that currently shows “Stereo Out”) and change it to the next unused bus. If you were careful not to lose the selection, all the tracks you picked will change to the selected bus. Once you've done this, the bus you chose will be added to the mixer.

Select the Bus Track and Add it to the Workspace
Find the bus/aux in the mixer (it's probably on the right side). It's easy to spot because it's the only track in the mixer that currently has “stereo out” set as its output. Double-click the bottom of the track and re-name it DJ Filter. Now Control-click (or right-click) the track itself and choose “Create Track.” It will be added to the Workspace with that name.

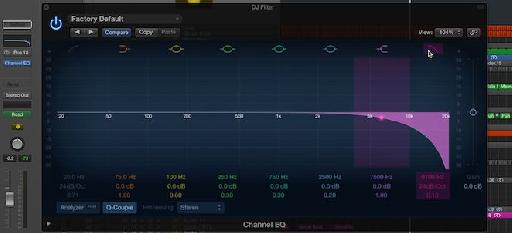
Add an EQ and Start Filtering
Close the mixer now. You should already be selected on the right track. The DJ Filter/bus you just created is where all the filtering will be done. Add a channel EQ to the top of its track from the Inspector, and turn on the High Cut filter by clicking its button (below the view menu on the right). Now press the A key to toggle the Automation view on for all tracks. From the automation select menu, move to the channel EQ menu, then on to the very top value labeled “High Cut.” The value will be set all the way up. Simply click now to create downward slopes that will filter all the high frequencies from your track! Create fast slopes that return the track back to its original state. Consider using a “Low Cut” instead to pull all the weight out of your track.

Decide What Tracks You Don't Want to Filter
Wish some of tracks could be left out of the filtering bus? When low pass filtering for example, leaving a single high sound like a hi-hat can remind the listener that the high energy will be back with a vengeance. You can easily take any track out of the filtering bus by opening the mixer and changing its output back to Stereo Out.

Tips
If you haven't used any buses/sends in your song, then this process couldn't be any easier. Simply Command-click all the tracks you want to process together directly in the Arrange/Workspace, then from Logic's Track menu select “Create Track Stack” and choose "Summing Stack" (or press Shift-Command-G). The top track of the Track Stack can now be used as the DJ Filter bus (as described above).
If you're starting a new song and you think you'll want to use this technique, simply select the first available bus as the track's output directly in the New Track window (under Details). You can do this for both your audio tracks and your software instrument tracks, and Logic will remember the output setting for any new tracks you create.
Thanks for reading!

Discussion
Want to join the discussion?
Create an account or login to get started!