A question often raised on forums concerns the lack of solo violin instrument in Logic Pro. There are plenty of great sounding string ensemble instruments - but no solo versions! In this tutorial we look at how to remedy that situation by creating one of your own.
Download the samples

First of all, you will need to locate a source of free solo violin samples. Why free? Well, if you have paid for an orchestral instrument library for EXS24, then chances are you already have a perfectly good solo violin! As luck would have it, there is a well recorded set of violin samples on freesound.org. A professional violinist by the user name of ldk1609 has gone to the trouble of recording every note on their violin with and without vibrato, with a spaced pair of Earthworks QTC MP40 microphones. The sample packs are available at the following links:
Vibrato sample pack -
http://www.freesound.org/people/ldk1609/packs/3560/
Non-vibrato sample pack -
http://www.freesound.org/people/ldk1609/packs/3559/
For the purposes of this tutorial, go ahead and download both packs - you will need to become a member of freesound.org if you are not already, and log in to the site in order to download.
Create your instrument
In Logic Pro, open EXS24, then click on the 'Edit' button to open the Instrument Editor and from the Instrument menu choose 'New Instrument'.
From the Zone menu choose 'Load Multiple Samples'.
In the dialog that appears, navigate to the samples you have downloaded (either pack) and select all the samples in the folder.
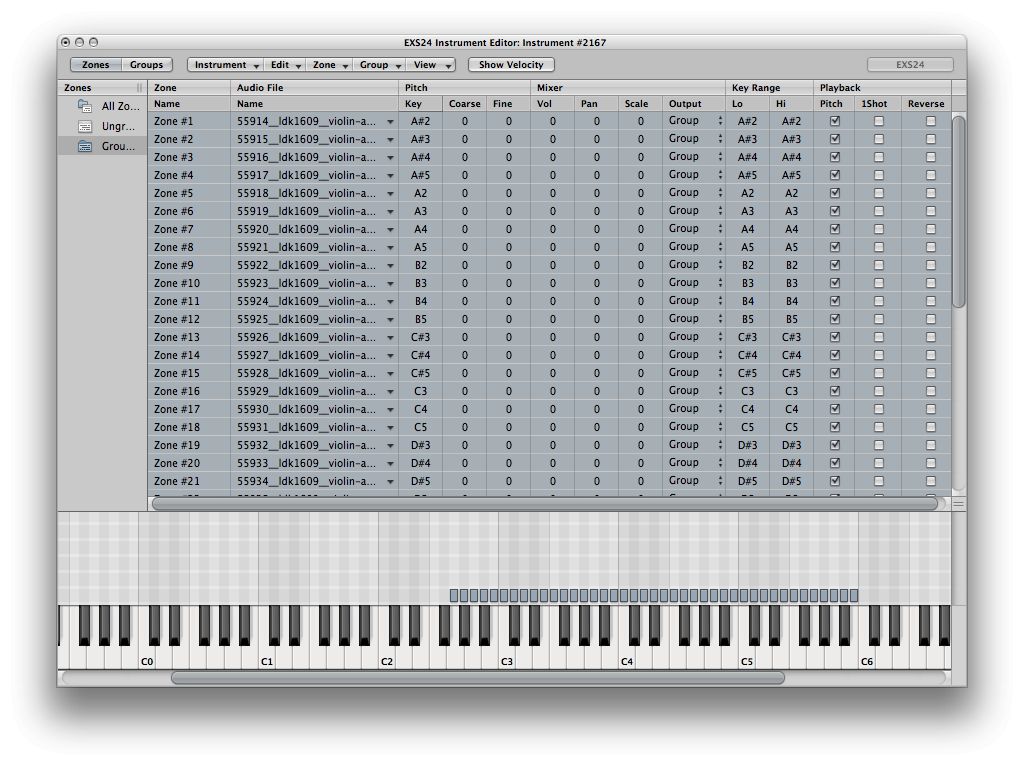
When you click 'Add', you will be given three choices. Weirdly, after some experimentation, the option that I found works as required in this case is 'Drum zones without range, root key from audio file'. There is however an unresolved issue with the Instrument Editor - samples will be mapped to the correct note based on the filename (Preferences - default), but in this case, those notes with a part of their name in the format 'C-3' (where the '-' represents a sharp) this does not happen correctly. The fix for this is to manually change the '-' in these filenames to a '#'. It sounds like a chore but it doesn't take that long!

Change the "-"...

…to a "#".
With corrected filenames the samples should be mapped across the keyboard as expected.
Select all the zones in EXS24 (click on one and press Command-A) and un-tick the '1Shot' option - this is of course the default for drum samples, which is what EXS24 is expecting you to load.
You will note that these samples have been placed in a 'Group' - you can rename the Group if you wish by double-clicking the group name.

In my example, I have added the vibrato samples first, so the next step (if you want both vibrato and non-vibrato samples in the same instrument) is to repeat the above steps and add the second set of samples to your instrument. The second set of samples should be added to a new group, which you can also rename if you wish.
The benefit of grouping zones in this way is that you can set global parameters for each group. Two useful examples are:
Velocity
You may need to choose View>Group:Velocity Range to edit group velocity.

Set the non-vibrato group with a velocity range of 0 to 63
Set the Vibrato group with a velocity range of 64 to 127
This way you can trigger the vibrato sample simply by playing the keys with more velocity (more than 64).
A(H)DSR
You can also tailor the envelope of the samples when triggered as a group, if required.

Velocity range and envelope set as group parameters.
Oh - and don't forget to save your Sampler Instrument! To do this, from the Instrument menu (in the Instrument Editor) choose Save As...


 © 2024 Ask.Audio
A NonLinear Educating Company
Discussion
Any further assistance would be greatly appreciated.
MG /UK
Want to join the discussion?
Create an account or login to get started!