

When Liine released Lemur into the iOS market, some questioned its relatively hefty $50 price tag. That was until its true potential became apparent. Now at version 4.0, Lemur opens up a world of creative ways to control your DAW that weren't possible before. The latest update even allows you to create templates directly from your iPad with the In App Editor. To give you a flavor of what Lemur is capable of, we are going to create an XY Pad that controls two parameters at once in Ableton.
Step 1
First things first. Once you have downloaded the Lemur Installer from the Liine website and the Lemur app from the App Store, make sure your computer and iPad are connected to the same network. It is always a good idea to create an ad hoc network as opposed to using your normal Wi-Fi one in order to ensure a reliable connection.
When you open up the Lemur installer on your Mac, you will see that it contains the Lemur Editor and Lemur Daemon. The Lemur Daemon handles the flow of MIDI data between your iPad and computer that we will look at later on in the article. For the time being, double-click on its icon so that it is running in the background, indicated by a MIDI port symbol in your menu bar.

Next, open the Lemur Editor and in the top right corner of the interface, click the Play button. Providing that you have Lemur running on your iPad, your iPad's name should appear in the pop-up box. Select it and click Connect. A Stop symbol now appears in its place and your iPad screen is updated with the same empty canvas as the editor.
One of the most impressive features of Lemur is that you can play around with objects on your iPad as you design them in the editor. Before we start adding objects to the canvas though, we will tell Lemur to automatically map each object to a particular MIDI Target and Message. Click the Settings button to the right of the Stop button in the editor and select the Lemur tab from the pop-up menu. Tick the Automap box and select 'MIDI 0' as the target and 'B0 - Control Change' as the message.


Step 2
Firstly, we will create a button that toggles our XY pad on and off. From the Creation panel in the top right of the editor, drag a Custom Button onto the blank canvas. In the Properties tab of the Objects panel (bottom left of the editor), you can alter its size, color, position and style to preference. For the Color Off and Color On buttons choose two distinctly different colors to make our button's off and on states easily distinguishable. In both the Style Off and On boxes, choose the T symbol and type 'Off' and 'On' respectively.
When you tap the button on your iPad, you can now see how it will respond to touch during your performance. So that your movements on the iPad are reflected in the editor, make sure the Sync button is turned on at the top right of the interface or press Command-R. To see the MIDI settings for the selected object, click the MIDI tab in the Mapping panel at the top right of the editor. To the right of the 'Target' menu there is a tiny icon called the Quick Map button. You will need to click this button every time you create an object to ensure that each object is assigned the same target and message as per our Automap selection in the previous step. The Quick Map button also ensures that each object will be mapped to a different controller number, saving us a lot of time down the road.


Now let's create the XY Pad itself. Drag the object Multiball from the Creation panel and resize it to cover a large portion of the canvas. With the Multiball selected in the editor, click the Behaviors tab in the Objects panel and from the 'Physics' menu select Mass Spring. Now move the ball on your iPad to see the effect this setting has. Experiment with the friction and speed settings to vary the way the ball moves across the pad. Where Lemur really stands out is that we can use other objects to alter these settings when performing live.
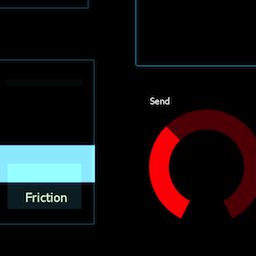
From the Creation panel, create two new faders and from the Properties tab in their respective Objects panels name one of them 'Speed' and the other one 'Friction'. Select the Multiball and in the Behaviors tab type 'Speed.x' in the speed menu and 'Friction.x' in the friction menu. Now when you move the ball on your iPad again you can control the speed and friction directly from the faders. Pretty cool eh? To let the ball bounce continuously, leave the Friction fader all the way down. As with the Custom Button, click the Quick Map button for the Faders and Multiball objects to ensure they each have the correct MIDI settings.


The Multiball object allows you to add up to nine balls to the pad via its Behavior tab.
Finally, we are going to create some send knobs so we can alter the amount of effect that the XY Pad has on each of our tracks in Live. Drag a Knob object onto the canvas and duplicate it a number of times, depending how many tracks you have in your Live set. When they are positioned and resized to your liking, select them all by dragging your mouse around them. Control-click one of the knobs and choose 'Group'. Now you can change any properties that the knobs have in common at once. Additional buttons also appear in the group's Properties tab to help you align them correctly. Don't forget to select each one of them individually and click the Quick Map icon when you are finished.

To complete your template use the Text object to label each control accordingly.
Step 3
In order to send MIDI data between our iPad and computer, tap the setting button on the top right of the Lemur app and choose 'More Settings'. From the MIDI Targets section, we will use MIDI 0 as all our objects have been assigned to this target from earlier. Choose 'Daemon Output 0' from the 'From' menu and 'Daemon Input 0' from the 'To' menu and tap Done. Now when you open the Lemur Daemon from your computer's menu bar, you should see that the Daemon's inputs and outputs are all set up.


Open up Live and drag your favorite audio effect or rack onto a Return track. For this tutorial, I am using the XY Pad to control the Amount and Rate knobs in Live's Auto Pan plug-in. Open up Live's Preferences and select the MIDI tab. In the MIDI ports section make sure Track, Sync and Remote are all turned on for both 'Daemon Output 0' and 'Daemon Input 0'. Now we can map our objects in Lemur to our chosen parameters in the Return track.

Enter Mapping Mode and click the Auto Pan's on/off button. Touch the On/Off button in Lemur to complete the mapping. For the XY pad, you may need to change its Physics mode temporarily from Mass Spring to Interpolate in the editor. This is to avoid confusion when mapping the pad's X and Y-axis to different parameters. To map the Auto Pan's Amount knob to the X-Axis, select it and drag the ball along the bottom of the pad in Lemur. Now select the Rate knob and drag the ball along the sidewall of the pad to map it to the Y-axis. In the editor, switch back to Mass Spring. Finally select the Send A knobs for each of your tracks and assign them to the relevant knobs in Lemur. Make sure the correct controller number is assigned each time. To save your template, tap the settings button on Lemur and choose Save project.

The template can now be accessed on the fly by tapping Project in the app's settings menu. You can also edit it directly from your iPad by switching 'Edit project' on. Even though we only scratched the surface of what Lemur can do, we still got a glimpse of Lemur's power, especially by seeing how you can use objects to control the behavior of other objects. Check out the vast user library of templates on Liine's website for further ideas and inspiration.


Discussion
Thanks for the comment. Live 9 Standard will work perfectly fine with Lemur. If you haven't already heard of it I recommend you download LiveControl 2 which is pretty much the most comprehensive Lemur template you can get for controlling Live. This should give you some pretty good inspiration for creating your own templates.
Want to join the discussion?
Create an account or login to get started!