
While many believe the secret to mixing a great track is 192 kHz sample rates and coveted vintage consoles, great gear won't help without a fundamental understanding of physics, acoustics and orchestration by the mixer. A mixer's challenge is to render a recording with greater detail and clarity than a live event that satisfies play after play. Understanding how humans hear is vital to this process. The best way to begin your mix is by “staging” it as if all elements occupy real space on a stage. The leads will be center closest to the audience and the lesser voices will occupy the sides and rear of the stage.
How one creates perceptible width and depth in a recording comes from manipulating three acoustic properties: loudness, presence and ambiance. With your eyes closed, you can instinctively tell how far away a person speaking is by determining (a) how loud he is, (b) how bright the voice is, and (c) the ratio of direct vs. ambient room sound you hear. Loudness in distance perception is a function of the inverse square law of acoustics. It's how single microphone recordings were balanced through much of the first half of the twentieth century. Singers and instruments were placed around one microphone at various distances to achieve the desired balance. A singer might be 18 inches (0.5 meters) from the microphone while the horn section and drums could be 20 feet (8 meters) away. Since air absorbs high frequencies over shorter distances than low frequencies, the close singer sounded brighter, having more “presence” than the horns. We also heard more room sound versus dry sound the farther away the instruments were. To see this in action, click here: http://www.wimp.com/thatvoice/

Figure 1: The acoustic inverse square law. Note that when the distance to the mic is cut in half, the sound pressure is four times greater. (Source: http://www.jiscdigitalmedia.ac.uk/images/ppos-07-inversesquarelaw.jpg)
By using these three known acoustic properties, you can create perceivable depth in your recordings, the same way filmmakers shoot into corners, use back lights and depth of field focus to create the illusion of depth on a flat movie screen. Use your volume faders, pan controls, the high end shelving EQ and aux busses with two reverbs to accomplish this. Set one reverb to a short room setting and the other to a long, darker chamber effect. Sounds in the foreground would be brighter and dryer, those in the mid ground less bright and with some room sound and those far away would be softer and dark sounding with more of the long chamber.
You must be able to locate the sound's position and environment within the stereo panorama in order to make it believable. If the sound location is hard to pinpoint or seems blurred, check the phasing or narrow the pan. Since bass has the longest wavelengths, it's harder to locate and best panned in the center of the mix. Stereo miking is appropriate for physically large sources like drum kits, acoustic pianos, string sections and choirs, but in most cases, one well placed mic will sound better than “forced stereo” from two poorly placed mics on most smaller instruments. Humans locate sounds by loudness, arrival time and ambient reflections. Panning is a function of relative loudness in either the left or right channel. Sounds can be equally loud in both channels, but by introducing a slight delay (0–25 ms) in the right channel, you can create the illusion that sound is coming from the left.
 inserted in a mono channel. Notice the parameters on the left side are set to zero and the right side has a 22 ms delay with a LPF (low pass filter) set at 4 kHz. The channel pan controls are set at 66 to the left and 100 to the right. The result is the sound is located near the left edge of the stage and the first reflection bouncing off the right wall. Since the sound would travel much farther on its first reflection, the 4 kHz LPF mimics the high-end absorption of air and environment.")
Figure 2: Mono to stereo delay. Shown is the plug-in Short Delay II (mono – stereo) inserted in a mono channel. Notice the parameters on the left side are set to zero and the right side has a 22 ms delay with a LPF (low pass filter) set at 4 kHz. The channel pan controls are set at 66 to the left and 100 to the right. The result is the sound is located near the left edge of the stage and the first reflection bouncing off the right wall. Since the sound would travel much farther on its first reflection, the 4 kHz LPF mimics the high-end absorption of air and environment.
By combining both techniques, the mixer can create a believable location and environment for each instrument. For instance, you may have a loud power chord guitar that you want to pan to one side so it won't crowd the center where the singer is. So pan it mostly to the left, but add a 20 ms delay of the same guitar panned hard right. That creates the effect that the guitar is filling the room and bouncing off a wall on the right about 20 feet away. Remember, sound travels in air about a foot (1/3 meter) in 1 ms. When you stage the panning, remember that there is more to balance than just loudness, it is also spectral. If you have a hi-hat and shaker playing similar parts, you can hear each part better if they are panned to opposite sides because they are both playing in the same frequency range. It is also temporal. If there are two melodic lines played at the same time, they will blend better when panned together or be more distinct when panned apart.
You cannot create depth without space. An extremely dense mix that flat-lines at maximum has no depth, as there is no open space to reveal depth. Flat line mixes also wear out the listener much faster that those with some open space. The unlimited number of tracks and compressors offered by modern recording systems can be more of a curse than a blessing in the hands of an inexperienced or over-indulgent orchestrator. A filmmaker could show a bar fight as one long shot of a whole barroom in chaos. However, a series of close ups that shows only action vital to the plot is far more compelling to the viewer, rather than relying on the viewer to sort out what's important in the chaos.
The mixer's challenge is separating content from chaos by understanding the concept of masking. Masking occurs when one audio or musical element plays in the same range simultaneously with another, thus rendering both either indistinguishable or inaudible. Not every idea a musician ever records is his most brilliant; some are more brilliant than others.
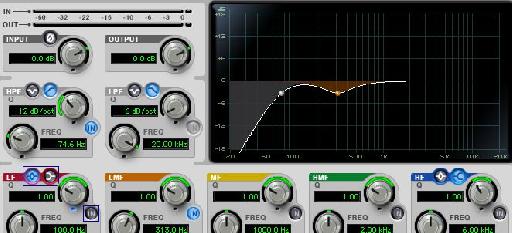
The trick is not always trying to hear everything that is recorded, but reducing or removing the less important elements to reveal the brilliance of the dominant ideas. Masking is also spectral. Consider that the densest melodic range is most often the octave around middle C. The fundamental frequency of middle C is 262 Hz and the A above C is 440 Hz. By reducing these fundamental frequencies in chordal, lead and percussion instruments with equalization at around 300 Hz will make their overtones more dominant, thus easier to distinguish the individual voices. If you have a harsh or muddy sound, narrow boost the EQ and sweep the problem area until it sounds “the worst.” Then, use cut by the same about and, voila, problem solved! If it still sounds muddy, use a high pass filter. Removing subsonic rumble on each track will improve the clarity when set just below the lowest note used on the instrument. The concept “less is more” will always serve you well, meaning that very often the best solution will be subtraction, not addition.
 is set below it at 75 Hz. There is a broad cut by 3 dB at around 300 Hz to pull some of the mud out of the sound to reveal more overtones. A solo guitar may not need the 300 cut, but with other guitars and keyboards, it may cut through better than making it brittle by adding high end instead.")
Figure 3: Less mud EQ: This shows a typical curve to improve clarity in a chordal instrument, say an acoustic guitar. The lowest note E on a guitar is 82 Hz, so the HPF (high pass filter) is set below it at 75 Hz. There is a broad cut by 3 dB at around 300 Hz to pull some of the mud out of the sound to reveal more overtones. A solo guitar may not need the 300 cut, but with other guitars and keyboards, it may cut through better than making it brittle by adding high end instead.

Discussion
Want to join the discussion?
Create an account or login to get started!