
Delay Designer is Logic's full featured delay effect. A “delay” literally means what it means; everything that comes out of it, comes out late! In this article, I'll be showing you its capabilities while designing a few sound FX. With a single one-shot sample or synth tone, we'll use Delay Designer to create an evolving rhythmic pattern, a riser, and a pitch-based sequence. Let's begin!
Find a Sound to Process and Set a Loop
First choose a sample you'll be processing. Not a full loop or sequence, just a simple bass, a pluck, a drum sound, or a vocal sample (as I used in the sample), and place it at bar 1. If you're using a synth just right-click to create an empty MIDI region and draw a single note at the start. Set a loop around 4 bars as in the image below.

Setup Delay Designer
Using Delay Designer's default setting, make sure the Sync button stays enabled (it has a red circle around it when it's on). You'll want to immediately turn off the Auto Zoom by clicking its button. When it's enabled, the display area is constantly attempting to display all the taps at once. This makes it too difficult to place perfectly timed repeats/taps.

Understanding the Overview Strip
The overview strip at the top of the main display area (below the Pan button) represents 10 seconds of time. Delay Designer taps can be placed anywhere from the start, to up to 10 seconds out! When you point to this overview strip you'll see a square with arrows pointing in all directions. When you see this, you can click and move the mouse up and down to zoom into specific areas. While doing this, you'll notice the graphic represents the area currently visible in the main window. You can also point to the edges of the displayed range to fine-tune the zoom, and adjust the visible area by clicking in the center of it and dragging left and right. If taps are currently displaying over the overview (making it difficult to adjust), you can hold the Shift key down which will bring it forward.

Understanding Taps
“Taps” are the actual delayed repeats themselves, and Delay Designer has up to 26 of them lettered from A to Z. Each tap can play a repeat in the traditional way, but Delay Designer goes further and allows each tap to have independent filter, resonance, pitch, and panning too. The default setting has a single tap placed 1/2 note out, so if you play the short sound you chose above, it will repeat on the 3rd beat of your song. The strip at the bottom of the of the main display allows you to add taps. When the sync button is enabled, the grid/strip at the bottom represents synchronized positions for each tap. The dark blue lines are the currently selected grid value (1/16 if you're following along), the white lines represent a beat position, and the thicker ones are bar positions. You might be wondering why there are no actual numbered musical bar positions? Remember, a delay effect deals purely in time. It doesn't care where you are musically in you're song because it's always delaying. That's a very twisty thought so give that one time to sink in!

SFX 1 Placing Taps
Now that you know where to place taps and how to get them in time, we'll create a nice rhythmic pattern from a single short sound. Start playback of the the 4 bar loop you set above, and start placing taps in various positions. The default grid is set to 1/16, so if you want quicker repeats, try 1/32 or 1/64. Remember though, Delay Designer tops out at 26 taps, so if you plan on making a long delay pattern, place your taps wisely. You'll definitely want to adjust the visible area while placing taps, so getting comfortable zooming and positioning with the overview strip is vital. You can easily move a tap by click-holding on its letter in the strip and moving left and right. Try right-clicking too…you can do things like delete taps, and copy settings from one to another.

SFX 1 Level, Cutoff, Resonance, and Panning
Switch back to Auto Zoom by clicking its button so it zooms all the taps you've placed. Each tap's volume can be set by clicking and pulling up/down on each vertical tap. You can also hold the Command key down and “draw” across the taps in the main display to change them in a single swipe. Click onto the Cutoff selector tab at the top. Each tap can be independently set to various filters like low pass, high pass, and band pass by clicking and pulling down from the top, or up from the bottom. Try out different filter shapes like in the image below. Move on to Resonance and Panning and try different values on each tap.

SFX 2 Transposition and Feedback
Let's make a pitched riser sound now. Save the preset you made above by clicking the settings menu and selecting “Save As.” Now reset Delay Designer by selecting “Reset Default.” Grab Tap “A” and slide it over closer to the far left edge. Click the Transposition tab now. Click tap A's column and raise its value to “1.00semi.” Press the “Feedback” button now to enable it, then adjust the knob below it to around -1.0dB. Be extremely careful with this parameter… values above zero dB will result in extremely loud sounds! When Feedback is enabled, the echo literally “feeds back” into itself. Only a single tap can be chosen to feedback from the tap selector menu below the feedback button. Choosing a tap that triggers earlier in time will give better results. Press Play now …you should have a cool sounding delay that rises a step in pitch every time it repeats!

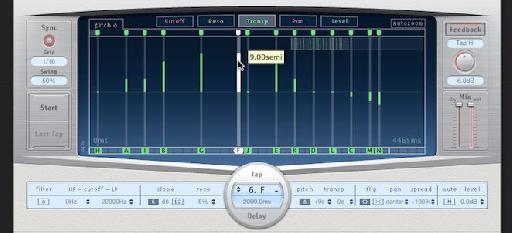
SFX 3 Using Transposition for Melodic Sequences
Once again, save the preset for the last sound effect and reset to the default setting. Adjust the Cycle/Loop to only two bars for this effect and start playback. Use the Overview Strip to display 2 bars (watch for the second thick white divider on the tap strip). Place taps at various positions like in the image below. Now switch the display to Transposition by pressing its button and change each tap's setting to various musical intervals. Turn on the Feedback and select a tap that plays earlier in the sequence. Step sequencing in Delay Designer!

Hope you enjoyed the article, article, article, article....

Discussion
Want to join the discussion?
Create an account or login to get started!