
When creating dance music meant to have a large impact on big sound systems, there's nothing more important than a tidy low-end. Ensuring the kick drum, bassline, and other low frequencies are free from mud can often be tackled with surgical high-pass filters on mid-range and high-frequency elements—but sometimes you don't want to scoop everything out of pads, organs and other sounds that require the added girth or warmth. The good news is we can wrangle Live's Audio Effect Racks to address this very issue in easy and elegant fashion.
Bass Is the Place
I'll start with a simple kick drum and Operator sub-bass pattern. I've been careful to syncopate my bass notes so they don't overlap with the quarter-note kicks, but I've added a sidechained compressor on there as well to guarantee the kick comes through as clean and crisp as possible.

Simple sub-bass sidechained to kick drum.
Bass line kick drum combo:
I've got a nice foundational low-end here: everything is punchy and clear so far. Next I'll add an Operator with a sustained full-spectrum pad sound to enhance the mood with a four-bar chord progression.

Bassy organ pad in effect.
Pads added:
Listening now, it's evident the overall low-end energy is compromised by the low-frequencies of the organ pad, which obscure the kick and bass. The first thing we could use to try and address the issue would be to apply a high-pass filter using the EQ Eight plug-in; using the steep high-pass curve on the first band, I'll slide it up to around 250 Hz, safely out of the way of our kick drum and bassline subsonic frequencies.

Pads with high-pass filtration.
Pads with high-pass EQ:
While the high-pass EQ was successful in freeing up energy in the low-end to power our kick and bass line more clearly, the pads have been drastically altered: removing their low frequencies essentially gutted them of their essential depth.
Rack It
Selecting the EQ Eight on my pad track, I'll hit Command-G to Group it to an Audio Effect Rack. Next, I'll right-click the Frequency control of the first EQ band and map it to Macro 1. I'll then have to move that Macro back to the desired setting; I'll also hit Command-R to rename it “Crossover.”
Clicking the second icon of the Rack's far left side will expose the Chain view. Selecting the first Chain, which includes the EQ Eight, I'll hit Command-D to duplicate it to a new Chain within the Rack. On this newly-created second Chain, I'll go into the duplicated EQ Eight device, and for the 1st EQ band, which is currently set to a high-pass filter, I'll select the steep low-pass filter curve instead. Before going further, I'll rename the new Rack Chain “Low”, and the original one “High”. Since the 1st EQ band filter frequency was already assigned to the Crossover Macro from our first Chain, it will remain assigned to the same Macro on the second chain, even after we invert the EQ curve shape. We now have one Chain strictly processing frequencies above our Crossover value, and one strictly processing frequencies below the Crossover value.

All racked up.
This tutorial presumes some experience with basic sidechain compression, so what I'll do to our new Low Audio Effect Rack Chain is copy the Compressor device from my Sub Bass track and paste it in after the EQ Eight with the low-pass filter applied. I can do this easily by navigating to the desired device in my set, select it by clicking its title bar, use Command-C to copy it—then go back to the track I want to paste it into, click the cursor between the devices in the Chain I want to paste it to, and hit Command-V. All set!
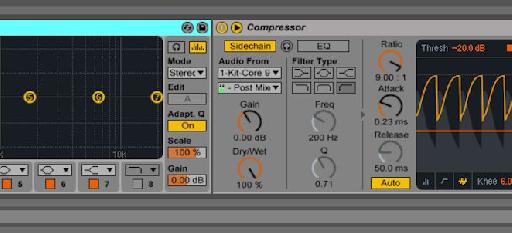
Now that the compressor is on the Pads receiving sidechain input from the kick, I'll bring the Threshold down and the Ratio up to make the results somewhat more extreme since the pads are actually coinciding with the quarter-note kick drums. Having made these adjustments, I'll now select our new Compressor device and use Command-D again to duplicate it within the same Rack Chain; on this last Compressor instance, I'll select the Sub Bass track as the sidechain input source.
The result is that content from our Pad track which falls below the Crossover Macro frequency is now being sidechained to both the kick drum and the bass line: this ensures it gets out of the way of higher-priority low-end instruments, but fills the gaps between them to retain as much warmth and depth as possible without detracting from key bottom-end impact elements.
PRO-TIP: Multiband sidechaining is also ideal for bass sounds that contain crucial mid-range content, allowing the kick to cut through the sub frequencies without compromising essential characteristics elsewhere in the frequency spectrum.

Low Rack Chain in effect.

Crossover now set to 200 Hz.
Multiband sidechain compression cleaning up the low-end while allowing the tops to breathe—without any overt ducking effect on the main body of the pad:
Here's what it would sound like if the same sidechain compression were applied to the entire Pad track without assigning it strictly to the low end frequency range: big-time pumping sounds:
PRO-TIP: Assign the Ratio of both Compressors to Macro 2 and, optionally, the Threshold of both Compressors to Macro 3, for additional control of the sidechain amount without navigating deep into the Rack and its Chains.
Adding Flair
Since our top end pads are conveniently separated from the low-end which has now been processed to coordinate with the other low-end parts, we can add extra effects to help make it sparkle. In this case, I'll add a Saturator, Chorus and Reverb to widen it and make it a bit more expansive—but to really get a better sense of spatialization, I'll need to add another multiband Rack Chain.
Chorus and Reverb on our Pads from 200 Hz and up:
Take Me Higher
To do this, I'll go back to our High Chain EQ Eight and add a steep Low Pass curve on my 8th EQ band, then map the Frequency to Macro 4 and adjust it to around 2 kHz. Now, I'll select this Chain, duplicate it using Command-D, and on the new Chain's EQ Eight, deactivate the 1st EQ band and switch the 8th band curve from steep low-pass to steep high-pass. To keep things sensible, I'll rename the old High Chain to “Mid”, rename Macro 1 “Low Cross” and Macro 4 “High Cross”, and then drag the new High Chain above the newly-renamed Mid Chain in the Rack Chain order.
On our new High Chain, I'll delete the Chorus and Reverb copied from the Chain I just duplicated, replacing them eventually with a Ping Pong Delay and Flanger instead. A Utility plug-in helps boost the gain of this quieter frequency range as well. Finally, I'll adjust the High Cross Macro frequency to taste. The result? A dynamic full-spectrum pad sound that adds plenty of texture and mood—without obstructing the crucial elements that keep a dance floor moving.

Multiband Audio Effect Rack with high band Chain in view.
High-band Pads only with kick and bass:
Mid-band Pads only with kick and bass:
Low-band Pads only with kick and bass:
Full spectrum Pads with kick and bass:
Full spectrum Pads with kick, drums and bass:

Discussion
Want to join the discussion?
Create an account or login to get started!