
Apple's new Retro Synth is an awesome new instrument and welcome addition to Logic Pro X. It features a simple control set and a solid collection of presets. If you have explored the supplied patches, one thing you may have noticed is that the Retro is capable of a few different forms of synthesis.
In this quick tip, I show you how you can use multiple instances (in a Track Stack) to add an extra edge to existing parts. Here we look at the Virtual Analog, Wavetable and FM synth modes. The whole lot then gets mixed up and added to our project.
Step 1 - Your Original Retro Synth Part
So we're starting with an existing sketch for a track and one of the parts used is being produced by the Retro synth. It's a pretty percussive virtual analog patch but it could use a few extra layers to make it stand out in the mix.

The loop containing the original part at the top.
The original loop in its entirety:
You can hear the sound both in the mix and in isolation at this point. For the record the cutoff frequency was at about the halfway point when it was exported for the audio examples you can hear.

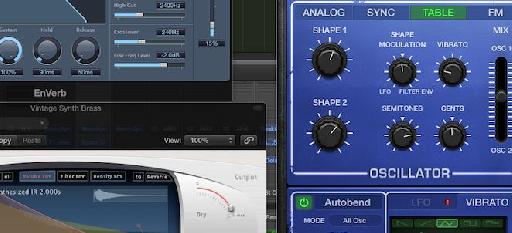
The Retro Synth in Analog mode.
The Retro Synth part in isolation:
Step 2 - Prepping The Track Stack
In many situations where you opt for the use of Track Stacks, you'll probably be combining existing parts. The real difference here is that we are duplicating our Retro synth and then combining the copies into a new stack.

Creating the track stack.
Start by copying the original Retro synth into a few more instrument tracks. The three synth tracks can then be grouped into a stack, this will ensure they play together as one. The original MIDI part should now be moved to the top of the Track Stack to trigger all three synths simultaneously.

The instrument copies are enclosed the new stack.

Turning the second two layers down in the mix.
At this point, it's a good idea to turn the two new channels down. After all, these are simply duplicates of our original part and combining them all will just result in some heavy clipping!
Step 3 - Adding A Wavetable Patch
You can now start to alter the parts on the copied instances of Retro. There are actually four modes available of which we'll be utilizing three. This copy will use the Wavetable style mode. Both of the layers we add here should add some brightness and bite to our sound. I am looking for a subtle lift but you could dial in more extreme effects if you prefer.

The Retro Synth in Wavetable mode.
The new Wavetable layer:
As you can hear, the Wavetable mode is ideal for metallic, almost glass-like effects with plenty of high frequencies. The sounds produced are perfect for complimenting the virtual analog layer.
Step 4 - ... And An FM Patch
The Retro Synth's FM mode is also capable of producing edgy metallic sounds but also great bell-like leads and pads. Here it is used to add some more high frequencies and extra harmonics to the mix.

The synth in it's FM synthesis mode .
The FM layer adds a different more metallic edge:
You'll find that when you switch synth modes you are generally at a good starting point but will need to tweak things to get your final patch perfected. If you aren't sure what to alter you can always use one of the FM-based presets as a starting point.
Step 5 - Your Sounds In The Mix
Finally, you'll need to get a good relative balance between the synths in your new stack. Once this balance has been struck, you can control the overall volume with the Stack's level control.

Mixing the new layers in Logic Pro X's mixer.

Adding some automation for a more dynamic effect.
The final loop with all parts in the mix:
Adding automation to the individual layers can make the combined patch more dynamic. In this case, some simple filter cutoff movement makes the whole thing open up as the loop progresses. Try making your own custom patches with combinations of the different modes.

Discussion
Want to join the discussion?
Create an account or login to get started!