
As well as sporting a slick and clean user interface and some interesting workflow methods, Bitwig Studio has unique audio routing possibilities. It comes with its fair share of bundled plug-ins and instruments, but one thing that it's lacking for now is a multiband compressor. However, by using its bundled FX Layer effect, it's very easy to build your own. Let's take a look at how this is done in Bitwig Studio.
Step 1 - Adding an FX Layer
Let's build a multiband compressor as if we were using it for mastering a stereo mix (but you can also apply it to single audio tracks if you want). First add an FX Layer plug-in to the master output track. To do this, select the Master Track then click on the plus sign and choose FX Layer under the Containers tab. This will insert an empty instance of the FX Layer. On this FX Layer, we want to create three different layers (or more if you want more bands in your multiband compressor).

Step 2 - Adding Layers to the Container
Click on the plus sign within the FX Layer (or simply drag a device/effect onto this area to create a layer) and choose the Dynamics device under the Audio FX tab as the compressor. This is a great compressor. It has your standard controls and a graph displaying your compression shape, plus you can dial in downward compression with the Loud section or upward compression with the Quiet area (which we'll talk a bit more about later in this article).

Add another layer, and again choose the Dynamics audio FX, and do this one more time so that you have three layers.

Step 3 - Create your EQ range bands
Now let's set the EQ bands for each layer. The principle behind a multiband compressor is that each band creates a key EQ range, and the different compressions are applied to each band. On the first layer add an EQ2 before the Dynamics compressor. You can use the plus sign before the Dynamics effect to add it.

Set the Hi band to a 24 dB lowpass filter. Solo this layer, and while playing back your song, decide where you want the low range to be. I've set my frequency to 100 Hz, and the Q to 0.70.

Jump to the third layer and add an EQ2 in front of the Dynamics. This time set the Lo band to a 24 dB highpass filter. This will be your high range, so choose where you want this range to be. I've set mine to about 1.8 kHz.

For the middle band, it will occupy the region between these two filters, but with a slight bit of crossover. So add an EQ2 again in front of the Dynamics effect for the middle band. Set the highpass filter to about 110 Hz, and the lowpass to about 1.81 kHz.

Now you've set up your 3 different EQ bands for the multiband compression. You can jump back and listen to each layer in solo to compare each EQ band. Maybe for the Low band you want to hear mainly the bass and kick drum, in the Mid band you want the vocals and guitar to be more dominant, and then the high band will contain all the high-end sparkle like the cymbals, hi-hats and the high-end range of the guitars. These bands will be different depending on the mix of your song, so slight tweaking will be needed depending on how it sounds on your side. Now let's look at how to compress these bands.
Step 4 - Adding in Some Compression
With multiband compression you will use slightly less intensive settings than your standard single-band compressor, so longer attack and release times are desired. Let's start with the Low band. Solo this layer, and then add in a Loud compression ratio of about 1:1.40, set the attack to 32 ms and the release to 550 ms, now start pulling down the threshold until you hear it compressing the bass region.

Now move onto the other bands and go through the same steps. But what is really the key is to unsolo the bands and hear the bands in the context of the whole song. So don't tweak the settings in isolation for too long as it may not sound coherent without the rest of the EQ bands.


Step 5 - Adjusting your Band Levels
After the compression of the bands, you should notice that your song mix will have changed, especially the levels between the different bands. Maybe your bass now sounds too low in the mix. The beauty of multiband compression is that you can use each band as a level meter. Use the Output on the Dynamics plug-in as a makeup gain for each band. Maybe you want to increase the bass region and then also increase the high band for more sparkle. If you're using it in a mastering context, just use slight increases in levels on the bands, as big jumps in levels may have an unwanted, dramatic effect on the mix.

Step 6 - Assigning to Macros
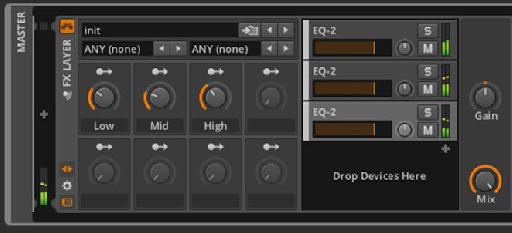
To make it even easier, you can assign some of the parameters on the plug-ins to macros. Let's assign the makeup gains of each compressor so that you can easily adjust these from the macros. Click on the double arrow to show the Macros pane.

Now above each button, there is an arrow head pointing to the right. This is the modular routing button. Click on this and it'll start flashing blue. Now click on the Output button for the Low band Dynamics plug-in. Then you can set a range for the output by dragging up or down with your mouse. You won't be changing the levels drastically, so you can set a small key range. Click on the flashing blue arrow again to finishing off the macro assigning.

Go through and do the same for the other band outputs. Now you can easily adjust the levels for the bands through the macros. You can also rename the macros by double-clicking on the name and then typing in a new name. I have renamed my macros to Low, Mid, and High so that I can easily distinguish which macros is assigned to which output. You have 8 macros that you can use on the FX layer, so maybe you also want to assign the thresholds to macros so you can adjust them as well from within the Macros pane.

Step 7 - Upward Compression
Another bonus of setting up this multiband compressor using the Dynamics effects is that you can apply upward compression/expansion to your mix. There is the Quiet Mode on the Dynamics effect. It has a ratio, threshold, and knee. But you'll see when you tweak these settings how it changes the graph. This will take the lower dynamics and compress this quiet region of the audio and will add a different shape to your audio. Try it out and hear what it does to your master.

Conclusion
Now you've created your own multiband compression effect in Bitwig Studio, this should come in handy when you're mastering your audio and you want to have that extra control over the dynamics of your final mix. You could also apply the multiband compression to individual elements in your mix if you want to, but I'll leave that up to you to decide. Until Bitwig Studio includes a built-in multiband compressor, this is a great way to achieve this effect using its current bundled effects and devices.
http://www.macprovideo.com/tutorial/bitwig-studio-101-creating-your-1st-bitwig-project
http://www.macprovideo.com/tutorial/bitwig-studio-102-effects-and-processing-explored
http://www.macprovideo.com/tutorial/bitwig-studio-103-instruments-and-midi-explored
Discussion
Want to join the discussion?
Create an account or login to get started!