
Studio One comes bundled with a great selection of drum kit presets in the Impact instrument. But what if you have a selection of drum samples and would like to build up a drum kit presets with Impact using these samples. Let's look at how we go about doing this.
Adding Drum Samples
Load up an instance of Impact on an Instrument track. In the Browse panel, click on the Instruments tab and then drag Impact onto an empty space on the Track list, and this will create an instrument for you.

The default preset pops up but has no samples loaded into the drum pads.

Now it's as easy as dragging an audio file onto the drum pad, and then it'll now be assigned to it. So for example you could drag a kick sample to drum pad C1, and then a Snare to drum pad D1.

Now let's take this a step further and look at Velocity Switching and how this can add more realism and variance into your drum pads.
Using Velocity Switching
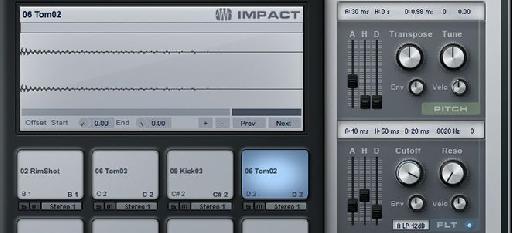
You may have a selection of drum samples of the same type and would like to add these to one drum pad. Let's look at how this is done. Let's say you want to layer up some kicks samples that you have on a single pad. Drag the first sample onto the drum pad. Holding down Shift, drag the next kick sample to the drum pad. Now both these samples will reside on that pad.

But each sample will be associated with a different velocity range. Up in the waveform editor you'll see the name of each kick drum sample in the top. These names refer to the velocity range or layers of that sample.

If you drag in between the names, you can change the velocity range. Maybe you want the first kick sample to have a bigger velocity range.

Now when you hit different velocity amounts on your keyboard or drum controller, it'll trigger a different sample. Make sure that it is set to Velocity mode. This setting is under the Amp Envelope section.

Choking Your Hats
A handy thing to do is to set up a choke group with your hats so that when you hit an open hi-hat sample followed by a closed hi-hat sample, it'll choke the open hats like a real drum kit would. Let's see how this is done. Add an open hi-hat sample to drum pad G#1, and then add a closed hi-hat on F#1. Now for each of these drum pads assign them to the same number under the Choke section. Assigning these hat samples to a group will make sure that only one sample can play back at a time. Try it out, hit the open hi-hat and then next the closed hi-hat. Listen how the closed hi-hat chokes the open hi-hat sample.

Envelopes and Filters
Another great way to fine-tune your drum samples is to make use of the Envelopes on the right-hand side. You can use the Pitch envelope to fine-tune the pitch your drum samples.
You can use the Filter Envelope to filter out specific frequency ranges on a sample. Dial in a Cutoff and a Resonance amount. Then tweak the AHD envelope (Attack Hold and Decay parameters) to filter out some of the frequency range to tonally change the sound of the drum sample. And the amp envelope can be used to influence the attack and release on the shape of your drum samples. I won't give you any specific settings, as your results will differ depending on what type of drum samples you're using. But test the envelope settings out to customize your drum sounds.

Saving Your Drum Preset
When you're done setting up your samples on the drum pads with the relevant velocity switching, choking and envelopes then it's time to save this as a preset so that you can recall it at a later stage, or in another song. To do this, click on the icon left of the arrows by the preset menu. With the drop-down menu, select 'Store Preset'.
Give the preset a name and description. Now this new preset will come up in your preset menu, so you can now recall it at any time.
Conclusion
That's how to create your own Impact drum instruments. Modify it with the modifiers and parameters. And then you can save the drum kit as your own preset that you can access later. If you want some more Studio One tips and tricks check out the following tutorials:
https://www.askvideo.com/course/songwriters-musicians-toolbox
https://www.askvideo.com/course/studio-one-102-producers-and-engineers-toolbox
https://www.askvideo.com/course/advanced-midi-toolbox
https://www.askvideo.com/course/studio-one-104-mixing-and-mastering-toolbox
Discussion
Want to join the discussion?
Create an account or login to get started!