
Max for Live can be quite intimidating to use but there are some simple and interesting effects that can be created using objects from Max/MSP. In this article we are going to look at one. Degrade~ is a bit depth & sample rate reduction object in Max/MSP that can be used in Ableton via Max for Live. Now there already is a similar plugin in Ableton called Redux that essentially does the same, but we will see how degrade~ can be utilized in a very different way and as a result processes the audio in a very different way.
Note: This article assumes you have Ableton Live, Max for Live and Max/MSP. 30 day demo's of all these applications can be acquired from www.cycling74.com & www.ableton.com
Step 1 - Loading & setting up devices
Open Ableton Live and load a Max Audio Effect (from the Audio Effects folder) into an audio track. This will load Max for Live and you should see a Max for Live splash screen if this is the first Max for Live device you have loaded into the session.

Load a drum loop or any rhythmic loop into a slot on the same audio track that has the Max for Live device. Click the edit button on the Max Audio Effect and it should load up the device in Max/MSP. Any changes you make here will be reflected in Ableton in realtime.
When you hit 'Save' or Command-S in Max/MSP, you will see a dialog asking you to give a name to this device and save it in the default location where all other Audio Effect devices are stored. I would suggest saving it in this location so it will be easy to access it later.
Step 2 - Adding Degrade~ to the audio chain
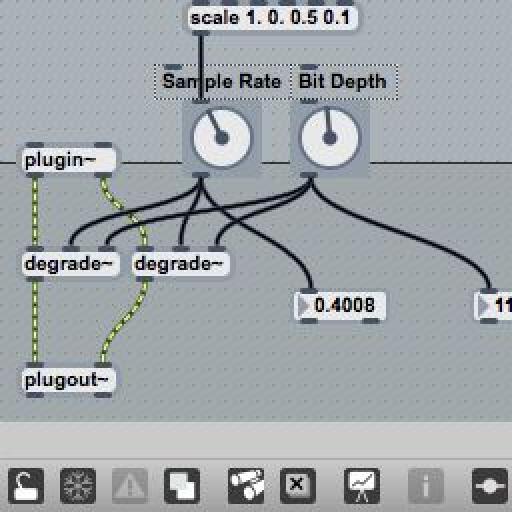
So now we have a device that simply passes the audio through without modifying it. Lets change that by adding a new object by hitting the key N and entering 'degrade~'. Lets also delete the cables that are connected from 'plugin~' to 'plugout~'. Feel free to delete all the text boxes as we will not be needing those as well.
Connect the left output of 'plugin~' to the left input of the 'degrade~' object. The degrade~ has 3 inputs but only the leftmost one accepts audio. Now connect the only output of 'degrade~' to the left input of 'plugout~'. Since the degrade object only has one output is is essentially a mono processor. But we don't have to live with that. Just add another 'degrade~' object or select the existing one and hit Command-D, this will duplicate the object. Now connect the second degrade object to the plugin~/plugout~ objects as shown in the image.

Step 3 - Controlling Degrade~
If you play the clip in Ableton, you will notice that the loop sounds unprocessed. This is because we haven't told 'degrade~' to degrade the sound yet. As you have already noticed degrade~ has 2 inputs other than the leftmost audio signal input. The two inputs are to control the sampling rate and bit resolution of the audio. You can verify this by mousing over the inputs and Max will briefly describe the inputs (The Menu Options > Assistance should be checked in Max for this to work).
Let's create a couple of dials to control these two inputs. Hit N to create a new object and enter dial. Duplicate this object as we will need two for the two inputs. Connect them to the inputs of both the degrade~ objects as shown in the picture. You will notice that I have connected one dial to the sample rate control of both the degrade~ objects and another dial to the bit depth control of both the degrade~ objects. Feel free to create more dials to control all 4 parameters independently.
In the picture, you will see I have created comment boxes to help identify the different dials. Hit C to add a new comment object and enter the text in it.

Now before these dial objects can work properly, we need to adjust the range of the dials that we have created. The sampling rate ratio control accepts a range of 0. to 1., where 1. is the unaltered sample rate and anything below is a reduced sample rate. Think of it as a percentage control. So if the original sample rate is 44100 Hz, setting the control to 0.5 will output a sample rate of 22050 Hz.
Currently the dial is outputting a range of values from 0 to 127. We can change that in the Inspector window of the object. Select the object and hit Command-I. Alternatively you can Right-Click the object and select Inspector. In the Inspector window scroll all the way down and change the 'Number of Steps / Range' parameter to 1. Max will automatically change it to 2. The reason why Max doesn't allow you to enter a value of 1 is because the object is currently set to output integer values (0,1,2,3 etc.) and it is expecting at least one value other than 0, which makes it a total of two values. We need floating point values (0.5, 0.34, 1.45 etc.). Check 'Float Output', the very last option in the Inspector and then set the range to 1. This time Max won't change it to 2 as now Max knows that you want to use all the values in between 0. and 1.

The resolution control of degrade~ uses the range of 1-24. Select the second dial object that is connected to the rightmost input of the degrade~ object. Change the 'Number of Steps / Range' parameter in the Inspector of the second dial object to 24 and set the 'Minimum Value' to 1. You can leave the 'Float Output' option unchecked as the resolution control doesn't need float values.
Step 4 - Verifying values
The dial object doesn't have a value display so it's hard to verify if the output is actually 0. to 1. or 1 to 24. Lets create a 'flonum' object that is used to display float values that it receives at its input. The shortcut for creating a float object is the F key. Connect the output of the first dial object to this flonum object. Let's also create an 'int' object which as the name suggests, displays integer values that it receives at its inputs. Connect the output of the second dial object to this int object.
Lock the patch by hitting Command-E or clicking on the padlock icon at the bottom left corner of the Max window. Now, the dial objects can be auditioned by clicking and dragging. You will see the values updating on the flonum & int objects. Back in Ableton hit play and change the values for both dial objects. You should hear the audio being distorted.

Step 5 - Modulation of Sample Rate
Changing the sample rate creates some really nice aliased frequencies and it would be great if the dial that controls this can be automatically modulated, just like an LFO in a synthesizer. So lets create something like that.
Create another object called phasor~ 1. This object outputs a sawtooth wave and the number '1' is an argument that defines the rate of the sawtooth wave. But another way of looking at this object is that it outputs values that ramp between 0. and 1. The rate at which it ramps between these values is defined by the number argument placed after its name.
What we want to do is connect the output of the phasor~ to the input of the dial that is controlling the sample rate. Unfortunately we can't just connect it directly as the two objects are of different types.
All the objects that have the '~' after their names are MSP objects that run at audio rate while the other objects are Max objects that run at control rate which can be though of as something similar to MIDI. Just like you can't connect a microphone to a MIDI input, you can't connect MSP objects directly to Max objects. Luckily there are some objects that convert one kind to the other.
Add another object called snapshot~ 10. This is an object that takes snapshots of an MSP signal and converts it into float values (Control rate) at a particular rate. The number '10' defines the rate at which the snapshots are taken, in milliseconds.
Connect the phasor~ to the snapshot~ and the snapshot~ to the dial as shown in the picture. I moved all the objects down to create space. You will now see the dial modulating on its own and hitting play in Ableton will give auditory confirmation of the sample rate modulation.

Step 6 - Syncing the modulation to project tempo
Right now the phasor~ is running at 1Hz. That means it ramps up from 0. to 1. in 1 second and keeps repeating that pattern. This is fine but the rate doesn't conform to the project tempo. Change the argument in the phasor~ object to '4n'. This changes the rate to a musical subdivision of the tempo in Ableton. 4n stands for a quarter note, 2n, 8n and 16n will sync to half, eighth and sixteenth note subdivisions respectively.
Keep in mind any modifying of objects in Max/MSP can only be done in the unlocked mode so make sure the padlock icon looks open and you will be able to make changes. You will also notice that the changes can be done while Ableton is running.
Step 7 - Modifying the Modulation
Right now, the modulation control is changing the sample rate ratio from its 0. value to 1. What if you want to reverse that?
Create another object called '!- 1.' This object subtracts the number it receives at its input from 1. Disconnect the connection between the snapshot~ and dial objects. Connect the snapshot~ output to the left input of !- 1. and subsequently its output to the input of the dial as shown in the image. You will now see the dial modulating in the reverse direction.

This sounds good but I feel that this modulation is a bit too wide. The range of the modulation would sound interesting if limited to the range of 0.1 to 0.5. A really helpful object to make this happen is the scale object. Create a scale object with arguments as follows; 'scale 1. 0. 0.5 0.1' and connect it up as shown in the picture. This object has four arguments. The first two arguments define the range of values that the scale object should expect at its input and the next two values define the scaled output range. So an input of 1. to 0. to this object will be scaled to 0.6 to 0.2.
Connect this object into the signal flow as shown in the picture.

Step 8 - Presentation Mode
The patch can be saved in Max and the Max for Live device in Ableton with automatically update showing all the objects and connections that are visible. It looks a little messy with all the cables and objects interconnected. So lets hide everything except the object we need to see in Ableton. This can be done by showing only the required objects in the Presentation mode
Let's select the two dials, the two text comment boxes, the int & flonum objects. You can select multiple devices by holding down Shift. Now open the Inspector window by hitting the key command Command-I. Here enable 'Include in Presentation' by clicking on the check box.

These objects will now have a pink border. To enable Presentation mode, go to View > Presentation or use the key command Option-Command-E. You will notice in this mode all the other objects disappear and you are left with only those objects that were set to be visible in Presentation mode.
To make sure Ableton opens the patch in presentation mode goto View > Patcher Inspector or use the shortcut Shift-Command-I. Here check the option 'Open in Presentation'.
Align the objects to the top left corner of Max's window so when you save and close out of Max, in Ableton it looks much more neat like in the image.

Save the patch and quit out of Max/MSP.
Hope this was fun. Try to figure out a way to change the phasor~ object's rate in a more intuitive way. The message object will be helpful for this as a message object can store a number or any text in it and output that value when clicked on in locked mode. Try connecting a message object with the rate(4n, 8n, 16n etc) to the phasor~ and see what happens. Max/MSP has a pretty good help database for all objects which also act as example patches. These help patches can be accessed in Max by selecting the object and hitting Shift-Command-H.

Discussion
Want to join the discussion?
Create an account or login to get started!