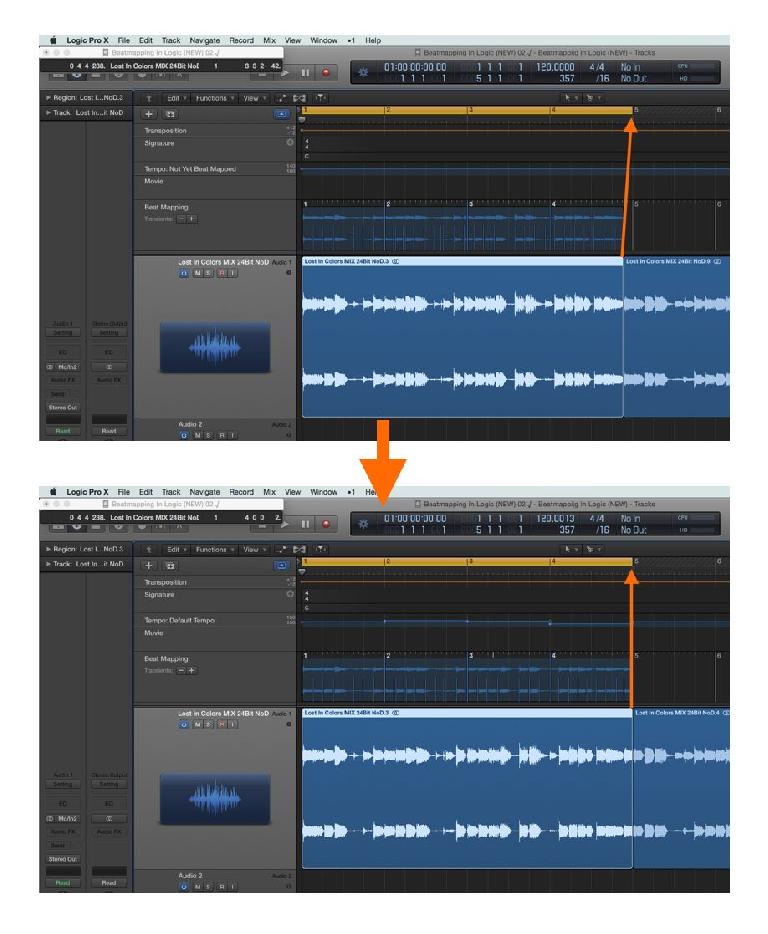
Among the many, many new features and fixes in the recent Logic 10.2.1 update (now at 12.2.2), there was a small one slipped in quietly—an improvement in the automatic Beat Mapping algorithm. Under-the-hood tweaks like this often go unnoticed, in the bustle of flashier new features, but Beat Mapping—in all DAWs—has always been as much art as science, especially automatic features like Logic’s, so any enhancements that might improve reliability and efficiency are always welcome. Logic’s new algorithm seems to deliver noticeably better results, at least on the several songs I tried it out on. But before getting into a detailed description, it might be worth it to do a brief overview of Logic’s Beat Mapping options, to put things in context.
Three in one
As is usually the case with almost everything in Logic, there are multiple ways to approach Beat Mapping. They all work with both audio and MIDI files, and they all can get the job done, although the methods that involve manual tweaking are far more time-consuming than the automatic approach. Just a quick reminder—Beat Mapping creates a (usually) varying Tempo (map) to match the timing of a performance (again, audio or MIDI) where the original tempo is unknown, and, typically, varies slightly over the course of the piece, which was often not played against a click. Once the correct Tempo map is in place, this allows Bar & Beat grid-based editing to be done more easily and efficiently, while still preserving the looser, more musical timing of the original performance.
Logic’s Beat Mapping options can be broken down into three different methods:
- The Adjust Tempo... Edit command
- Tap Tempo
- The Global Beat Mapping track
The improvement in 10.2.1 was made to the Global Beat Mapping track’s automatic mode (Beats from Region)—I’ll describe each method in turn, and then finish up with that.
Adjust Tempo
The full name of this command is Adjust Tempo using Region Length and Locators—quite a mouthful! It’s available from both the main and Track window Edit menus, and, of course, could be assigned a key command. It’s the oldest of Logic’s current Beat Mapping approaches, and possibly the most labor-intensive, but if you have a good eye, it can also be the most reliable.
The way it works is that you go through the song cutting the Region(s) you’ll be using as the timing reference. You cut a section that corresponds to exactly a certain number of bars (one, four, eight, it’s up to you)—that’s the Region Length referred to in the command. Naturally, this will not correspond to the Bar/Beat grid in the Ruler—a quick check with the Click will confirm the mismatched Tempos. So you create a Cycle of that same length in the Ruler—that’s the Locator. Then, with Cycle enabled and the Region selected, you invoke the command—Logic calculates the correct tempo to make the Cycle match the timing of the Region. So, starting with a 4-bar Region and a 4-bar Cycle of different lengths, you’ll end up with both having the same length. Turn on the Click, and you’ll see it will now be in sync with the music.
If the performance was steady, you could apply this calculated Tempo globally; if not, you’ll have to repeat the process. You’d play through the song with the click, and whenever it starts to drift, back up a bit, cut a new Region and select a new Cycle length, and repeat this procedure until the entire song is Beat Mapped. It can be tedious, but if you have a good ear and eye, it works reliably—possibly more reliably than some automatic detection algorithms (but I’ll get to that).
Tap Tempo
This does rely on Logic automatically detecting the beats in the reference, but still involves some manual labor, to provide a more reliable reference. A musical reference may contain lots of notes, which can sometimes confuse automatic Beat Mapping algorithms that try to pick the ones closest to the barlines. And when the reference is an audio region, the algorithm has an extra step of detecting transients in the wave, to identify the starts of the notes it’ll be using as bar/beat references. These steps may run into problems, which is why auto-Beat Mapping has always been a little more iffy than the more tedious manual approaches.
Tap Tempo lets you stack the deck in your favor—you create a MIDI track to use as the reference, in place of the original music track. This MIDI track will be much simpler—you can tap just whole notes or quarter notes, and the note starts will be easy for the algorithm to identify, rather than having to detect transients in a wave (especially if a lot of compression was applied). You’d tap along with the music through the entire song to generate the new MIDI reference track. Depending on your timing, you might want to check for accuracy, and make some edits before you’re ready to Beat Map. But remember, you can’t quantize it—it’s not yet lined up with the session Tempo—that’s the whole point of Beat Mapping in the first place!
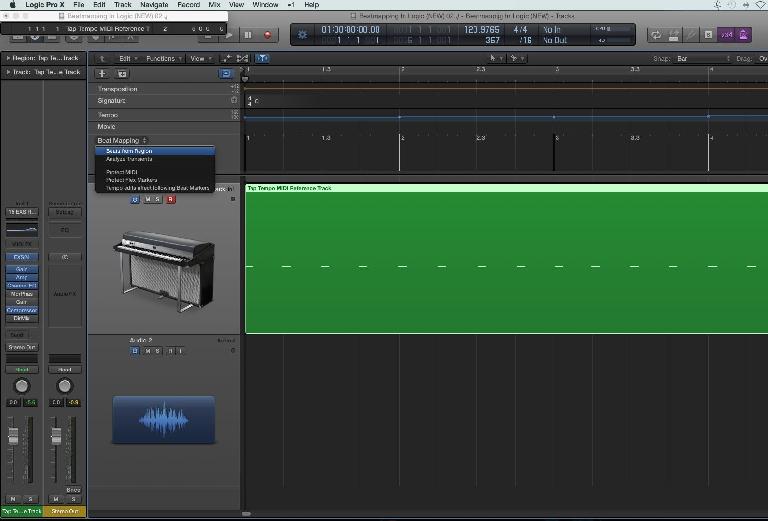
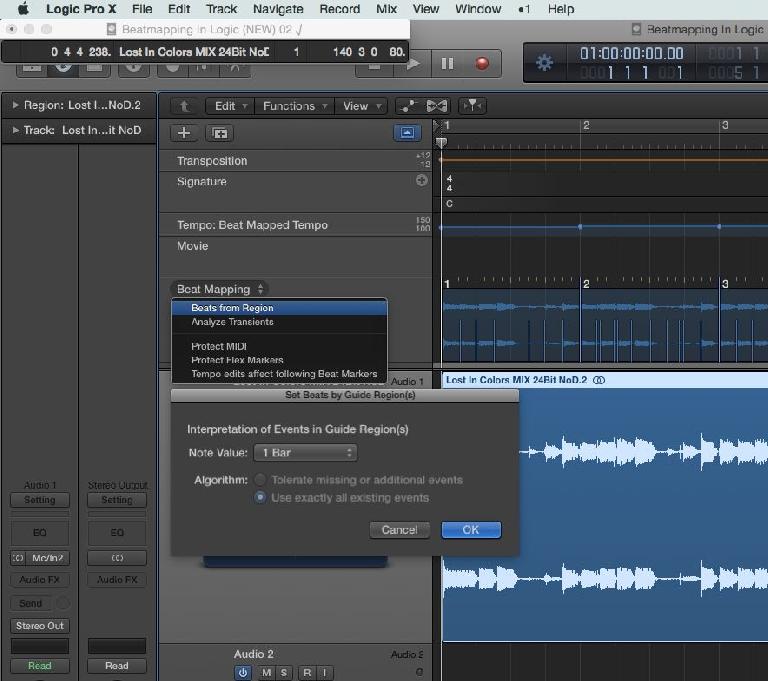
When the Tapped MIDI reference track is ready, you select it, open the Global Beat Mapping track, and choose Beats from Region from the popup. Select the correct value to match what you tapped—quarter notes, whole notes, whatever—and Logic’s automatic Beat Mapping engine will go through the MIDI reference track, assigning beats for each note.
Of course, this is only less tedious than the Adjust Tempo method if you have good musical timing, and can tap with a high degree of accuracy—otherwise, you’d have to go through the new MIDI track making manual tweaks to get it into shape, which wouldn’t be any faster than the first approach.
The Global Beat Mapping track
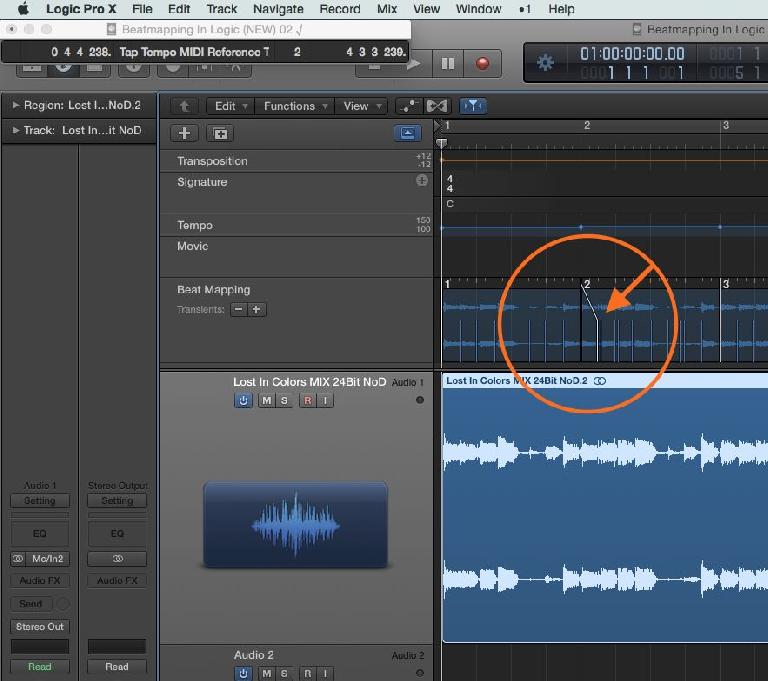
That brings us to the third method—the Global Beat Mapping track. This can be used either manually or automatically. It’ll work on audio or MIDI, but since most people probably need to Beat Map audio, I’ll focus on that. Beat Mapping from an audio reference track involves an extra step—Logic must first detect the transients in the audio wave, to identify the starts of the notes it will eventually use to establish the new bar/beat gridlines. When you select the reference Region, it’ll appear in the Global Beat Mapping track lane. If no transient lines are showing, just select Analyze Transients from the popup, and you’ll quickly be ready to proceed.
Now, if you choose to perform the Beat Mapping manually, the Global track provides an elegant, and editable, visual reference. Superimposed above the wave in the Global Beat Mapping track lane will be blue lines for the detected transients, and white lines for the barlines. If you can identify the correct note for each bear, or each downbeat, you simply drag the barline over to that note/transient, to align it. It’s much more visually straightforward that the other approaches, although, if you go through the entire song, it can be just as time-consuming.
But this is where the automatic Beat Mapping function comes in. Once you’ve got the reference Region selected, and the transient lines are showing in the Global Beat Mapping track lane, you can invoke the same Beats from Region command, from the popup, that we saw above. It’ll take a few seconds to analyze the reference track, and then the new Tempo map will appear (assuming you also have the Global Tempo track visible). This is where the under-the-hood improvements were made in 10.2.1. In the past, the results of this automatic operation were often a bit spotty, and trying to apply manual fixes might throw the whole Tempo map off—both those aspects are much improved now.
I threw several tracks at it, including several drum-less passages, and I could not get it to fail—it consistently Beat Mapped the entire song reliably. There were the occasional, inevitable, areas where the new Tempo drifted ever so slightly (in a couple of very rubato (sloppy) passages), but not enough to really be of concern.
But to give the user a way to help out the new algorithm, in case there are problems, Logic’s Beat Mapping engine will now follow the user’s “hints”. Both before and after Beat Mapping, you can make manual adjustments to a barline here and there, as I described above, and then re-run the Analysis—Logic should take the “hints” into account when performing its analysis, and hopefully tighten up any sections that may have been just a little loose. If there are more major issues—like with songs that have drastic Tempo changes, or really odd timings, I still wouldn’t expect miracles—sometimes there’s just no substitute for doing it by hand—but the current performance of the Beats from Region command seems improved to the point that I’d definitely be inclined to give it a shot now, even on what might appear to be a difficult project, before consigning myself to a more tedious manual approach.
So, if you’re haven’t tried Beat Mapping in the latest version of Logic, test it out for yourself—you may find it much more efficient than before. And if you’re new to Beat Mapping in general, well, maybe it’s time to get this very useful function under your belt—you never know when you’ll need it.


 © 2024 Ask.Audio
A NonLinear Educating Company
Discussion
In attempting to get tempo-mapping to do what I want (a 24 bar rubato section at the start; a a 10 bar or so rall at the end) all manner of mayhem has ensued with regions moving all over the place. Especially disappointing is the fact that those midi regions & audio regions were locked to sempte. The bookmarks also changed position and wouldn't be put into place. I had to close and reopen Logic to manage to get that under control.
I'm sure that Logic have good intentions - well at least, I was. Now it seems they put out Logic with a list of wonderful things that we can do with it, and then set back to hear what problems we have in trying to implement those features. Not good enough Apple!!!
Want to join the discussion?
Create an account or login to get started!