
Automation is a hugely important part of modern production regardless of the DAW you use, Ableton Live is no exception here and has a huge number of parameters that can be automated.
Lets take a quick look at the most efficient way of dealing with automation both in the arrangement and session views. With these simple techniques under your belt you should be set to add some real interest to static parts and projects.
Automation In The Arrangement Window
This is probably the most common way to add automation to your projects in Ableton Live. Every parameter that can be automated has its own 'lane' and these will become available when you open a device or record movements using a specific parameter.
You can choose to view all available automation parameters or simply the ones that contain automation data. I would opt for the latter as it tends to keep things a little more organized and concise.
You can enter automation data in two main ways in the arrangement view, it can be drawn or it can be recorded. I like to use a mixture of the two and I'll explain why. If you simply want to draw automation data in you'll have to find the parameter you want to change and draw in the data but by recording a small amount first the automation track will be prepared for you and ready to edit.

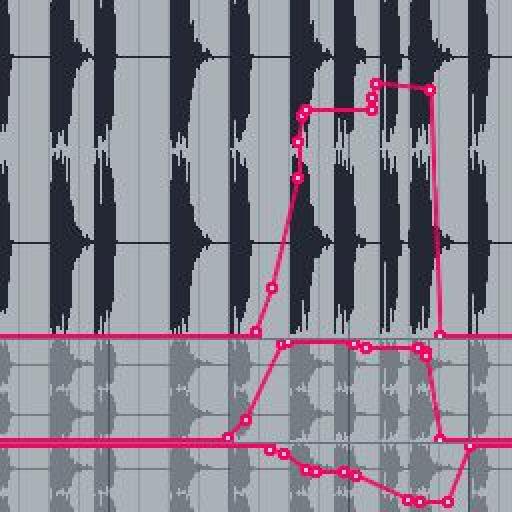
Automation data being drawn in.

Automation data is recorded.
With the 'show automated parameters' option on and using this method your automation tracks should be kept clear and tidy. Below you can see and hear an example of some simple automation I applied to a drum loop over a few bars using this method.
The recorded automation in action:
Applying A Groove To A Clip
In Ableton Live automation doesn't just have to be applied in the arrangement view 'per track' you can also have clip specific automation data. These small amounts of embedded data are called envelopes and can be great for quickly loading effects based clips or alternative versions of current parts in your project.
Another great thing about clip based envelopes is that they are completely non-destructive. Essentially this means you can program some clip based automation, save the clip and then load it at a later stage a change or remove the envelopes. Often this can help to avoid bouncing and permanently imprinting changes to your audio.

A clip based envelope is created.
Below you can see the clip based envelopes being accessed in clip view. There is also an audio example of the sort of effect that can be produced using this method.
The clip based envelope in action:
A Few Extra Tips
When drawing data in or amending recorded data you may find that the points entered jump and snap to specific points. You can change this by altering the resolution of the automation system.
To access this area simply right-click in the automation lane of your chosen track and you should be presented with a few 'grid' options. You can select an adaptive grid of varying resolutions that will snap intelligently to the best point or, if you prefer, you can use a fixed grid. The latter uses musical measures such as 1/8th, 1/16th and 1/32nd of a bar etc.

The automation grid is altered.
Once you have your resolution set correctly you should find that inputting new automation data is much easier and more predictable. It's also worth remembering that you can add and remove individual automation handles by simply double clicking them with the standard cursor, as opposed to using the pencil tool.

Discussion
Want to join the discussion?
Create an account or login to get started!