
Audition is able to see any third party VST, VST3 and AU plug-ins installed on your Mac, but it also ships with some great effects of its own that you can use to work with your audio projects. These are applied in realtime using the effect rack for a track or by applying them directly to clips, so you have ultimate flexibility when it comes to processing clips. Let's look at both methods and explore the new plug-ins.
Step 1 '" Apply an effect to a track.

Adding effects to clips means they affect only the clip to which they have been applied.
Here we have selected a clip and then in the Effects Rack for that clip, chosen to add a Notch Filter which is one of the new effects. Applied in this way, the effect applies only to that clip and not to the track, so other clips on the track will be unaffected.
Step 2 '" Make a setting

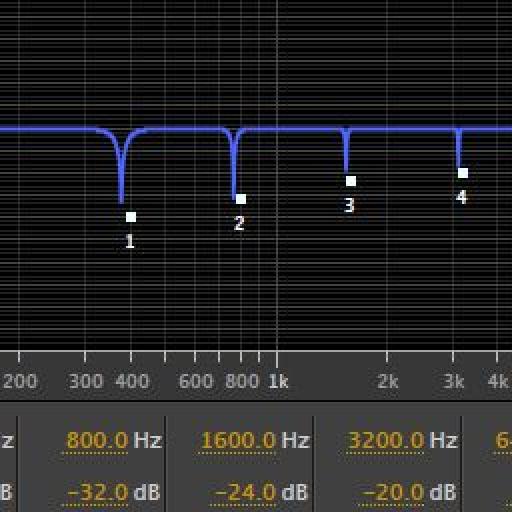
Notch filtering can be used to eliminate or enhance very specific frequencies in audio signal.
The notch filter plug-in has numerous presets for dealing with specific types of interference in audio clips. Electrical hum, high pitched hiss and other kinds of sounds have particular frequencies, and with a little experimentation, it should be possible to dial them out using very narrow Q values and moving the frequencies of the notches.
Step 3 '" Graphic phase shifting

Playing with the phase of audio lets you get creative with its position in the stereo field.
Another new effect is the Graphic Phase Shifter, which like any effect can be applied to the clip or the track. Try applying it to a clip for now. In its preset list you will see a number of interesting presets, like the ability to take a mono source and create a wider stereo effect from it by manipulating its phase characteristics. This can be useful for livening up field recordings that may be in mono but need a stereo effect, and saves you duplicating lots of files.
Step 4 '" Pitch correction

Automatic pitch correction is a great new effect '" auto tune for Audition!
This time, add an effect to an entire track by adding it using the track's FX box. This will make sure it processes every audio clip on the track, in addition to any effects already added at the clip level. On a vocal or instrumental track, try choosing the Automatic Pitch Correction plug-in, which is new. This acts as an auto-tune, allowing you to assign a musical scale to the correction, as well as controlling sensitivity and attack. It doesn't have to be used for musical applications '" you could for example use it to change the timbre of dialogue.
Step 5 '" Play with the routing

Creatively route effects, use sidechaining and now save rack presets as well.
Another new feature is the ability to change the channel mapping of each effect individually. Click on the tiny Channel Map Editor button at the top right corner of an effect to view its settings. Here you can swap left and right input and output channels, or force effects to process in mono. If you are set up for working in surround instead of just stereo, you can go beyond two channels. There's also side chain support in selected plug-ins, so you can get more creative with effects such as compression.

Discussion
Want to join the discussion?
Create an account or login to get started!