
The final stage of studio production can stymie even the most experienced producers. How do you convert a mostly mapped-out arrangement into a fully finished track? In this tutorial we'll explore a number of strategies to give your transitions plenty of punch while maintaining optimal flow.
1. Location, location, Location
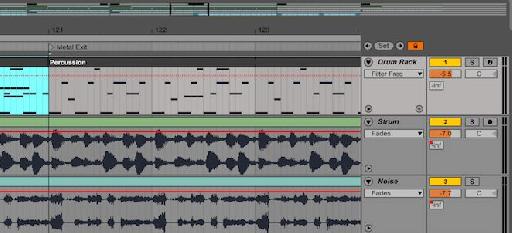
After getting a basic arrangement laid out with sufficient automation, I want to identify the important transition points in my track. These are going to be where major transitions take place. In this case, I'm using a fairly reductive hypnotic techno track to explore opportunities for edits.
Using arrangement Locators, I can make a handy map of the primary transitions I'll want to edit. This can be done in real-time by clicking the “Set” button to the right of the Arrangement scrub area, just above the first Track title; clicking this button will place a Locator at the nearest Global Launch Quantization interval to the current playhead cursor location. Alternatively, you can manually add a Locator to your timeline by right- or Control-clicking the desired location in the scrub area and selecting “Add Locator” from the context menu that appears.
You can type in a custom name for each Locator and easily rename it as needed via Command-R. Clicking the triangle of each Locator flag triggers playback from that point in the arrangement at the start of the next Launch Quantization interval.
| PRO-TIP: To leave important notes for yourself or a collaborator, you can add and edit Info Text for each Locator point—such as “Increase snare volume here” or “Possibly remove vocals at turnaround”, etc.—by right- or Control-clicking the desired Locator and selecting Edit Info Text from the attendant context menu. Your notes will appear in the lower-left Info View of the Live GUI when hovering your mouse over the Locator with Info View visible. |

Basic arrangement with minimal automation and Locators.
2. Reversal of Fortune
Designed as a relatively utilitarian DJ-friendly track, I don't want anything too jarring to occur in the first 1m30s, so my first edit Locator occurs 49 bars in, when the Pluck Loop arrives.
Zooming in, I'll select the last 2 beats of the 48th bar of both the Strum and Noise tracks, then use Command-E to Split them to two discrete clips, independent of the looping clip segments before and after. In each of these two Clip's Sample properties, I'll now hit the Rev button to reverse the audio.
Finally, to smooth things out, I'll adjust the Fade envelopes built into Live's audio clips to make sure there are no sudden clicks disrupting the transition from forward to reverse and back again. Just click and drag the maximum Fade breakpoint from the edge of one audio clip over the boundary of the adjacent clip to smoothly crossfade from one clip to the next; adjust the middle Fade breakpoint to attenuate the crossfade slope. Now we've got a subtle reverse edit leading into the arrival of the Pluck track.

Multi-track reverse edit.
Audio 1—Multi-track reverse edit:
| PRO-TIP: With Fades automatically enabled for audio clips, crucial transients – the first loud impacts of a sound – can be accidentally lost when a clip is first triggered in the arrangement, say for example with a kick drum sample on the first downbeat. You can recover the lost transient by dragging the top Fade breakpoint all the way left to remove the slope entirely, or by dragging the start of the clip a 32nd note or shorter before the beat you want it to start on, and fading up from there as needed so that the full transient plays back properly. |
3. Duplication Station
One of the handiest editing commands in Live's Arrange view is Duplicate: Command-D. Moving forward to the next transition point, where the Bleep track enters the arrangement, I'll want to make another edit.
In this case I'll select the second 1/4-note segment of the 64th bar of both the Strum, Noise, and Pluck track clips, and hit Command-D to repeat that single beat across those three tracks. To complete the edit, I'll select a 1/16 note segment of the last downbeat on the Drum Rack and duplicate it three times to create a rapid-fire kick and clap combo.

Multi-track duplication edit.
Audio 2—Multi-track duplication edit:
| PRO-TIP: Feel free to experiment with duplicating odd timing selections such as 3, 5, or 7 1/8th or 1/16th notes. For glitchy effects, try zooming right in and duplicating 64th, 128th, or even shorter note intervals. |
The next major transition occurs going into the breakdown. In this case I'll select a 3 1/16th note segment across all active tracks starting on the downbeat of the 80th bar and use Command-D to duplicate it three times until arriving at the last beat of the bar. From there it sounds too busy, so now I'll simply remove a few elements to clean it up: the last upbeat open high hat of the Drum Rack track and the last beat of the Strum and Pluck tracks all get cut, with a slight fade back into the downbeat of the Strum track.

Breakdown transition edit.
From this point, I can tell that the breakdown is sounding too busy, so I'll delete the drum part I initially had in place during this section. The exit from the breakdown back into the beats is also lacking impact, so I'll simply delete some elements at the end of this breakdown to emphasize the transition. In this case, I notice the last reverbed chord on the Bleeps track has a dramatic punctuation to it, so I'll use that interval—the 1/16 just before the 3rd beat of the 88th bar—as a cue for my removals. However, I noticed it sounded a bit too naked with absolutely everything else removed during this section, so I've just removed the Strum and Pluck loops to give this pause a more subtle feel.

Drop transition edit.
Audio 3—Transition into, through, and out of breakdown:
Delete That
Sometimes, a bit of deletion is all that's needed to see a transition through. When the open hi-hats come out of the arrangement at the 105th bar, all I need to do is pull a few things out at the right time to give this change some added punch. The Strum loop has a clear musical 1/2-bar phrase which I'll use to align the stoppages on that track, the Pluck, and my drums. Note that I've employed some fades to smooth it out.

Hi-hat removal edit.
Audio 4—Hi-hat removal transition:
5. Doing the Splits
As you may have noticed, my arrangement is primarily comprised of extended looping clips. Discrete clips on the same track, if assigned the same color, are designated by hard lines or empty space between them. The “teeth” within the extended clip block merely represent the loop duration roll-over.
Say if I want to make an edit to a MIDI clip in the clip editor—or adjust the sample or modulation properties of an audio clip – that edit or adjustment will propagate throughout the entire looping duration of that clip. This means that if I want to make an edit to just a single bar of a MIDI clip, I'll first need to Split it from the clips on either side so I can edit it discretely, without the new edits being looped before and after the desired section.
To Split a clip segment, select the span of one or more clips that you want to Split, and then select Split from the Edit menu, or hit Command-E. You can Split multiple clips simultaneously across more than one track.
For this transition, I'll Split the last bar of my Drum Rack No Hats clip and make some edits in the MIDI editor: duplicating my snare rolls, adding some syncopated claps at the end of the phrase, and removing the shakers after the last downbeat. It's important that I split the clip before doing this, or else these new edits would repeat every two bars leading up to it.

Split MIDI edit.
Audio 5—Split MIDI edit:
| PRO-TIP: If you like a clip edit you've made so much that you want to reintegrate it with a larger phrase for looping purposes, select the edited clip and the segment you'd like to join it with and select Consolidate from the Edit menu, or use Command-J. As a new clip, Looping won't be on, so you'll have to go into the clip properties to activate looping manually—and then you'll be all set to loop away with your new and improved clip. |
6. Closer to the Edit
These are just a few tips to work with the elements you already have in place in your arrangement. Rather than pile on new samples or added effects, a few simple tweaks with Live's most basic editing capabilities can make all the difference in the world. All you need to do is think creatively and don't be afraid to harness the element of surprise—when adding a new percussion element, try adding it a beat or two before or after a listener might typically expect it and see if that injects some energy into the transition. Push the tools you're already working with to their limit and you just might find yourself quite happy with solutions that were hiding right under your nose all along.
Learn more Ableton tips at AskVideo here:

Discussion
Want to join the discussion?
Create an account or login to get started!