
Drums are oftentimes highly terrifying for many artists who are not rhythmically inclined. This is even more so for DJs who, even though they know how to spin like no ones business, often times don't know much about the actual programming part of electronic music. In this quick tutorial, I'd like to show you a quick and easy way to build up a fast, grooving dance beat, with effects, that will assist you in adding another title, under your DJ, producer belt—full-fledged electronic drum programmer.
Step 1. Drums!
You'd be surprised how easy it is to build up drum loops manually, without ever having to play anything. It's merely a matter of creatively pasting and moving things around. Granted, some people like to manually draw in every note of a drum beat. However, most people don't have the patience to spend 20 minutes to an hour on just one 8, or 16 beat. I think you'll find this method works much faster, and gets some really interesting results.
After creating a Kong, in a brand new arrangement, go ahead and choose the Deep House, default drum kit.

Now, within the Kong sequencer lane, double-click one measure, with a 1 Bar snap setting. This will create an empty sequencer clip that we can edit for our own nefarious purposes.

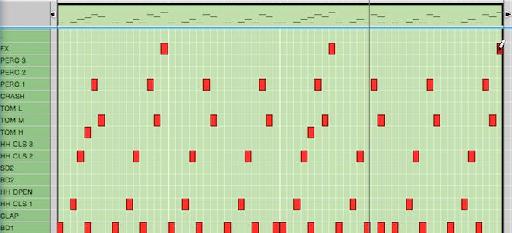
Next, let's go in the Edit Mode, within the sequencer (Command-E), change the Snap setting to 1/16, and draw in a nice 8-beat kick drum pattern within one measure.

Now, copy your kick drum pattern 3 times over so that it now has copies filling measures 2, 3 and 4, by using the Option-drag shortcut, to quickly create new pattern copies.

Next, use the Command-A shortcut to select all your current clips...

And then, go ahead and use the Command-J shortcut to join your clips as one, so that we can now edit drums over several measures, as opposed to just building up tiny bits at a time.
Now, here's the fun part—Creative Copying! I'll hold the Shift button down and start selecting ever other step of the kick drum.

This allows me the ability to now Option-drag the new quarter note rhythm over to my CL hi-hat, introducing a less repetitive, foundational, closed hi-hat pattern. I'll Option-drag to the third 1/16 step of the first measure, thus copying to the recurring measures, in the process.

Next, we'll Option-drag the same pattern again, to HH CLS 2, except this time, let's go ahead and place it right after our last copy. Copying and dragging around like this is a fun, and slightly Zen way of building beats, that start out simple. But, over time, they can get really interesting.

From here, I'll copy to the 6th step over, to Perc 1, and the 7th step over, at Tom M. Now, I have a little bit of a groove to work with. And, I can sprinkle in fills anywhere I like.
At this point, you may want to set your left loop locator 1 to measure 1, and your right loop locator to measure 5, so that you can place Reason in Loop Mode, to hear your pattern repeat, non stop!
Tip: House Beats
Some tracks don't work well with a rigid 16th note quantization like we are doing here. Sometimes you want it to groove! And this is especially true for certain genres like House, Lounge, Jungle, and many Trance tracks. If this is too rigid, make sure you apply a little Shuffle!
Step 2. Effect it!
Now, here's where things get really fun. And, you don't have to know a ton about signal flow to use this particular method in creating full and powerful drum patterns. In case you don't know, compression is a major effect for pumping up drums, and so are filters! Therefore, I'm going to bring in the Reason bad boy of 'pumping up', the Pulveriser, by right-clicking on Kong, and selecting it from the Effects menu.

Normally, when mixing, or creating a drum arrangement, you'll mix it down far more than I am, by running separate lines out of Kong, into the Reason mixer. But, if you're on the go, effects devices like the Pulverizer are great because there is a Blend knob. This knob keeps you from having to saturate the drum pattern with effects, thus losing low-end, high-end, and so on. You can have just a little bit of effect, to augment what you already have. Therefore, I'll adjust the Blend knob to 31%. And, trust me, you'll want to pull it back, as the Pulverizer can get very intense!

Okay, now let's put the Pulveriser to work! I'll raise the Squash up to 39%, and lower the Release to 24%. This will give us a slight pumping effect, as well as tighten the mixed signal that will playing along with the dry signal, as Kong passes through the Pulveriser. To add some coloration and grit, I'll also raise the Dirt knob to 61%.

Finally, let's get crazy! I'll set the Filter type to Comb, and then set the Frequency to 44.1Hz. Now, when I raise the Peak knob all the way to 87%, I'll begin to hear, already what the fuss is all about with the Pulveriser.

Alright, now it's time to modulate this filter, and get it a little tighter, huh? I'll set the Tremor Rate to 3/8, once the Sync button is pressed. This speeds up the modulation that we're about to add to our drum pattern, and 'Syncs' the Pulveriser's LFO to the host clock of Reason, keeping our modulation in time. I'll also raise the Tremor to Frequency knob, so that we can actually hear the modulation.

As the default pattern of Tremor (LFO) is a little annoying, in this particular situation, go ahead and switch it over to the four step ramp waveform that is shown below...

Now, we're hearing some major difference!
Step 3. Finishing Touches!
Now, I'll return to the Edit Mode of the Sequencer and just sprinkle some additional, one time hits, that are not as recurrent as the rest of our programmed drums. This is good practice, as it keeps the drum loops less tedious and keeps things fluid.

Once I have things together in a manner that sounds good to my ears, I can start building up the pattern more with other instruments. Or, convert this pattern into a Dr Octo Rex file, and add it to my loop library. Easy work! Of course, more effects can be added, velocity edits, and of course, synths. But, this is a decent, rhythmic starting point. Something you always want when either DJing, or creating your own dance music. Or, both... Even at the same time.

Discussion
Want to join the discussion?
Create an account or login to get started!