Ableton Live has all manner of fun tricks up its sleeve. Did you know that you can transpose MIDI and audio clips in real-time using a MIDI keyboard? Here's how.
Step 1 - Setup your MIDI controller
Before you start, make sure that MIDI keyboard is enabled for Remote usage in Live's MIDI Sync preferences.

Here you can see the 4th input on this Edirol MIDI interface is enabled to be used as a remote device.
Step 2 - Enable MIDI Map Mode
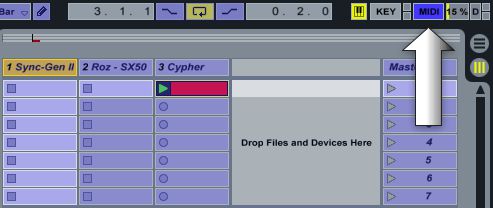
Once the MIDI controller is Remote enabled, exit the Preferences, head to the top right corner of Live's interface, just to the left of the CPU meter and enable the MIDI Map Mode Switch.

With MIDI Map Mode enabled, almost any control in Live can be mapped to MIDI messages.
When in MIDI Map Mode, any control you touch on the screen become the focus. Any MIDI message that Live receives whilst a control is focussed is automatically mapped to that control.
Step 3 - Setup the Clip
Select the MIDI or audio clip you want to transpose in the Session View. Transposing clips via MIDI will not work with clips in the Arrangement View.
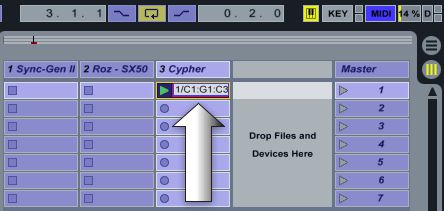
Once selected, you can give Live a key range with which to transpose the clip by. You do this by hitting three notes on your keyboard. The first note will be the root note - the note at which your clip plays at its natural pitch. Whilst keeping this key held, press the lowest and then highest keys you want to use to transpose the clip. In the clip itself, you should see the choices you made.

Here we can see that the clip is mapped between the keyrange C1 to C3 with a root note of G1.
Step 4 - Playing your clip
Hit the MIDI Map Mode Switch once more to exit MIDI Map Mode. You can now use your MIDI keyboard, in the range you set, to play and transpose your clip. If you are using an audio clip, the clip must be in Warp mode for the transposition to work.
It may be worth reducing the size of the clip's Launch Quantization value. This value dictates when the clip will be launched, and thereby transposed. Set this value to taste.

The Quantization parameter sets the value at which the clip will be launched and transposed.
Step 5 - More fun
My personal favorite way to use this fun feature is with MIDI clips. Try placing the MIDI Effect called Scale after your clip. This will force the output of that midi track to always be in a key and scale of your choice, even when you transpose it. This can be a very effective way to discover new melodies and chord progressions that you might never otherwise find.
Listen to this melody:
And then see how that melody can be transposed live whilst still playing within its original key and scale:
Whilst it's not something you might do on a day-to-day basis, transposing clips is one of those neat tricks that can fire inspiration and help with composition, live performance and sound design. Transpose away!


 © 2024 Ask.Audio
A NonLinear Educating Company
Discussion
Want to join the discussion?
Create an account or login to get started!