
Out of all the DAWs I've worked with, I'd have to say that I like the Return/Send tracks in Ableton Live better than any other. They are flexible, and provide excellent flexibility in routing. In this tutorial, I'd like to show you some fun ways to use the Send/Return tracks in Live. While I'm at it, I'll explain how they may help you reclaim some lost CPU, by spreading your plug-ins coverage across the mix, instead of individually tying up tracks.
Step 1. Set Up A Return
The beauty of a Return track is that you can insert a more CPU intensive plug-in and then spread the effect over to multiple tracks within your session, as opposed to instantiating the same effects multiple times, on to multiple instrument and audio tracks, and absolutely killing your CPU. You know, where you get hiccuping in your audio, and the computer becomes unresponsive every time you get to a certain part of your song? Let's set up a return track, now. I'll push the small 'R' button, on the right of Ableton's Session page, and instantly, the default Return tracks, A and B appear.

Like all Ableton track types, Return Tracks can hold several effects. You just drag an effect on to the Return track, and the device will be instantiated and activated, although you won't see it until you click on the Return track and look down towards the bottom of the page.
Step 2. Build up a Track? No, build up a Rack!
Now, on A, I'll drop an Audio Effect Rack, a device within Ableton that should not be underestimated! Sure, we could just throw a bunch of effects on a Return track, and call it a day. But with an Effects Rack we get a few more options. First, we can route multiple effects parameters to single knobs. Secondly, we get a way to contain and save complicated effects chains, with complicated routing.

Currently, in my session, I am getting pretty close to 60% of my processing power, using my CPU. Effects, and instruments are generally the reason for this. Real-time processing through effects puts a strain on a processor, especially reverbs and the delays.

In an effort to get back some processing, I'll take a look through my inserts and see if I find an effect that is being used multiple times in my session. As I continue to go through each track, I notice that I'm seeing several Simple Delay modules appearing on different tracks, within my session. As this is the case, I could locate one of the delays that 'is' important in my session, and drag it over to the Return track I just set up...

Or, I could simply load up a more formidable delay! Sure, Simple Delay sounds pretty good. But, if I'm going to set up a delay that I can use on multiple tracks, why not go with a really good one! I decide to drop in a Rob Papen Predator FX, into my Effects Rack. The German sound designer makes very robust synths, and effects. So robust, I normally will just use Predator for a synth, and cheaper delays, to keep my project running smooth, if I'm only running inserts.

But, since we're building up a return, let's get fancy. I just need to make sure I eliminate the other delays, before I run the session again, so I reclaim some of that processing power.

Step 3. Build an Effect
Now, we need to set up Predator FX, and get our send tracks, running. First, by pressing the 'S' button on the side of Live's Session screen, I'll expose the Send pots, so that I can get something going to my return track.

Then, I'll raise the first Send on all of my synth tracks that I want delay on, going to Send A, where my Predator FX device is located, within my Effects Rack.

So, now all we need to do is set up an effect on the Predator! I'll go ahead and choose a preset on Predator FX that has delay in the title.

Then, I'll press the Show/Hide Macro Controls on the Effects Rack. This exposes the multiple macro knobs on the Effects Rack that you can assign parameters coming from within your Effects rack plug-ins, like Predator FX.

Within the Effect Rack Macro screen, I'll press the Map button, at the top. Now, I can just tap a knob, or button, within any instrument GUI, within the Effects Rack, and it will appear in the Effects Rack as an assignable option. I'll tap the Mix knob, on the Predator FX. Now, it's an assignable parameter in the Effects Rack.

Next, with my new Mapping selected in the Effects Rack, I'll press the Map button underneath Macro 1. As soon as I do this, the FX 1 title appears on the Macro knob.

As effects assignments can get very confusing, very fast, I'll label Macro Knob 1 as 'Delay Mix'. To do this, I'll simply select it, and press Command-R. Then, all I have to do is type! Also, make sure you raise the Macro knob so that it corresponds with the setting that audibly works for you!

Step 4. Multi-FX
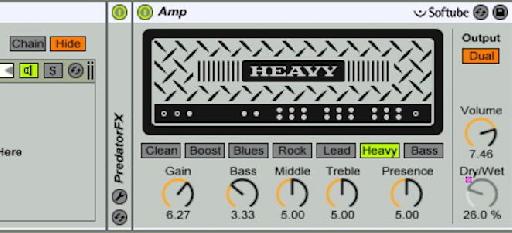
Now, I have an active Return, plus an active Effects rack, that still has plenty of Macros left. This time, I'll drop an Ableton Amp device on to the Effects Rack, within Return A. After tightening up the settings to a distortion that works for me, I'll go ahead and map the Dry/Wet knob to Macro 2, and label it as Dist Mix. This gives me the ability to raise a knob and add in either distortion, or delay. But, both effects are both coming from one single instance, and I can spread them over any track in the mix!

But, it even gets better. Because both mappings and effects are loaded into an Effect Rack, I can even save this rack, and use it again on another Ableton Session! The mappings will still be in place, I'll have multiple effects inside. Finally, I'll have great effects, inside one little rack, that I can spread around the mix, while saving some valuable CPU resources, as these hearty plug-ins, Papen and Amp, are only in my session once... but, effecting many tracks. Just make sure you drop the saved preset on a Return track, when you want to use it in a session!
Conclusion
Return tracks are not only a great way to save CPU, but they are also a great way to create an atmosphere. When multiple tracks are effected by the same effects going across, it builds an illusion that the whole 'band' is in the same room. Like real bands are. And, because we have absolute control over our effects, within the effects rack, we can continually build that room, over time, with automation and simple settings, and give our audiences something cool to hear, and give ourselves some peace of mind, knowing that our CPU isn't about to break 100% with multiple inserts, all over the place!

Discussion
Want to join the discussion?
Create an account or login to get started!