
Building up your ideas as clips and loops and then recording your performance from the Session into the Arrange view, all in direct tactile contact with the source material that inspired your latest production—that's the fun part, right? Now you're staring down a rough-hewn block of raw sequence in your timeline. What comes next? In this tutorial, we'll look at workflow tips to get your productions wrapped up more efficiently, and some handy automation techniques to imbue your final arrangements with verve and polish.
Project Organization
If you haven't already done so in the Session view, now is the time to organize your tracks. When you're trying to navigate a complex arrangement, there's nothing worse than staring down 30 tracks simply called Audio and another 40 called MIDI when you're looking for a specific sound that's hiding in your mix. It may seem tedious at first, but in the long run, it's a real time-saver, and once you're deep in your editing phase, you'll thank yourself for having labeled your tracks clearly enough to easily find your sub-bass counterpoint or string pad harmonies without having to expand or solo ten other tracks first.
Even better: develop a coherent system that's easily applied from one project to the next so it's always easy to navigate your arrangements in the same fashion. Start by giving tracks standard or at least similar names and putting them in a similar order. For myself, I've always got kicks and drums up top, followed below by bass, synths parts, vocals when applicable, and atmospheric elements, in that order so I always know where to find things no matter what project I'm working on. If you really want to go the extra mile, you can even color-code your tracks and clips for easier navigation at a glance. It's up to you how detailed you make it, but some type of coherent organization is a good habit to have—especially as you begin collaborating with other artists and taking your projects to bigger studios.
Preparation for Automation
Before getting focused on transition edits and your final mix, it's important to get your automation dialed in to ensure your composition turns out as dynamically compelling as possible.
In some cases, automation may have already been captured via controller when recording the Session take and simply needs to be reined in; in other cases, nothing will have been automated at all yet. Either way, there's a tidy technique to get all your automation parameters visible and organized so you can easily reference everything that needs to be tackled.
In the arrange view, click the track reveal button at the right edge of the arrangement, to the left of each track's title. Beneath the device and parameter selection drop-down menus is a “+” symbol in a circle; to add the currently selected parameter to a new automation lane below the main track lane, click the “+” sign.
Navigating to new parameters via these drop-down menus can be rather laborious, but thankfully there's an easier way. Double-click a track to expand its device detail view along the bottom of the screen, then find the device you want to automate, and (depending how you have your mouse or trackpad configured), right-, two-finger, or Control-click the parameter you wish to add to a new lane, and click “Show Automation In New Lane” from the context menu that appears. You can do the same for mixer parameters such as volume or send amounts by accessing their context menu the same way.

Pic 1: The context menu is your friend.
Now you can go through, track by track, and create a sort of automation task list represented by all the parameters added to automation lanes using this method. Once the lanes are in place, they can be re-ordered by dragging them up or down by their title at right. To be clear, clicking the “-” button beside an automation lane only gets rid of the viewing lane, not the automation data itself. You can hide and show all dedicated automation lanes via the automation reveal button beneath a track's drop-down menus, left of the “+” button.
| PRO-TIP: To automate parameters from a third-party VST or AU device, click the device reveal button located to the right of the on/off toggle. If it's a simple device with only a handful of parameters, they'll be displayed to the right of the device view area. If it's a complex instrument or effect with lots of parameters, you'll see a Configure button: click this to open the GUI; now, each parameter you twist on the GUI will display a corresponding parameter slider in the expanded device view. While in Configuration mode, each added parameter will show a green box overlay; to delete an unnecessary or unintended parameter, click it with your mouse to select it and just hit delete. Exit Configuration mode by clicking the Configure button again, and now your configured parameters are available for automation, Macro and MIDI assignment, just like the parameters of any Live device. |
Point Break
Now you've got all the instrument, effect and mixer parameters you need to edit all lined up. What now? In context it's all going to be parameter-dependent, but here's a few tips to automate your filters, effects, sends and more swiftly and accurately.
The distinction between Live's editing tools is stark when it comes to automation. The Draw tool edits parameters in segments quantized to the arrangement time ruler. For smaller segments, use Command-1, for wider segments, Command-2, and for triplets, Command-3. You can also access these along with zoom settings via the timeline context menu. Editing automation with the Draw tool is particularly useful for momentary effects, such as throwing a dub echo on a single snare hit via one of your sends. It's also good for automating elements that are either non-continuous, or where changes can occur in stepped intervals. To draw automation freehand, you can use Command-4 to toggle the entire arrangement note grid off and on—or just hold down the Option key while drawing to make your own crazy, un-quantized shapes.
Switching to the Edit tool via the B key or the pencil box in the right of Live's upper transport area, any parameters edited with the Draw tool or recorded via MIDI now show up as breakpoints: little circles along the red automation envelope (an as-yet un-automated envelope shows up as a lighter pink dotted line). Click on the envelope to create a new breakpoint; click a breakpoint circle once to delete it; click, hold and drag a breakpoint to move it. You can also hover above an envelope segment between breakpoints; once the segment turns blue, click and hold to drag the entire envelope segment up or down.
To adjust a breakpoint value in finer increments, hold down Command while dragging up or down. Now this is important: when a section of time is selected—highlighted light blue—moving any breakpoint or segment within the selected timespan moves all of the automation within that timespan; if you don't wish this to be the case, click elsewhere in the arrangement to deselect the region so you can go back to editing on a per-breakpoint basis.
Curves for Days
As of Live 9, a great new automation feature is the implementation of Bezier curves: hover above an envelope segment between breakpoints until it turns blue, then hold down the Option key and drag up or down to impose a curve, which varies in shape depending how far up or down you drag while still holding the Option key. Smooth, non-linear slopes are now easily generated where dozens of breakpoints would have been required in previous versions of Live.
| PRO-TIP: Sometimes, the interplay between Draw and Edit modes is just what you need to accomplish a swift fade. To quickly create a ramp up to full parameter value, use the Draw tool to boost a parameter to maximum value over the entire desired ramp area. Then hit the B key to switch back to the edit mode and click the upper left breakpoint to delete it: now you have a perfect triangular ramp from minimum to maximum value over the desired time, dropping back to minimum afterward. This technique can be applied for fade-outs or any other automation slope you need, up or down, adjusted as necessary, and can of course be augmented via Bezier curves to fine tune the onset of your parameters. |
It's nice to have your automation viewable in multiple lanes simultaneously to get a look at how different parameters interact with one another—but it's even more important so that automation can be edited independently of audio or MIDI clip data. You can select a span of automation in one or multiple lanes, then copy it (Command-C) and paste it (Command-V) to wherever you click to place the cursor in the same automation lane – or even on another parameter's automation lane. You can also select a span of automation and use the handy duplicate command (Command-D) do duplicate it as many times as you need. To quickly generate non-repetitive automation, select an irregular span of, say, 23 bars of automation, and duplicate as many times as you need; since it won't synchronize with standard 8-bar phrasing, it generates a more dynamic sounding automation which can of course be fine-tuned as needed.

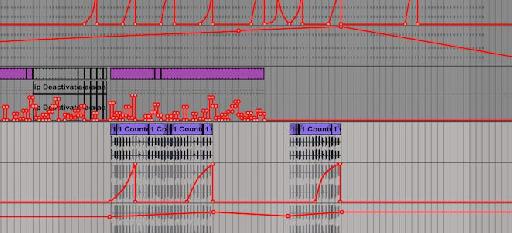
Pic 2: Automation—it takes all kinds.
Finally, above track titles in the Arrangement view is the automation lock: a small lock button. When activated (orange), automation is locked in place and won't be moved around along with clips. When deactivated (grey), automation is unlocked, and will move around along with clips as they are copied, pasted, or dragged elsewhere in the arrangement. As with many of the techniques discussed above, it's a matter of context: in some cases you'll want the filter automation to be copied along with a bass line, in some cases you won't. Knowing what you want to achieve is half the battle—and when it comes to Live automation, having these techniques at your disposal should help take care of the other half.

Discussion
Want to join the discussion?
Create an account or login to get started!