Ableton’s Racks essentially comprise a modular sound design system and figure prominently as one of Live’s more powerful features for sound designers and musicians alike. This tutorial explores some tips and hidden features to inspire and streamline your MIDI Effect, Audio Effect, and Instrument Rack builds in Ableton’s Live 9.
1. Chain Selector Morphing
Clicking the Chain button to access the Chain Selector assignments allows you to scroll and morph between different Chains by dragging the orange line at the top - the Selector - so long as they’re assigned to different values, represented by the bluish bars to the right of each Chain. By default, all Chains are assigned to a standard value of zero which means that dragging the selector anywhere to the right means no Chains will play. Grabbing the edge of a Chain’s selection zone bar allows you to stretch it out to a wider range, while grabbing the lighter, narrower bar above it allows you to create smooth fades on either side. To quickly distribute all Chains to roughly equal areas, secondary-click on any Chain zone bar and select “Distribute Ranges Equally” from the menu that appears. Use the Shift key and make a multi-selection to adjust multiple Chain selection zones simultaneously. The Chain selector works identically in MIDI Effect, Audio Effect, and Instrument Racks, allowing for all sorts of dynamic morphing between signal paths and timbres – and can of course be assigned to a Macro dial for easier control.
2. Dynamically Reactive Zones
Programmed almost identically to the Chain selector zones, the Instrument Rack’s Key zones allow you to map each Chain to its own range of incoming MIDI notes, stacked or separately. Green bars with fades replace the bluish ones from the Chain selector. Programming the Key zones cleverly can add dynamism to melodies as different notes trigger different instruments, or can simply be used to play for example a bass instrument with the left and a lead with the right. Instrument Rack Velocity zones determine which Chains are triggered by which range of incoming velocities, adding enhanced dynamism to any performance. For potentially mind-bending results, try adding randomization to a Velocity MIDI Effect placed before an Instrument Rack to randomize which instruments are triggered.
3. Siblings & Twins
When you have multiple instances of the same device instantiated on different Chains of a Rack, you can easily copy a parameter value to the other devices on neighboring Chains using the Copy Value to Siblings option: secondary-click the desired parameter and select “Copy Value to Siblings” from the context menu that appears; a number in parentheses next to the option denotes the number of available Sibling targets. You can easily create new duplicate Chains by selecting a Chain in the Chain view and hitting CMD+D. In doing so, all Macro assignments of the duplicated Rack are copied as well, so bear that in mind as it's highly useful in some situations, less so in others.
4. Macro Navigation
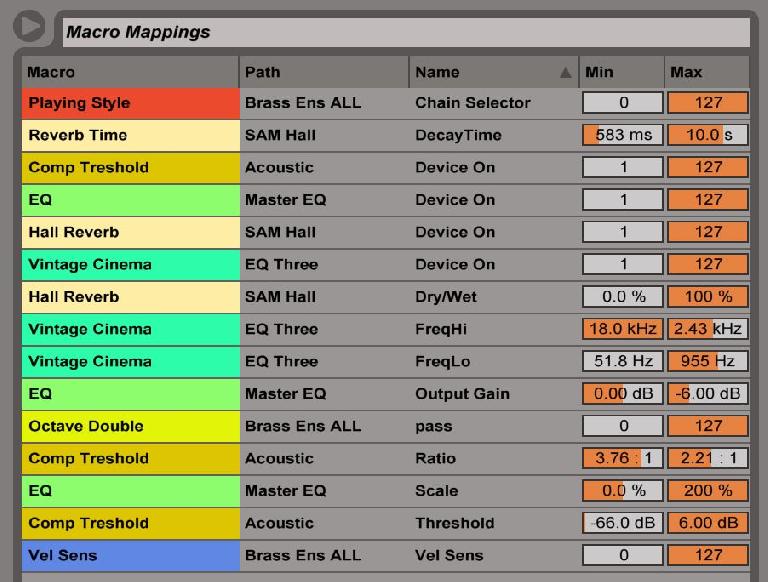
Entering Macro mapping mode via the Map button, the Macro mapping browser inhabits the standard browser tab at the GUI’s upper left, providing quick access to all Macro mapped parameters. Clicking the title tab at the top of each Macro category reorders them to more rapidly locate specific parameters in a complex Rack - Macro orders by the title given to the Macro controlling the parameter, Path by the name of the device the parameter is actually located in, and Name by the original name of the parameter itself. Clicking the same title bar again reverses the same listing’s alphabetical order.
5. Macro Programming
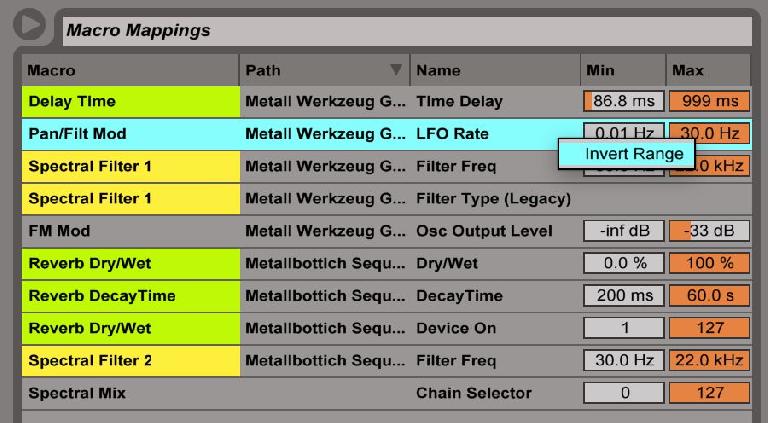
In the Macro mapping browser, the Min and Max values of each parameter can be adjusted to constrain Macro parameter control to musically optimal ranges. Don’t want your Filter Cutoff going below 100hz, or your Delay Feedback over 90%? Just type in the desired value or drag the mouse accordingly. You can easily flip the values so Macro dial behavior is reversed by secondary-clicking the Macro mapping and selecting “Invert Range” from the resulting context menu and this is useful if you want the twist of a Macro to move two simultaneously assigned parameters in opposite directions. If you have Racks nested within each other and can’t map a parameter to a desired Macro, that probably means it’s buried one or more Rack levels down: map the parameter to a Macro of its own Rack to enable mapping it to the Rack one level above – and so on and so forth, right on up to the ultimate parent Rack.
6. Better Rack Mixing
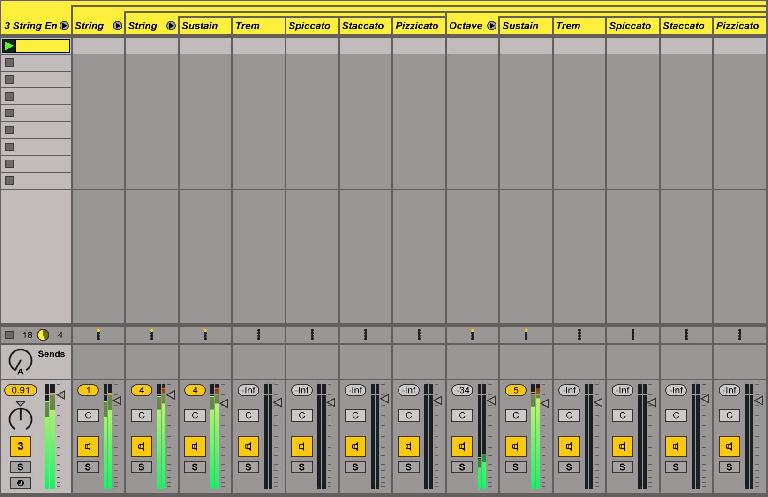
While each Chain’s volume, panning, activation and solo are accessible in the Rack Chain view, the meagre metering and tiny faders on hand are rarely sufficient. To remedy this, Instrument Rack tracks contain a reveal button in their track header. Click the triangle in the circle at the right of the track’s header to unfold and reveal all Chains as separate track channels for a far more generous mix reference. Clicking the header of each Chain’s sub-track representation displays strictly the devices contained on that Chain in the detail view below.
7. Default Bootstrapping
As you create more and more complicated Racks, you might begin to see it as a modular programming system. At this point it’s advisable to begin saving not just your full Racks but component Racks within them, if applicable, for easy implementation in future builds. All of this can be achieved via the standard Save disk button in the Rack’s title bar. You can also save an empty Instrument Rack as your default Instrument Rack by secondary-clicking on the device title bar and selecting “Save As Default Preset” from the menu that appears, saving you the hassle of always mapping the Chain selector, for example, to the bottom right Macro, which serves to help find that same parameter in the same Macro location on all your future devices.
Learn all about Racks in Ableton Live this video course by DJ Kiva on building DJ effects racks.


 © 2024 Ask.Audio
A NonLinear Educating Company
Discussion
Want to join the discussion?
Create an account or login to get started!