
Whether you're new to Reason, or an old hand, you've probably noticed that there are many little tricks for editing MIDI data. Knowing these tricks can be so helpful in not only getting some amazingly polished drum patterns, basslines, and lead melodies, but they also just expedite the whole songwriting process. In this tutorial, let's take a look at 7 MIDI editing tips for Reason 7 that really could change your whole workflow.
Tip 1 - Shift Selection
In any DAW, editing MIDI can be tedious. This is especially true when editing drums, particularly hi-hats that are working in a 16th note resolutions, or even higher. One easy trick to quickly edit and tame multiple drum hits is through the use of the Shift key.
The next time you're editing MIDI drum sequences in Reason and want to quickly edit velocities of several notes at once, hold down Shift and click on several different notes, in or out of order. Try clicking one note in one portion of a measure and then select another note, in an entirely different part of the sequence (it's possible to select notes out of order).

| Bonus Tip: You'll also notice that while holding down the Shift key, you can edit velocities of the selected notes, without affecting the deselected notes. |

Tip 2 - Command that MIDI!
When you hold down the Command key while in the Sequencer screen, you'll notice that the cursor changes to the Pencil tool. Granted, you can easily press W on your keyboard to bring up the Pencil and Q to get back to the Selection Tool, but by holding down Command, you eliminate that step and are able to do quick, tight, little edits wherever you need to.

When you hold down Shift and Command at the same time, you'll find that you can safely edit Velocities, as I mentioned above, without affecting other notes. And, once you depress both keys, you're back to a cursor, and you can move to other sequences that need more attention!
Tip 3 - Option-Command the Grid
Another handy tip, especially for drum editing is the Option-Command shortcut. When you do press these two keys at once in the Velocity editor, your cursor turns into a Line tool.

If you click on an area within the Velocity editor while holding down Option-Command and drag, you'll notice a line appears behind the cursor. You can use this line to create easy, gradual fades.

And, if you hold down the Shift key, while holding down Option-Command, you're only fading the notes selected. By having diverse, and rhythmic velocities for your drums, you'll create some beats that people will swear were made by a drummer.
Tip 4 - Scale On the Fly!
Do you enjoy switching your drums to half-time several times during your song? If this is true, you'll want to spend some time with the Scale Tempo command, which is found in the Tools window, as well as being available as another shortcut.
Try this out! When you hover near the edge of a MIDI clip, while holding down the Option key, the cursor will change to a clock. If you continue to hold down Option and drag the edge of the cursor either left or right, you'll notice that you can now drag the edge of the clip and the MIDI content in the clip will elastically be resized.

Tip 5 - Alter Notes
One thing that can be frustrating is having to go back and listen to a song that has the same MIDI drum pattern going on, through the whole song. Thankfully, there are functions like Alter Notes, where you can direct Reason to rearrange a few notes in a sequence, or a lot of notes, depending on what you want.
The true Alter Notes for MIDI sequencing is actually buried in the Tools window, but if you're working in the Matrix, the function exists there, too. With the Tools window, however, you can actually select several specific notes, and then alter.

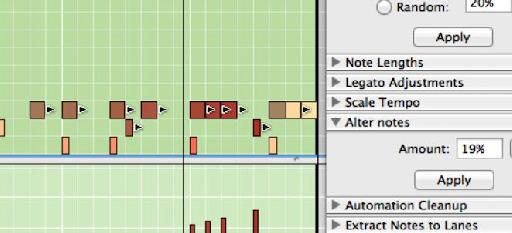
Select some MIDI notes and then, in the Alter Notes section of the Tools window, choose the percentage for how much alteration you want on your MIDI clip. I usually go with somewhere around 19%. At this percentage, most of the original pattern will still be intact. Only some of the notes will be altered. This is awesome, because we can just Alter Notes a couple of times, and suddenly, we have a nice fill, or new breakbeat, or something that we didn't even anticipate. Use Alter Notes to add diversity and humanity to your drums, melodies, and more. You'll sound like the most creative person on the planet!
Tip 6 - Explode
If you're one of those producers that likes to have every drum on a different lane, or track, you'll really want to take a look at the Explode function.
To use it, select a MIDI Clip (preferably drums) and select Explode. Once this is done, Reason will put all different keys played to create your MIDI drum clip onto separate lanes, based on note information. The end result is having the kick drum on its own lane, as it is only triggered on C1, so C1 gets its own lane. The snare will be placed on its own lane, as it was always only on D1. Essentially, Explode means that Reason took all of the work we would've had to do ourselves, through copying and pasting, and just broke it down for us, quickly and easily.

Tip 7 - Snap
Perhaps one of the most crucial tips I can give would be understanding that through adjusting the resolution of the Snap, in Reason's editor, it's possible to make some seriously complex drum patterns.
I can start off working in an 8th note resolution. This means that any notes I add will only appear as 8th notes, in the sequencer window.

So, I can establish my basic hi-hat rhythm in 8th notes, and when I'm ready I can switch to a 16th note resolution, to change up the 8th note pattern, and add in a little shuffle.

If I feel like being really tweaky, I can move my resolution up to 32nd, or 64th notes. In this resolution, I can draw in rapid little shuffles that really change up the pattern, in a good way.

Conclusion
Reason is an incredibly deep program. As such, there are tons of techniques, tricks, and shortcuts. It is my hope that these tips inspire you to get in there and make some amazing MIDI, of your own. As well as make your editing quicker, and smoother!

Discussion
Want to join the discussion?
Create an account or login to get started!