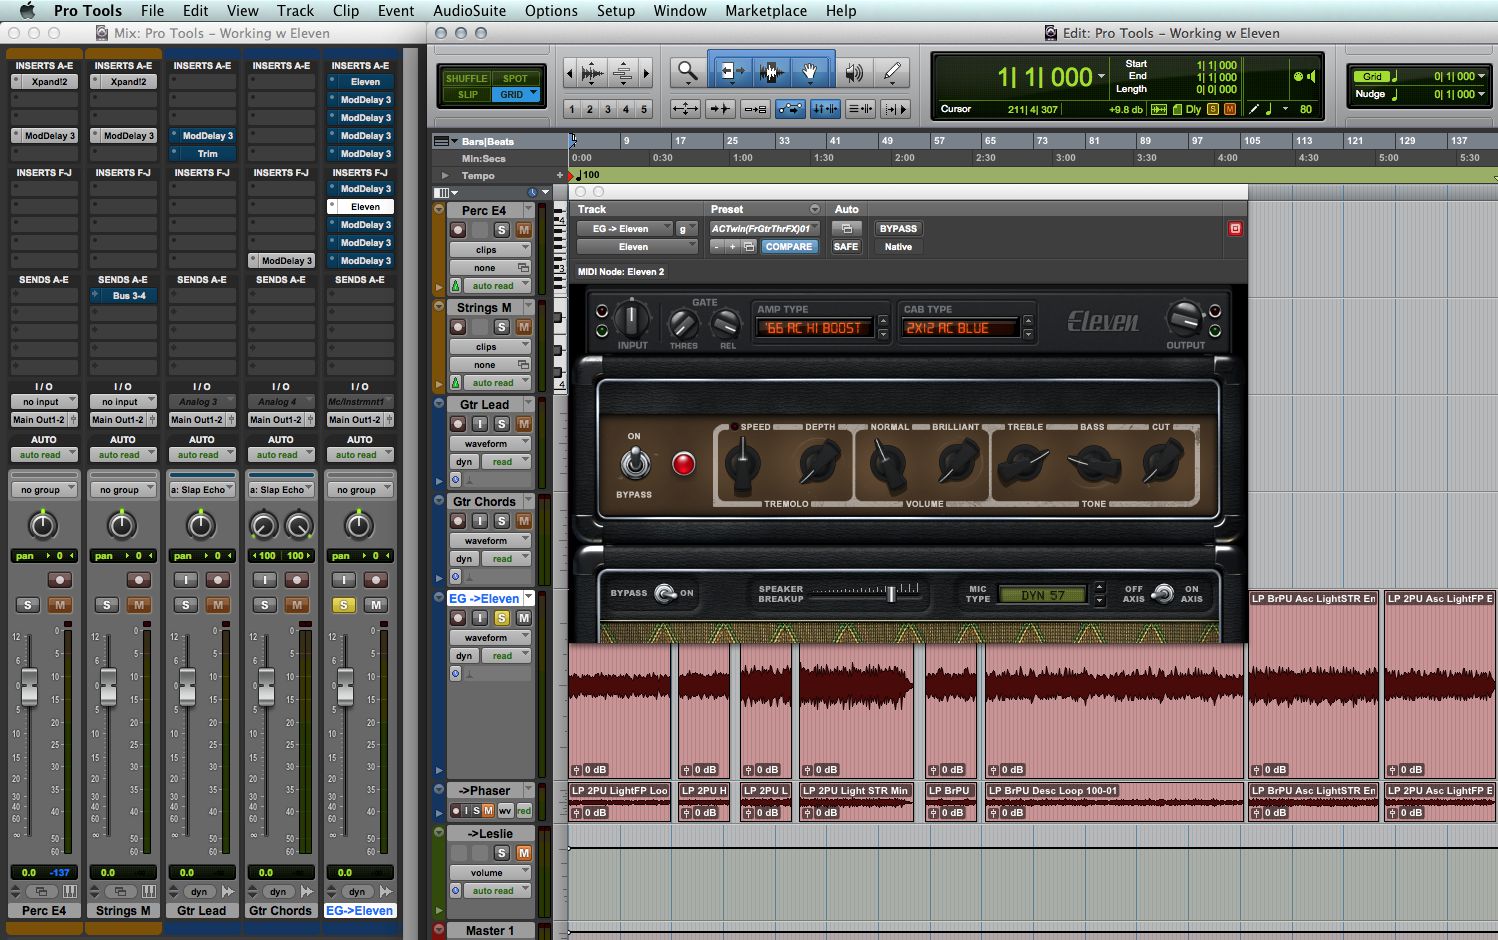
There's no shortage of guitar amp simulations (sims) these days—in addition to a plethora of third-party hardware and software, most DAWs include their own suite of modeled amps and speakers. Pro Tools' offering is Eleven (which takes its name from the classic comedy film “This Is Spinal Tap”), a collection of 16 modeled guitar amps with matching cabinets, along with a choice of virtual mics. While the experience of playing a DI'd guitar through an amp sim plug-in may not be quite the same as playing through a real miked-up amp, in playback the best of these software emulations are virtually indistinguishable from the real thing—as long as they're set up correctly.
Figure 1—Pro Tools' Eleven Guitar Amp Simulator.
It's easy to record or reamp a guitar track with a plug-in amp sim: just plug the guitar directly into the interface, setup the plug-in, dial up the sound, and Bob's your uncle. But, from a technical standpoint, plugging an electric guitar into an interface is not the same as plugging one into a real amp, and that's a critical distinction. A big part of what defines the unique qualities of classic amps is the signal transfer from guitar to amp, and from amp to speaker. If the input and gain staging of a guitar signal running through an interface and plug-in is not properly set up, the simulation won't respond that way the original would have, and the result will be a less-than-accurate, and a far-less-than-ideal, amp sound. There are a number of aspects of setting up and managing signal flow that need to be addressed, to get the best out of software amp sims, and these tips should be helpful in addressing those considerations in Eleven (though they'd apply to any virtual amp plug-in as well).
The input—the right way to DI
An electric guitar, with traditional passive pickups, requires a very high input impedance (Z-in) in the device it's plugged into to transfer the sound of the guitar without compromise. Guitar amps typically have an input impedance of at least around 1 megohm. Line level inputs, however—like the ones you'd find in a DAW Interface—usually have a lower input impedance, and plugging a guitar straight into one will likely result in a compromised signal, in terms of level, distortion, and frequency balance. If the guitar signal is compromised at this early stage, even the best amp plug-ins may sound weak and thin.
Figure 2—DAW interfaces with Dual Mic or Instrument inputs.
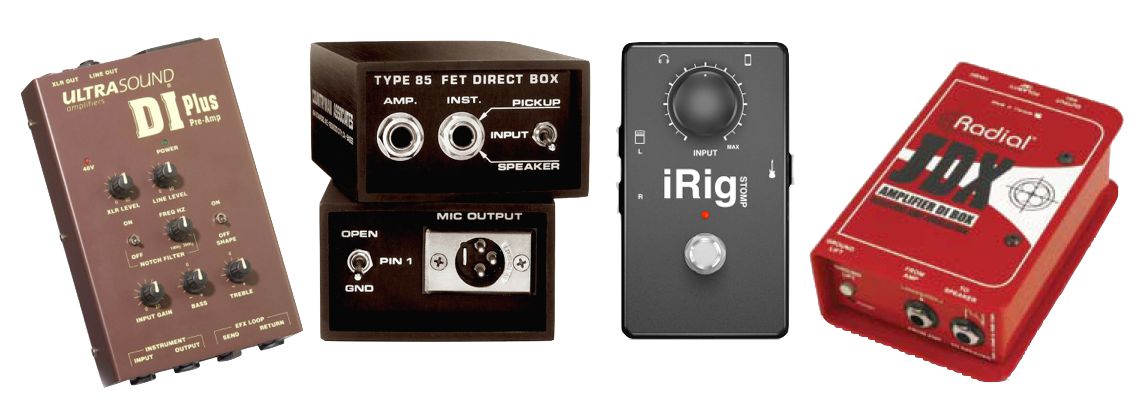
If an interface has an “Instrument” input, this would be the one to use [Fig 2]—by “instrument” they mean electric guitar or bass, and this connection will have the right impedance and gain to transfer the signal properly into the converter and DAW, insuring that you start off with the true sound of the guitar. If no such input is available, then you'll need a DI—a “Direct Input” or “Direct Injection” outboard box [Fig 3], which will accept the guitar signal properly, and pass it on to any standard line (or mic) level input. These are widely available, not only for computer-based rigs, but even for use with phone or tablet-based guitar sims.
Figure 3—Various DI Boxes for guitar.
Calibrating i/o levels
When a guitar is plugged into a real amp, the level of the signal that hits the input stages—tubes and other components—is the level coming straight off the guitar. But with the guitar running through an interface/DI, there'll likely be additional input gain controls. Amp simulators, which mimic the behavior of the real circuitry, are designed to respond to signals at the level they'd be at the input stage of the real amp. But, with the additional input level controls on interfaces and DIs, how do you know that your guitar signal is at the correct level—one that will assure that the virtual amp's sound response will properly mirror the sound and response of the original amp being emulated?
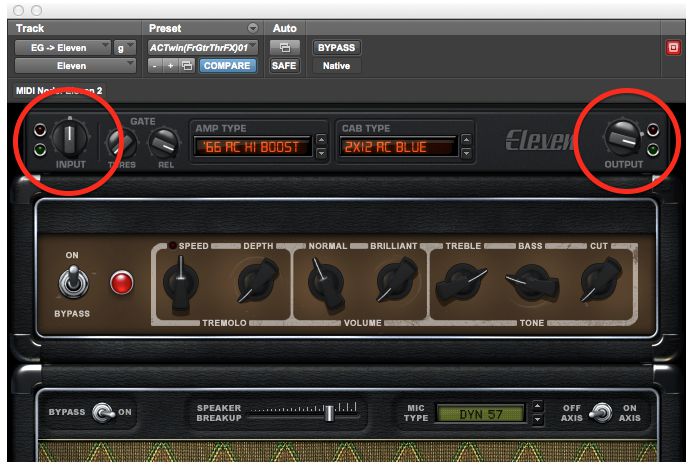
To get the best, and more importantly, the most realistic response from the virtual amp's controls, you need to calibrate your input level. This can be done on the hardware, if there's an input gain setting, or if not, Eleven (like most amp sims) has an Input level control for this purpose [Fig 4]. This is not part of the simulation, and won't introduce any nice simulated overdrive—it's just there to insure that the incoming signal level is a good match for what the virtual circuitry is expecting to see. An accompanying pair of LEDs indicate signal level—green, yellow, orange or red, with a clipping indicator. To calibrate, Avid recommends strumming as hard as possible, and setting the input level (ideally with the interface's input knob, with the plug-in input gain at its default of Unity Gain) to a maximum of yellow or orange. If your guitar has single-coil pickups, I'd go with yellow (-8 to -4 dB); for humbuckers, I'd go with orange (-4 to 0 dB).
Figure 4—Eleven's Input & Ouput Level Calibration Controls.
Once you've made this setting, it should be fine for any instruments with passive pickups (you might need to back off a little if someone brings in a guitar with active pickups). The gain controls that are part of the amp sim itself will now introduce the proper amount of simulated overdrive, at settings similar to those on the real thing, insuring not only the intended distortion quality, but familiar behavior when dialing up amp tones.
If you look to the right of the Input control, you'll see that there's also an Output knob [Fig 4]. Once, again, this is not part of the actual amp sim, it's just a neutral level control for adjusting the level of the signal after it's passed through the virtual amp and speakers. The output control (Master Volume) that's part of the simulation itself [Fig 5] will affect not only level, but also tone and distortion, and so should be used as part of sculpting the tone, not for simple level tweaks. Once the desired sound is dialed up with all the virtual amp knobs, the Output control should then be used to restore the signal to an appropriate level to pass along to the next plug-in or mixing stage.
Amp Gain vs. Master
Experienced guitarists will already know this, but for anyone else who may be using Eleven, it's important to be familiar with the distinction between the amp sim's Gain or Drive (input level) control and the Master (output level) control [Fig 5], on amps which have both (usually high-gain amps).
Figure 5—An Eleven Amp Sim's Preamp Gain (Drive) vs. Poweramp Master Volume.
The input Gain knob affects the level being fed into the virtual preamp tubes, while the Master knob affects the level hitting the virtual power amp tubes. Preamp tubes, when they distort, tend to have a brighter, “fizzier” distortion quality, while overdriven power amp tubes tend to have more of a “crunchy” or “grinding” quality. With many classic real amps, the sound of power tube overdrive is more distinctive—the quality that is often associated with that amp's characteristic “sound”—so pushing the input Gain and not hitting the Master very hard may not provide the sound you're expecting. It really depends on musical style, and that's also the reason for the separate Output control, above—it lets you dial up as much edge as you want from both sets of virtual tubes, and still be able to have a reasonable level exiting the plug-in, without compromising tone by having to lower the virtual amp's Master Volume.
Bypass options
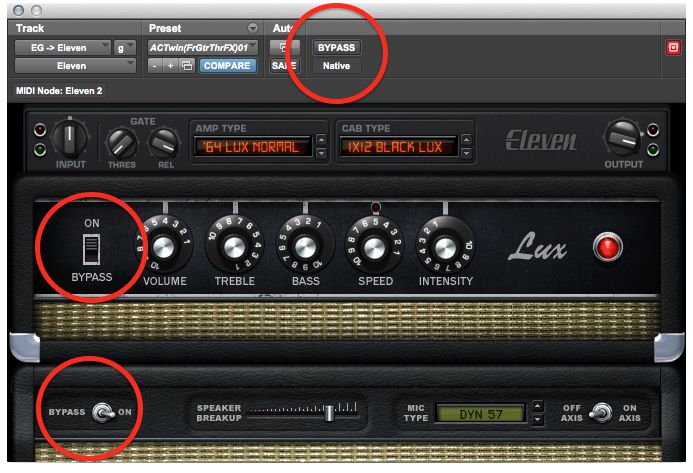
There are no less than three bypass options in Eleven. There's the usual plug-in bypass—the one you find in the header of all plug-ins [Fig 6]. This, as I'm sure you know, bypasses the plug-in in its entirety, passing just the unadulterated signal through, with no effect at all. But below that, as part of the amp simulation, there's another bypass switch, which bypasses only the virtual amp. The difference here is that the simulated speaker cabinet and microphone are still active, for situations where you might want the coloration those components contribute, without any edge from the amp section—suitable, perhaps, for running electric pianos or synths through the plug-in, or even for voices, for a little clean coloration.
Figure 6—Eleven's Three Bypass Options.
The third bypass control is for the speaker/mic section. Engaging Bypass here passes the processed signal from the virtual amp's output, but without the speaker and mic colorations. This can be handy if you want to use a different cabinet simulation—many people might like to use Impulse Responses (digital samples) of their favorite speakers/cabinets, in place of the ones that come with Eleven.
Speaker/mic options
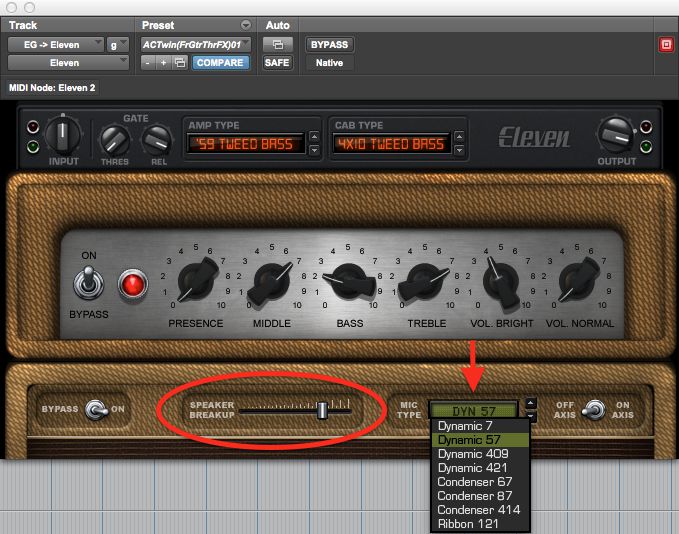
While we're down there, let me finish up by mentioning Eleven's options for adjusting the speaker and mic simulations. One really nice touch is the Speaker Breakup slider. In the real world, preamp and poweramp tubes are not the only source of distortion—the guitar cabinet's speakers will also break up a bit, when driven hard. This has its own subtle quality, and adds a little extra something to the overall sound. Most amp sims don't address this, but Eleven lets you dial up as much of it as you'd like, for that extra touch of subtle realism.
Figure 7—Eleven's Speaker Breakup & Mic Selection Options.
Finally, the last part of the virtual chain is the choice of mic simulations. Different mics impart their own coloration to the overall sound—some mics are better for some amps, and swapping the mic out when mixing is a good way to subtly change how the track sits in the mix, without making more obvious adjustments with EQ. Like with most amp sims, Avid doesn't name the specific mics modeled—most people will know them from the names or model numbers they do use. But if anyone's wondering, here's what's what:
• Dynamic 7 = Shure SM7 (high-end dynamic vocal/instrument mic)
• Dynamic 57 = Shure SM 57 (the ubiquitous instrument mic, and most engineers' go-to mic for guitar amps and snare drums)
• Dynamic 409 = Sennheiser MD 409 (a dynamic mic, popular on amps and toms)
• Dynamic 421 = Sennheiser 421 (a classic dynamic mic, known for its crisp sound, also very popular for amps and drums)
• Condenser 67 = Neumann U67 (a classic tube condenser mic—a vintage studio standard)
• Condenser 87 = Neumann U87 (a classic (solid-state) condenser mic—a modern studio standard)
• Condenser 414 = AKG 414 (another classic condenser, with a drier, tighter sound than the Neumanns)
• Ribbon 121 = Royer R-121 (a high-end modern ribbon mic, with a warm sound, typical of ribbons)
In real cabinet miking, dynamics are usually used up-close (an inch or so from the speaker), and condensers and ribbons are often used at a slightly greater distance (several inches to several feet), for a more open sound, so, even though Avid doesn't specify virtual distance, you can probably expect similar subtleties for these simulated options.
Wrap-up
Of course, most of time you spend working with an amp sim is probably spent twiddling the amp's Drive and Tone controls, but these additional adjustments, especially the gain-staging, are an equally important part of achieving the perfect amp sound, and making sure that you get the best out of plug-ins like Eleven.



_vs_poweramp_master_volume.jpg)
 © 2024 Ask.Audio
A NonLinear Educating Company
Discussion
Want to join the discussion?
Create an account or login to get started!