
| Learn more about Revoice Pro 3 in this excellent video course at AskVideo.com: Revoice Revealed |
For many years, Synchro Arts' VocALign—probably most widely known as an AudioSuite plug-in for Pro Tools—was the secret weapon for a host of audio editors, especially in the Post Production world, and now its big brother Revoice Pro has taken up the baton. Revoice Pro, currently at v3, is a standalone application that is designed to be a one-stop solution for pitch & time editing, specializing in (though not limited to) auto-aligning one audio take to another. It's a fantastic timesaver for both music and Post (voice) applications, for anyone who needs to grab an alternate take—like a line of replacement dialog—and time (& pitch) align it to the original source audio it'll be replacing, maintaining perfect timing and lip-sync, in a fraction of the time it would take to do this manually, even with today's cutting edge time & pitch editing tools.
Besides its auto-aligning specialty, Revoice also provides fast Doubling effects, ranging from the tight sheen of massed backing vocals, to loose, human-sounding ADT. And for those occasional situations where even Revoice's automatic processing may need a little manual tweaking, there's a complete set of Warp editing tools, that can be applied to multiple layered parts.

Fig 1 The various Processes & tools in Revoice Pro.
Since Revoice Pro is all about speed—taking tasks that would be possible via manual editing, but so time-consuming as to be impractical, and rendering them at the push of a button—the most effective use of this program will be enjoyed by taking advantage of the opportunities it provides for maximum efficiency. This article will go through—in no particular order—5 suggestions for achieving especially efficient workflow in Revoice.
1) Use keyboard shortcuts
This advice, of course, applies to just about any audio application, but with Revoice's design, and the often repetitive nature of the editing tasks it's put to (replacing/aligning phrase after phrase of dialog, for example), it's really imperative to get a rhythm going. There are many shortcuts available, and some are pretty standard (like Spacebar for Play/Stop), but here are a few that control the most frequent actions.
Soloing back & forth between source (Guide) audio tracks, replacement (Dub) takes, and finished, aligned (rendered Output) audiofiles will be done constantly—Revoice offers several shortcuts. Revoice's APT (Audio Performance Transfer—auto-alignment) function involves three tracks, as I just described, and arranges a set of adjacent QWERTY keys to very quickly solo them alone, or in combinations.

Fig 2 Some of the keyboard shortcuts that are integral to the speed & efficiency of Revoice's workflow.
“A” solos the Aligned (rendered, finished) Output track; “D” the Dub (replacement take, prior to alignment); and “G” the Guide (source) recording—the timing (& pitch) reference. The in-between keys solo combinations (“S” = Output+Dub; “F” = Dub+Guide), and “E” solos the Guide (source) and Output (aligned), for the final check. For processes that may involve more than three tracks (like multiple Doublings), the number keys solo tracks in order, and Option/Alt+Numeric Keypad numbers provide exclusive soloing.
“R” and “T” zoom horizontally, and the main processing windows can also be opened more efficiently via key command—“B” opens the New Process Window (the start of every operation), “N” creates the new, processed audio, and “P” opens the Process Settings Window, where you can tweak the settings that determine the quality of the effects (see below).
There are plenty more, and the amount of mousing around these shortcuts save really does speed up repetitive sessions to a significant degree—even more so than in many apps.
2) Monitor through the main DAW
Though it's a standalone app, in use Revoice can feel almost more like a plug-in. It comes with helper plug-ins, in all formats (VST, AU, AAX, AudioSuite) to integrate as seamlessly as possible with the main DAW.

Fig 3 Revoice's Link plug-ins, for transferring audio, in various DAWs.
One of these is the Revoice Pro Monitor plug. This can be inserted on a track in the main DAW, and it offers you a choice, as you work—you can monitor directly in Revoice, through whatever output you've set in its Preferences, or you can monitor through the DAW, hearing your edits-in-progress in context, along with other tracks and video.
If you open the Monitor in a spare (stereo) Aux, you can (at the push of a Solo button) listen to just the track(s) you're working on, or hear everything (including effects), to see if the time (& pitch) tweaks you're making work with other tracks (like instrument accompaniment, for example, in a music session).

Fig 4 The Revoice Pro Monitor plug-in lets you choose to audition edits in isolation, in Revoice, or in context, through the DAW.
With dialog-to-picture sessions, you can align Dub (replacement) takes by ear at first, auditioning without distraction from within Revoice, then flip to the DAW with a Video window open and play from there, to verify that the lip-sync of the aligned Dub is working as well as required.
3) Work with Revoice without leaving the DAW (Pro Tools only)
The other helper plug-ins Revoice provides are for transferring audio quickly from the DAW to Revoice (and in one case, back again as well). These work well for all DAWs (Fig 3), moving time-stamped audio into Revoice with no more effort than it always took to “capture” the audio in the VocAlign plug-in (it's the exact same procedure, in fact). But Pro Tools users have an extra goodie, thanks to the AudioSuite plug-in format. Revoice provides two AS plug-ins—Quick APT & Quick Doubler—that manage the transfer of audio to and from Revoice invisibly in the background. While Revoice must be open in the background for this work, you never have to visit it, you can perform edits right within Pro Tools, duplicating the automatic workflow of the VocALign plug-in (and extending that workflow to Revoice's Doubling process as well).
 let you use Revoice's tools without leaving the DAW.")
Fig 5 The Quick APT & Quick Doubler AudioSuite plug-ins (for Pro Tools) let you use Revoice's tools without leaving the DAW.
But if you need to customize any aspect of the algorithms that do the processing for a particular session, you can create a preset of your own at any time, and save it as the “User Default Preset”. Your custom settings will then be applied every time you do an automatic edit in the Quick Process plug-ins within Pro Tools. When the work is done, you save the Pro Tools session (with the new rendered, processed audio files), and Revoice simply tosses the temporary background session—and you're good to go.
4) Create “Protected Areas” to deal with problem audio
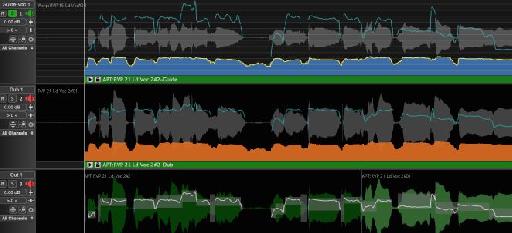
Sometimes, when aligning a replacement (Dub) take to a source (Guide) take (the APT Process), the Dub won't match every word and sound in the Guide closely enough, and the matching algorithm will be thrown off, resulting in an obvious mis-alignment. Words in one take but not the other, gaps in the Dub, breaths or other sounds in one take only—any of these can cause the automatic alignment to fail (to some degree). You could divide up the audio into even smaller segments, but a more efficient solution might be to create what Revoice calls a “Protected Area” in the Dub (replacement) track, around a section where the Dub's content is not a close-enough match for the Guide's. This selection tells the Process algorithm to ignore that section of the Dub, and use only the sections of the replacement audio that correspond well to the original reference (for example, ignore a breath in the Dub that's not there in the Guide—don't try fruitlessly to find a match for it). This feature will let you continue to work on reasonably-sized sections of audio, without the inevitable discrepancies tripping up the process.
 “Protected Area” in the Dub track isolates a missing word in the dub take, solving a problematic APT time-alignment.")
Fig 6 The selected (red) “Protected Area” in the Dub track isolates a missing word in the dub take, solving a problematic APT time-alignment.
5) Create & Save your own Process Settings for fast customized effects
While Revoice is all about fast, automatic processing, it does offer control over the behind-the-scenes algorithms that do the analysis and processing. Each of the three Processes—APT (Audio Process Transfer—auto-alignment), Doubling, and Warp editing—has its own under-the-hood settings, and they can have a significant effect on the results. Here's a quick example.
The Doubler Process has some particularly interesting settings. Besides the obvious (delay time), you can add various types of modulation: You have LFO Modulation, for subtle chorusing. There's Random modulation, for a more natural, human doubling effect—this is the secret ingredient of classic varispeed tape-based ADT effects (Abbey Road). Artificial Vibrato can be added—if a held note is too static, adding a doubled part may sound too synth-y; having the double's vibrato shifting against the original can provide some welcome animation. You can even Formant-shift the doubled part, to subtly suggest a different singer, or at least a different tone, for the copy. Put these all together, in very subtle amounts, and you've got a much richer Doubling effect than most simple delay plug-ins provide.

Fig 7 The various modulation options in the Doubler Process Settings window; custom settings can be saved as User presets or as a User Default.
Once you've tweaked these options, to achieve the quality of Doubling best suited to the particular project you're currently working on, you can save these custom settings as a preset, or even as the User Default preset, to save time as you call them up repeatedly to create multiple doublings. And when you're all done, you can simply revert to the standard Factory Defaults (or set any other settings as the Default), for the next project.
So these are just a few simple suggestions for maximizing workflow—and sound quality—in Revoice Pro. Revoice is one of those programs that's so easy to work with, that you could easily overlook some of the options to make it even better, but taking a minute to optimize different aspects will pay off with even more efficient sessions and better-sounding results.
| Learn more about Revoice Pro 3 in this excellent video course at AskVideo.com: Revoice Revealed |

Discussion
Want to join the discussion?
Create an account or login to get started!