MIDI editing is generally a pretty straightforward task. The variety of editors available in most DAWS—piano roll, score display, event list—usually make it fairly easy to visually move around notes and phrases, and automatic MIDI commands like Quantization allow for quickly implementing what would otherwise be somewhat tedious operations. But there are still mistakes that can be made which can sometimes slip by in a busy session, resulting in problems. Here, in no particular order, are 5 mistakes to watch out for when tweaking MIDI performances.
1. Don’t Forget The CC And Other Metadata
Cutting/copying and pasting MIDI data is a pretty common edit—an arranger may need a particular section to repeat for a while, or want to fly in a phrase for reuse elsewhere in the tune. This is usually easy, and can be done in various ways: MIDI regions can be cut up in the main editing area, or notes can be selected and edited in a particular editor display like a piano roll editor window.
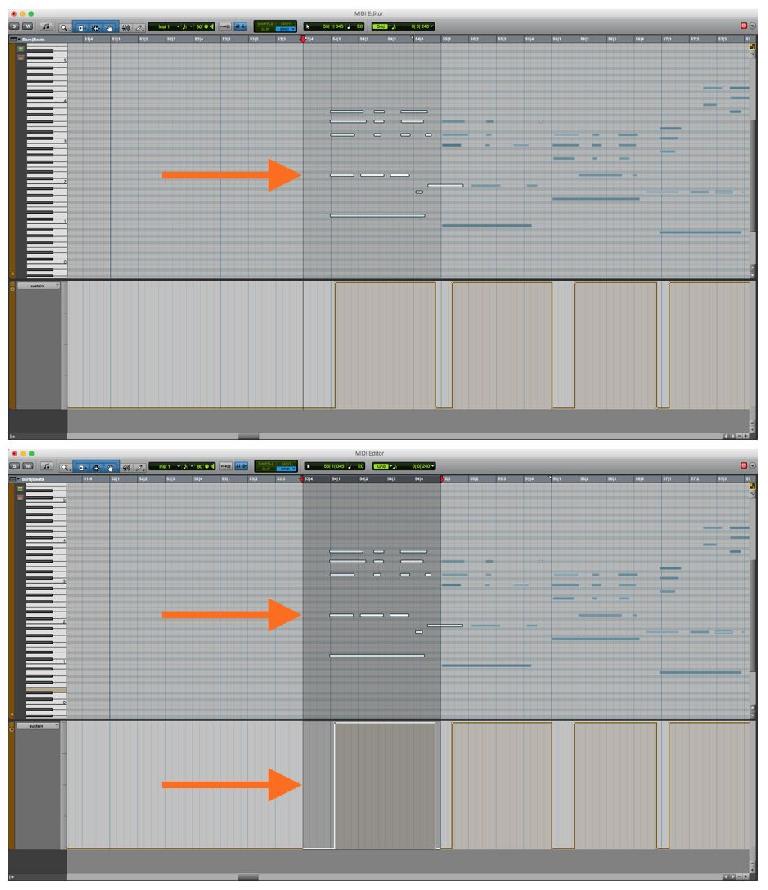
But depending on the method used to make the edit and the particular DAW, there could be a gotcha with this kind of tweak. If the MIDI region has only note data, then the edit should be fairly straightforward, but if there’s also other MIDI data as part of the performance, then the editor needs to be careful not to accidentally leave that behind. Typical examples could be sustain pedal data (MIDI CC 64) or Pitch Bend data—if a Sustain Off message or Pitch Bend reset message is left behind, subsequent notes might ring out too much or be slightly out-of-tune.
If MIDI regions are copied or moved in the main track editing display, usually all MIDI data in the regions would be included—notes plus whatever other MIDI data is present. But if a region is cut, the editor needs to be careful that the cut isn’t made at a location that fails to include a few necessary CC messages (as above) that occur after the last notes in the region. In a dedicated MIDI editor display like a piano roll editor, this could most likely happen when selecting a particular series of notes in a busy part.
Some DAWs may automatically move any concurrent MIDI CC data, or at least have an option for this behavior, but the arranger needs to be aware of whether this is happening in his specific DAW when making relevant MIDI tweaks.
2. Don’t Let MIDI Get Out Of Sync With Audio
Adjustments that affect a Session/Project Tempo map have the potential to unintentionally put MIDI parts out of sync with the audio. DAWs provide a variety of ways to beatmap a session, making the Session/Project Tempo match the specific tempo of a recorded track/region; this is typically done with rubato (no metronome) recordings to preserve the natural timing of the musical performance. Depending on the DAW, there may be a beatmapping feature that automatically detects transients in a desired audio region and calculates the internal tempo of that performance. Then the Session/Project Tempo is changed to match that particular track/region. But if there are existing MIDI regions in the arrangement when such an operation is performed, there could potentially be a problem.
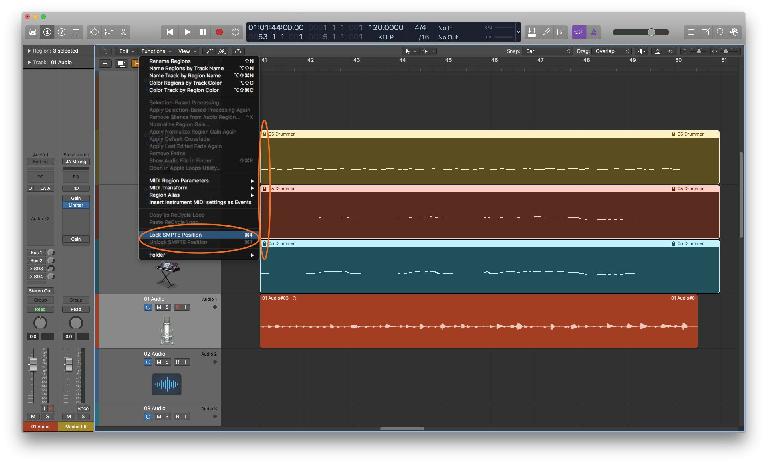
The timing and positions of MIDI events automatically follow the Session/Project Tempo, and if that’s changed in beatmapping, the timing of notes in those MIDI regions could be unintentionally altered. Ideally, beatmapping shouldn’t change the timing of any of the recorded performances, only match the position of the bars and beats in the Tempo ruler to notes that were not already lined up with them. Depending on the DAW, it may be necessary to manually lock any MIDI regions, preventing the MIDI data from being moved, when a beatmapping operation alters the bar and beat positions in the Session/Project Tempo ruler.
The user will need to be aware of how their DAW handles this, and if any manual locking/unlocking of MIDI is required when engaged in this kind of Tempo-related activity.
3. Don’t Always Make Performances Too Perfect
With some musical styles like EDM, it’s appropriate to apply full 100% quantization to MIDI recordings. However with many other genres, a MIDI part with perfect timing would not necessarily be desirable. If the performance has natural, expressive timing variations that contribute to the listener’s emotional response then straightening them out with full quantization can rob the music of well-needed expression.
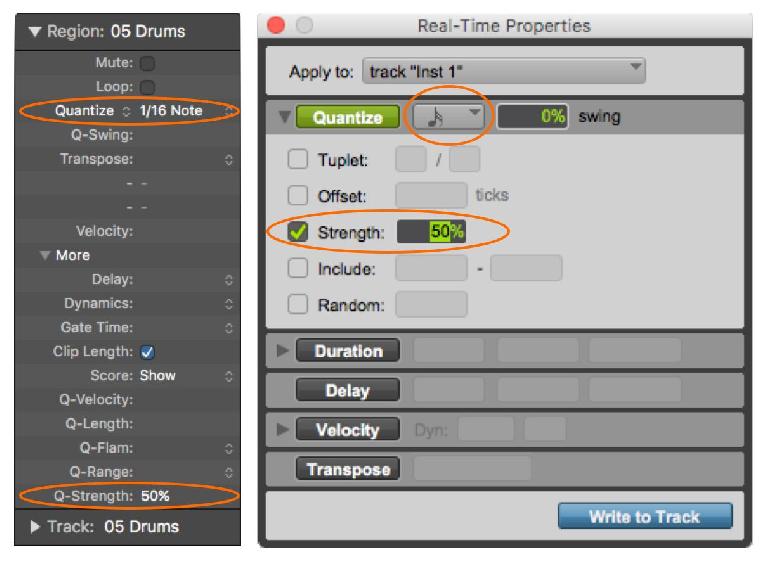
In those cases, if Quantization is deemed necessary then a less aggressive mode of timing correction would be better. Pretty much all DAWs offer partial Quantization options—instead of moving the notes 100% of the way to the nearest gridlines, notes are moved only part of the way to those gridlines. For example, a 50% partial Quantization value would move notes half the way from their recorded positions to the nearest gridlines.
This will tighten up the timing of the performance, but still preserve some degree of the player’s imperfections—the musical variations in timing—that may be needed to add the requisite musical expression to the performance.
4. Don’t Let Mismatched Velocity Response Trip You Up
One of the big advantages of MIDI is that it can separate the performance from the sound of the instrument—the MIDI notes (and CC data) represent what the player played, but that data is not necessarily tied to the sound the player heard while recording the part. In playback the recorded MIDI data (notes, CCs) could be routed to trigger the same virtual instrument that was used during recording, but the arranger could also substitute a different virtual instrument for the final mix—an electric piano could sub for an acoustic piano for a different musical vibe, or more high-quality version of the same instrument could be used for a more natural, more musical sound quality.
While swapping out the instrument after-the-fact is a simple matter, there is a potential gotcha that may rear its head—MIDI Velocity. The Velocity values of the recorded MIDI notes—the dynamics of the performance—reflect the dynamic variations of the virtual Instrument that the player was triggering during the original recording. But a substitute Instrument may have a different Velocity response—a.k.a. Velocity Curve—and this can change the performance itself, often for the worse, making even a player with a subtle touch sound clumsy and lacking in expression.
For example, if the original recording instrument had a narrow dynamic range and a substitute instrument has a much wider one, the result may be that the Velocity variations in the MIDI recording don’t vary enough within the MIDI Velocity range of 0-127; a narrower range of Velocities that resulted in an appropriate range of volume and tonal variations in the original instrument may not trigger the same degree of volume and tonal variation in the replacement instrument. As a result, the performance seems to be lacking in musical dynamics.
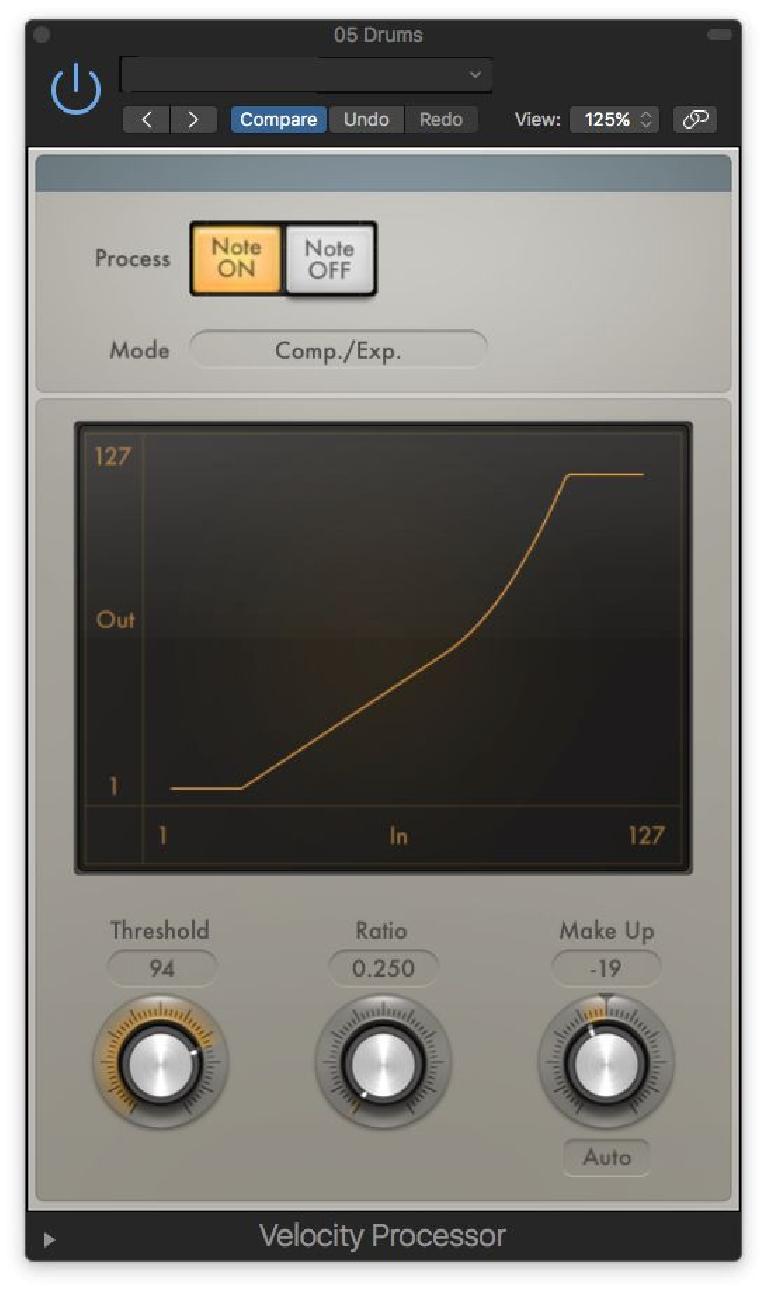
This kind of issue is way more common that most people realize—often the differences are subtle enough that the negative impact on the musical performance is not immediately obvious, unless the two parts are carefully A/B’d. The solution is to utilize whatever method the DAW offers for editing the Velocity curve in playback, matching it by ear to the musical dynamics of the original performance.
In the example described above, expanding the Velocity range of the recorded MIDI notes (loud notes a little louder, soft notes a little softer, as a gradual curve) would probably restore the appropriate musical dynamics with the replacement instrument, restoring the musical intent of the original performance.
5. Don’t Forget To Render MIDI On Export
In many workflows, it’s common for musical collaborators working with MIDI and virtual instruments to exchange sessions or export/import MIDI tracks while a project is in progress. Thanks to the universal compatibility of Standard MIDI Files (SMFs), this is usually pretty straightforward. If the collaborators don’t share the same collection of virtual instruments, they may run into Velocity curve issues as described above, but the MIDI data should be transferred with no problems.
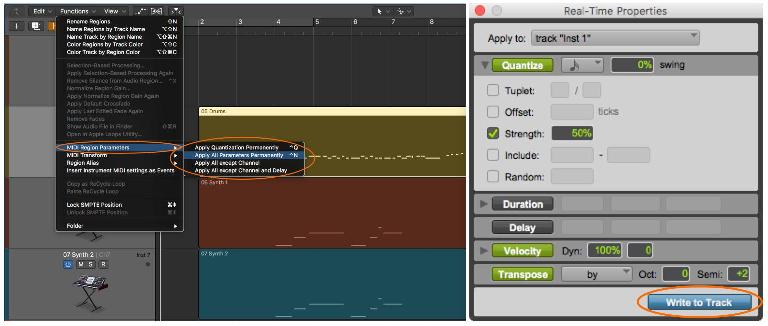
However, many DAWs allow for a number of non-destructive MIDI edits to be made to MIDI data in an arrangement. This allows the arranger to restore the MIDI data to the original MIDI performance, selectively or globally undoing any MIDI edits in a particular track or region. This is great, but if the MIDI performance you’re hearing in an arrangement is dependent on such non-destructive edits being applied in realtime during playback, then the actual MIDI data in the MIDI regions may not reflect those edits. That’s all well and good when working within that DAW, but if MIDI tracks/regions are exported, the user needs to be aware of whether that particular DAW will automatically render (make permanent) any non-destructive, realtime playback-only MIDI edits to the exported MIDI file, making sure that the recipient will get the same MIDI data that the sender has been hearing all along.
For example, a non-destructive, playback-only Quantization that wasn’t included as part of an exported MIDI file could leave the original, possibly flawed or sloppy performance in the hands of a collaborator who received the exported MIDI file. Some DAWs offer manual actions to render or flatten any non-destructive MIDI tweaks to a MIDI region, and if the DAW doesn’t do that automatically, the user would have to manually ensure that the MIDI data that’s exported reflects all changes made to it in the current DAW. It’s usually easy enough to do, as long as the user is aware of the DAW’s behavior in this regard, and of any need to handle the issue manually.
Wrap Up
MIDI has many terrific advantages, but it’s often the details that can trip up an unwary arranger or producer. With a little attention to those details however, it should be a relatively simple matter to take the fullest advantage of everything MIDI has to offer.


 © 2024 Ask.Audio
A NonLinear Educating Company
Discussion
Want to join the discussion?
Create an account or login to get started!