
Audio Editing has progressed from the simple edits that were possible in the analog era to the much more elaborate capabilities of the modern DAW. Back in the day, it was possible to cut and splice different sections of audio (even multitrack audio) by cueing up to the edit point at slow speed and making a razor-blade cut - no second chances - and you could always punch in on the fly to replace a section of audio (definitely no second chances). Nowadays of course, audio can be edited non-destructively allowing for an unlimited number of “second chances”, and thanks to modern time and pitch tools, tweaks can be made to individual notes, words, or even syllables that were only dreamt of in the old days.
But there are still mistakes that can be made which can sometimes slip by in a busy session and reveal themselves at a later stage—even if they can be repaired, those repairs can distract from and bog down a mix, and in a worst case scenario, subtle yet audible editing flaws may slip through all the way to a final release. Here, in no particular order, are 5 mistakes to watch out for in any audio editing session.
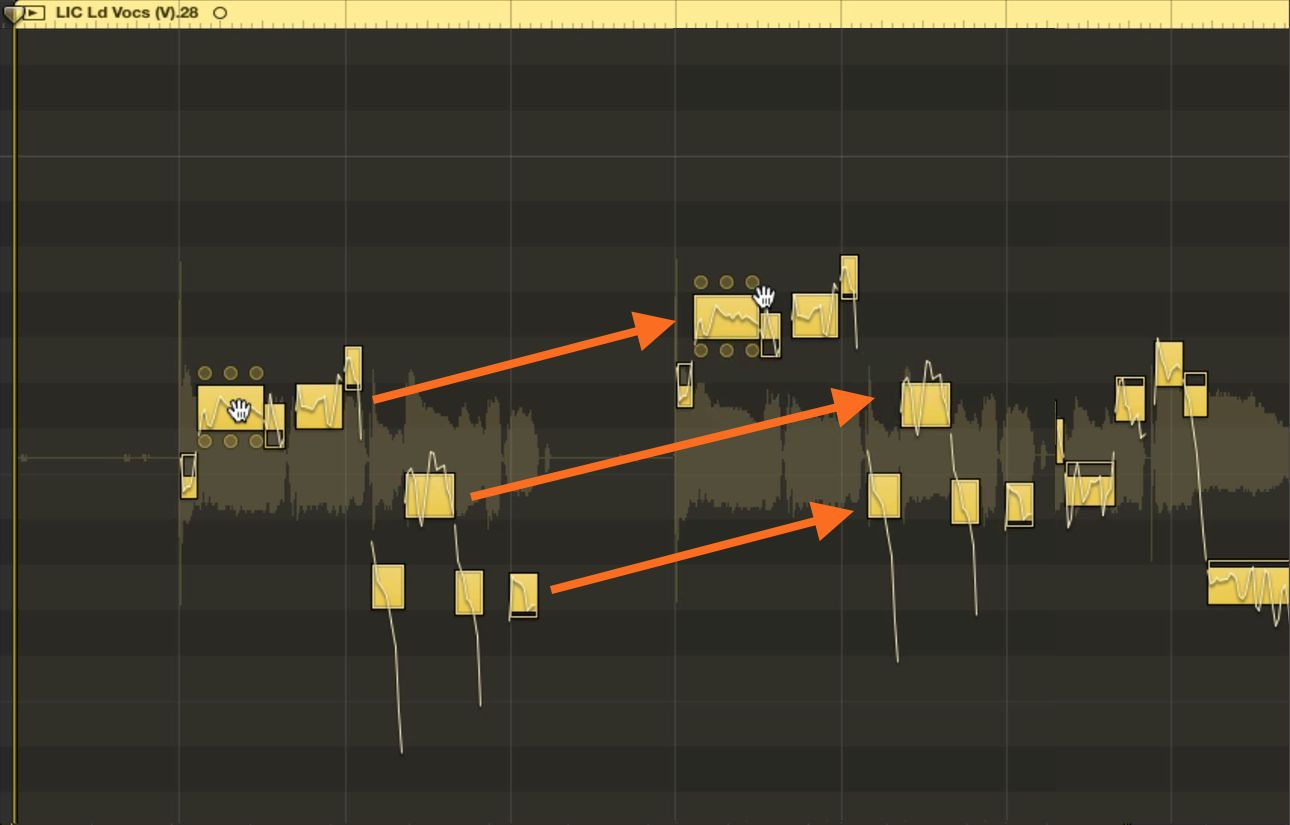
1. Don’t Slice And Dice Too Much When Comping
As most people probably know, Comping means creating a composite final track—most commonly done with vocals—by utilizing the best sections from a number of takes of the same musical part. This was possible even in the old days, by selectively bouncing audio segments from different tracks, but in a typical DAW it’s quite easy to do—many DAWs offer a dedicated comping feature that allows the editor to simply swipe over the preferred sections of the various takes, automatically moving up to the main final “comp” track.
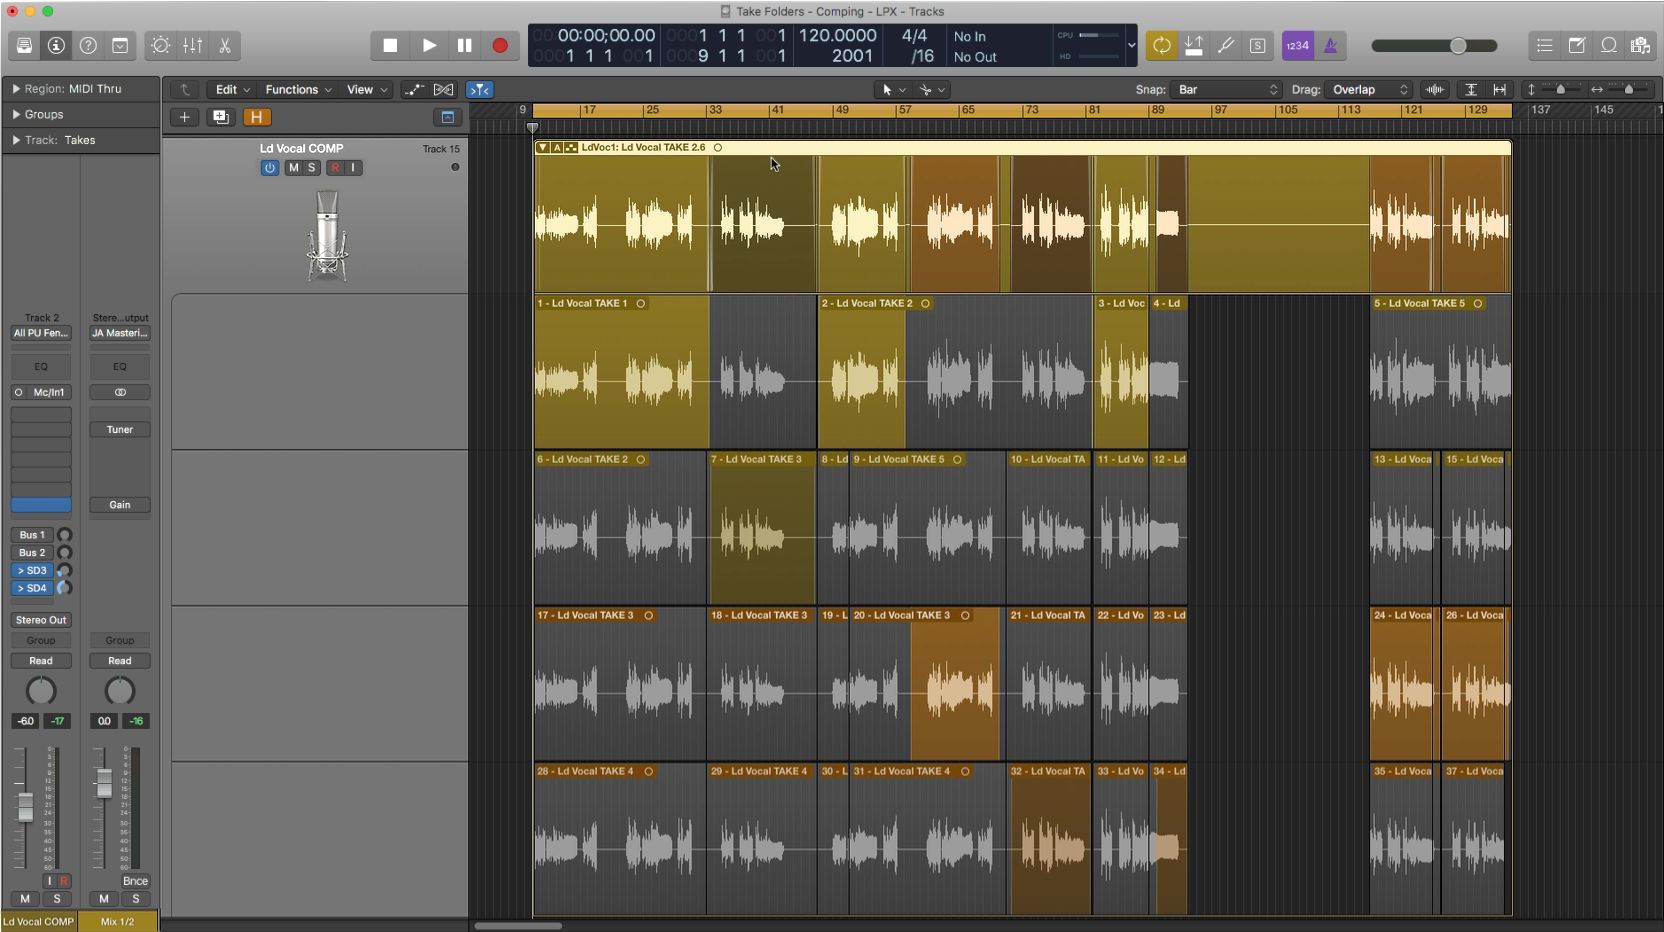
Some editors use this technology in a quest for performance perfection, slicing and dicing the various takes up into very small pieces—even down to the syllable! But for many performances, especially vocal performances, this may have a musically detrimental effect.
A lot of vocal performances have a musical “arc” from the beginning to the end of the song—subtle variations in intensity, tone, and the specific use of vocal flourishes to build up intensity or to ebb and flow for musical reasons. Even with professional sessions singers this arc is likely to vary from take to take, and when comping from a number of performances it’s not uncommon for any sense of musical “arc” to be lost in the process, especially with lots of small cuts and pieces.
Many editors prefer to take a more minimal approach to comping; often they choose one take as the best overall performance, and then make tweaks that are designed to preserve the specific musical “arc” of that take. They may bring in small bits from other takes purely for technical reasons like problem fixing but otherwise they’re likely to work in larger phrases that both preserve the overall arc and captures the smaller, more localized arc of a particular phrase or line. If the comping is done with a musical ear, the results can end up not only with a high level of technical perfection, but an excellent sense of musical continuity, the comp sounding like it could have actually been a single take with all its musicality intact.
2. Don’t Allow Waveform Discontinuities
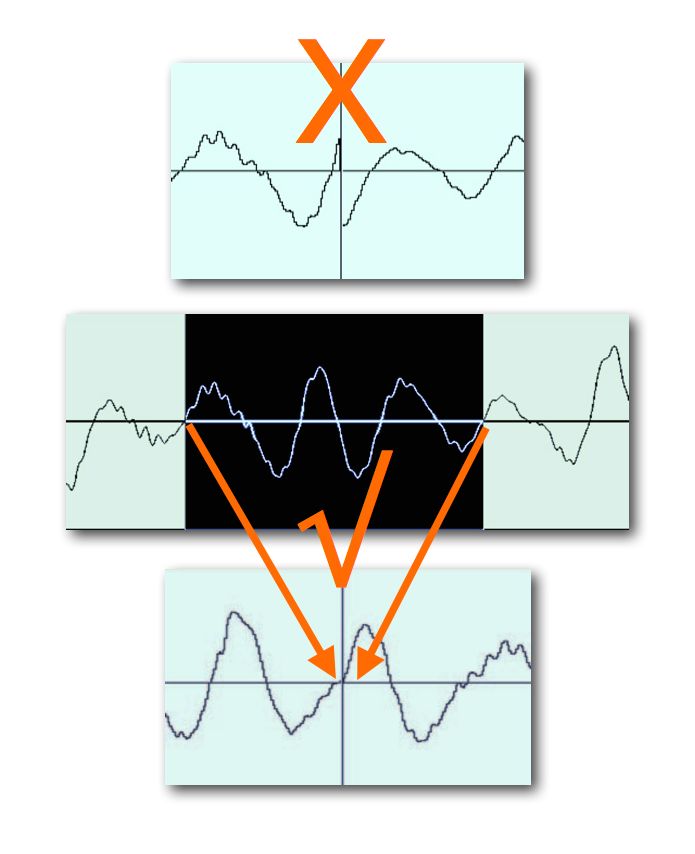
These next two suggestions relate to more specific technical editing issues. One of the first things taught to budding audio editors in engineering programs is that when two sections of audio are cut and pasted together, the waves need to be cut so there aren’t any waveform discontinuities—that means jumps in the visible line of the wave, as shown on the accompanying image. Jumps like this make the loudspeaker try to jump unnaturally quickly to follow the wave, and this results in an audible ‘click’, which can often stick out even in a bust mix and even when it’s relatively low in level.
Ideally, all cuts would be made at what’s called “zero-crossing” points in the wave—where the audio wave is momentarily at the (vertical) center line in the waveform display. This represents a point of momentary silence in the audio when the speaker is at its original position of rest between the positive and negative excursions that produce sound; a cut and join made at a zero crossing point in both waves should be silent. Keep in mind, though, that to ensure a clean, quiet edit the direction of the wave also needs to be maintained at the zero-crossing edit point, to ensure the cleanest edit.
But cutting at only at zero crossings can be a tedious, slow process when many edits need to be made. Fortunately, in the real world, there are a number of ways to avoid waveform discontinuities that make for a more efficient workflow. Some DAWs have an option that automatically detects and moves all cut points to the nearest zero crossing, letting the editor work more quickly at a higher zoom level. This can work well with some audio recordings like spoken word, but with musical performances it may throw off the musical rhythm/timing, if there isn’t a zero-crossing at the right spot for a closely-timed rhythmic edit.
So most editors use a slightly different approach—rather than restricting edits to zero-crossings, they utilize very short crossfades to smooth out any waveform discontinuities and the resulting clicks.
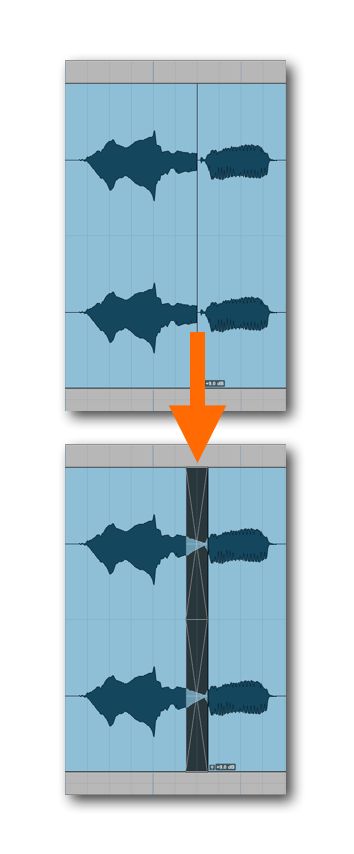
Most DAWs have options for this as well—setting an automatic crossfade of around 10 milliseconds or so should effectively smooth out any discontinuities without impacting on the sound in any noticeable way. This can be enabled for all editing, or perhaps better, applied to selected audio regions when needed (if clicks are noted), to make quick work of a difficult or finicky editing session.
3. Don’t Accidentally Cut Off Transients
Another thing to watch out for is accidentally cutting into musical transients when making an edit on the beat. Naturally, when cutting and pasting musical sections to trim or extend a song’s length, or to rearrange them in a different order, you’d cut on the beat to ensure that the groove will be consistent at the edit points; this is especially true when cutting all parts/tracks together. But if there are un-quantized audio performances there may be notes that start a little ahead of the beat here and there, and cutting on the beat might cut off the initial transients of those notes, softening them to negative effect, potentially making the musical transition problematic.
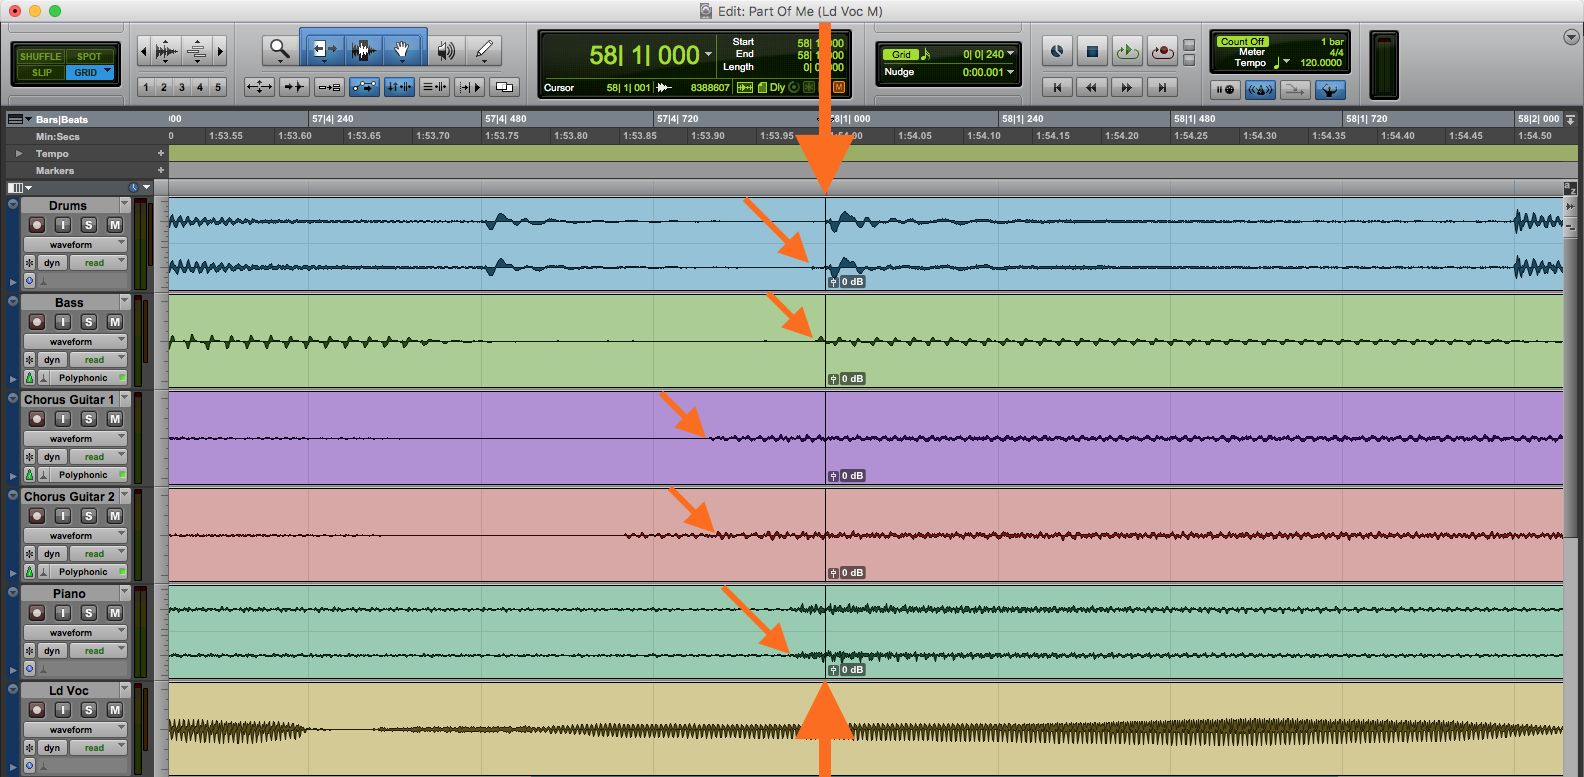
Of course, it’s ok to cut on the beat, but just be sure to listen carefully to the completed edit (and zoom in and eyeball the edit transitions too), and if you notice any truncated transients, simply drag the beginnings of the effected regions to the left with any snap-to-bar function momentarily disabled. Many DAWs have a tool that will let you move both the left edge of a region and the right edge of the previous region (the end) abutting it at the same time; if necessary, apply a short crossfade just before the transient to avoid any clicks, and you should be good to go.
4. Don’t Over-Transpose Audio
With the plethora of pitch editing tools for audio these days, we tend to take for granted the ability to not only fix pitches (auto-tuning) but also creatively edit pitch, freely changing melodies and creating artificial instrumental and vocal harmonies after the fact. But we have to remember that even these slick tools have their limits. Pitch processing and transposing recorded notes, especially vocals, too far from the original pitch can still introduce an old familiar artifact—the dreaded “chipmunk effect”, where the vocal tone becomes decidedly unnatural. Pitches shifted up can get squeakier; shifted down they can get more guttural.
Most modern pitch editing tools preserve a natural tone much more effectively at larger pitch shifts than older devices, and some apply some degree of compensation automatically to help, but you can still get a little of the effect. If the transposed part in buried in a busy arrangement, it’ll usually go unnoticed, but if a transposed vocal is front and center, it may be a distracting flaw. But most DAWs’ pitch-editing tools also provide an option for manual compensation—this is usually labeled a “Formant” control.
Formants are the normally fixed vocal resonances in our voices; when a person sings different pitches, the formants don’t transpose, but when audio is artificially pitched up or down they are, and that’s a main component of the Chipmunk effect. A manual Formant edit option lets the editor shift just the Formant of a note (or selected group of notes) independent of the actual pitch of the note. Shifting in the opposite direction from a pitch shift may help restore a more natural vocal timbre. One thing to note: you don’t necessarily need to shift the Formant by the same interval as the note; in fact usually much smaller shifts will work best—make the final adjustment by ear, both soloed and in context of the arrangement.
5. Don’t Make Musically Inappropriate Tempo Changes
Finally, with the ease at which overall session Tempo changes can be made, including audio tracks, it’s important to not only listen for any technological artifacts when speeding up or slowing down a song’s Tempo but to also keep an ear open for any musically inappropriate artifacts. Many times a Tempo-shifted tune that’s, say, sped up considerably may have drums or a rhythmic guitar part that sounds fine technically, but simply isn’y musically effective at the new speed. Subtle drum fills or instrumental flourishes can sound rushed and clumsy at the new speed—often the player would have never played such a part if he/she were actually performing at the new Tempo. This can be especially problematic with a significant slowdown—a part originally performed (or programmed) at a faster Tempo may simply not groove as well at the slower pace, making for a blend or boring track.

There are times when all the tech in the world may simply not be a substitute for re-imagining and re-playing a musical part or two, to make them work as they should at a significantly different Tempo. And sure, it must be possible to use technology to augment or simplify a part that’s been rendered less musically effective by a Tempo change, but at times the best approach is the traditional one—instead of flogging a part that’s no longer working, simply replaying it can make all the difference.
Last Word
Modern editing tools provide a dizzying array of cool features, but a little attention to detail can still make a big difference when it comes to getting the best results.

Discussion
Want to join the discussion?
Create an account or login to get started!