Equalization—EQ for short—is arguably the most widely-used type of signal processing, in every situation from live sound to mixing and mastering. We reach for those controls almost reflexively—whenever we hear something that doesn't sound quite right—too bright, too dull, too thin, too fat—we grab hold of an EQ knob and start twiddling away. That's how many people learn to use EQ—by the seat of their pants, just tweaking things until it sounds “better”. But in professional situations, or any situation where a more efficient workflow is required, a little extra familiarity with the technical aspects of EQ can go a long way to making better use of this key tool in the recordist's arsenal. For those who'd like a little more tech savvy on EQ, here are several tips for using this processor to best effect..
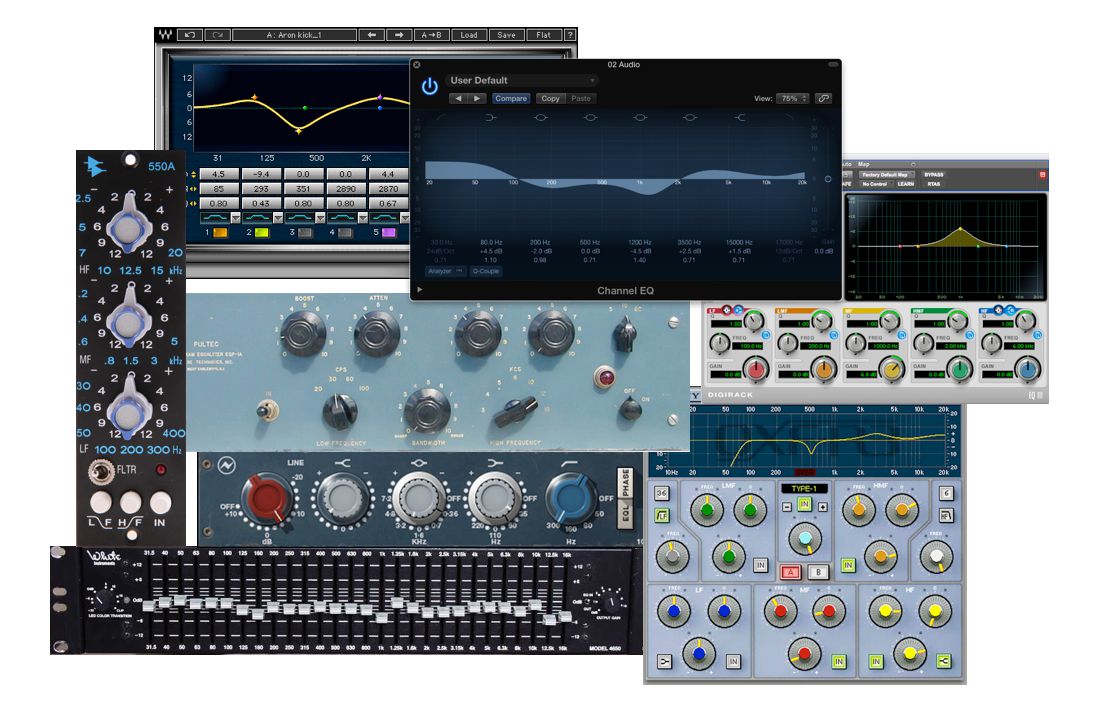
Various Hardware & Software EQs.
1 - Know your EQ & Filter Types
An EQ is a tone control—a circuit that affects the level of only a part of the audible frequency range. Naturally, this has the effect of changing the balance of harmonics & overtones—the components that give every sound its distinctive tone, or timbre—and altering the tonal quality. That's the obvious part—anyone who's ever twiddled a bass or treble knob on their hi-fi or guitar amp knows what tone controls do. But when you start using them on multiple, separate, instruments in a busy mix, then it quickly gets more complex—it's just as easy to make things sound worse as it is to improve the overall sound, unless you know your way around the tools a bit more than just “treble=bright” and “bass=fat”. As I go through these tips, keep in mind that they apply equally to hardware and software EQ devices.
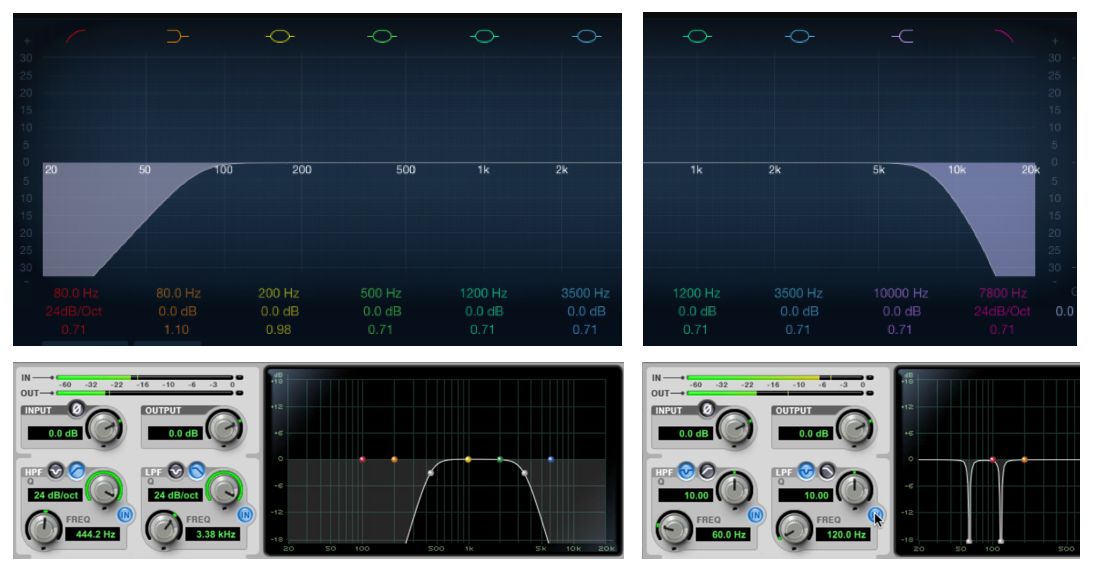
The most basic type of tone control is a filter. This is a circuit (real or virtual) that only cuts—or attenuates—the level of a certain frequency range. The most common types are low-pass and high-pass filters. A low-pass (a.k.a. high-cut) filter cuts out all frequencies above a certain user-selected “cutoff” frequency. So, given the range of human hearing, from 20 Hz–20 kHz, if a low-pass filter's cutoff was set to 5 kHz, then all frequencies above that would be gradually removed, making the tone warmer (or duller). How gradually would depend on another control, the “slope”. This measures the attenuation above the cutoff in dB/octave—sometimes measured in “Poles”—a one-pole filter's cut would be very gradual, while a four-pole filter's would be very sharp. A low-pass filter can be good for removing unneeded highs from a signal, like cymbal leakage in a kick drum mic, which won't have much of its own energy in the very high frequency range.
A high-pass filter works the same way, in reverse—it cuts everything below the cutoff. This is most commonly employed to get rid of rumble and footfalls (thumps) that a mic (say, a vocal mic) might pick up. Since the vocal range doesn't have much, if anything, below 100 Hz or so, a high-pass (a.k.a. low-cut) filter set at 60-80 Hz will clean up such a track nicely—especially if the recording is ever played through a system with a subwoofer. Set to a slightly higher frequency cutoff, a high-pass filter can thin out the sound, which can be either good or bad, depending on the situation.
Filters: Top: High-Pass (L), Low-Pass (R); Bottom: Bandpass (L), Notch (R).
Combining these two filters is also common, as a Band-pass filter (removes both highs and lows—like the familiar “telephone voice” effect), or as a Notch filter (which can cut out very narrow frequency ranges, like only the frequency that corresponds to 60 Hz hum, without affecting the tone of a bass instrument).
But these kinds of technical fixes are probably not the most common applications of EQ. Tweaking the tone of various tracks is usually what we spend the most time on, and for that, an EQ that both cuts and boosts specific frequency ranges is needed.
2 - Master the Parametric EQ
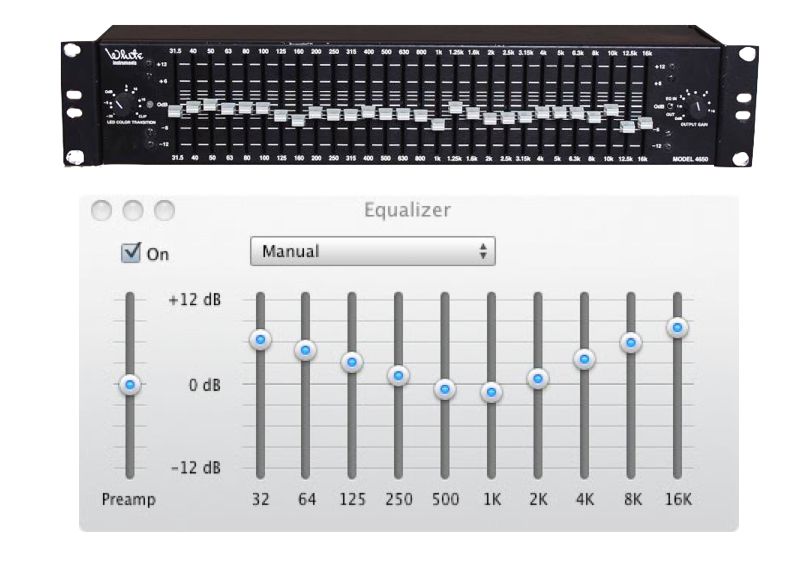
Hardware & Software Graphic EQs.
Graphic EQs allow for simultaneously boosting & cutting several (usually 10 or more) separate preset frequency “bands”, and are common—especially in sound installations—but the most widely used type of equalizer is the parametric EQ. A parametric EQ has several frequency bands (typically 3, 4, or 5) that allow the user to choose not only the specific frequency range (center frequency) and amount of boost or cut (gain) for each band, but also the bandwidth—how wide a range of frequencies is affected for each band. This gives the user the greatest control over the specific tonal aspects of the sound he/she wants to tweak, and is the type of EQ that's found in all consoles and DAW mixers & plug-ins, as well as in a lot of outboard gear. Having those three controls available for every band lets the user set just the right amount of adjustment in each part of the frequency range, and can achieve almost any tonal variation desired.
Typical Parametric EQs.
But, other than trial-and-error, how do you know exactly what frequencies to tweak and how much alteration to do to each area of adjustment? Well, the key is to get to know the sound of the different frequency ranges that fall in the range of human hearing, between 20 Hz and 20 kHz..
3 - Get to Know the Frequency Ranges
When you see an experienced engineer/mixer work an EQ, he'll often jump right to particular frequencies and dial up specific amounts of boost or cut, sometimes without even listening to the effect of what he's doing right away. But how does he know that those settings will work, especially since every track is recorded differently, and has a different tonal balance? Well, experienced ears will recognize the tonal quality of specific frequency ranges, and can immediately tell if there's too much energy, or not enough, in a certain frequency range, just by a quick listen to the playback of a track. And that engineer will also know what the tonal effect will be if he dials up a boost or cut in a particular frequency range, anticipating how that tweak will affect the sound he's hearing.
This is the difference between spending hours fiddling with EQ, using trial-and-error to find a pleasing tonal adjustment, and spending minutes zeroing in on just the right frequency range to get the job done quickly and efficiently—critical if you have dozens of tracks to tweak in a big mix, and a ticking clock on the wall, while the client (artist, producer) sits, foot tapping, waiting patiently (or impatiently!) for you to “work your (EQ) magic”.
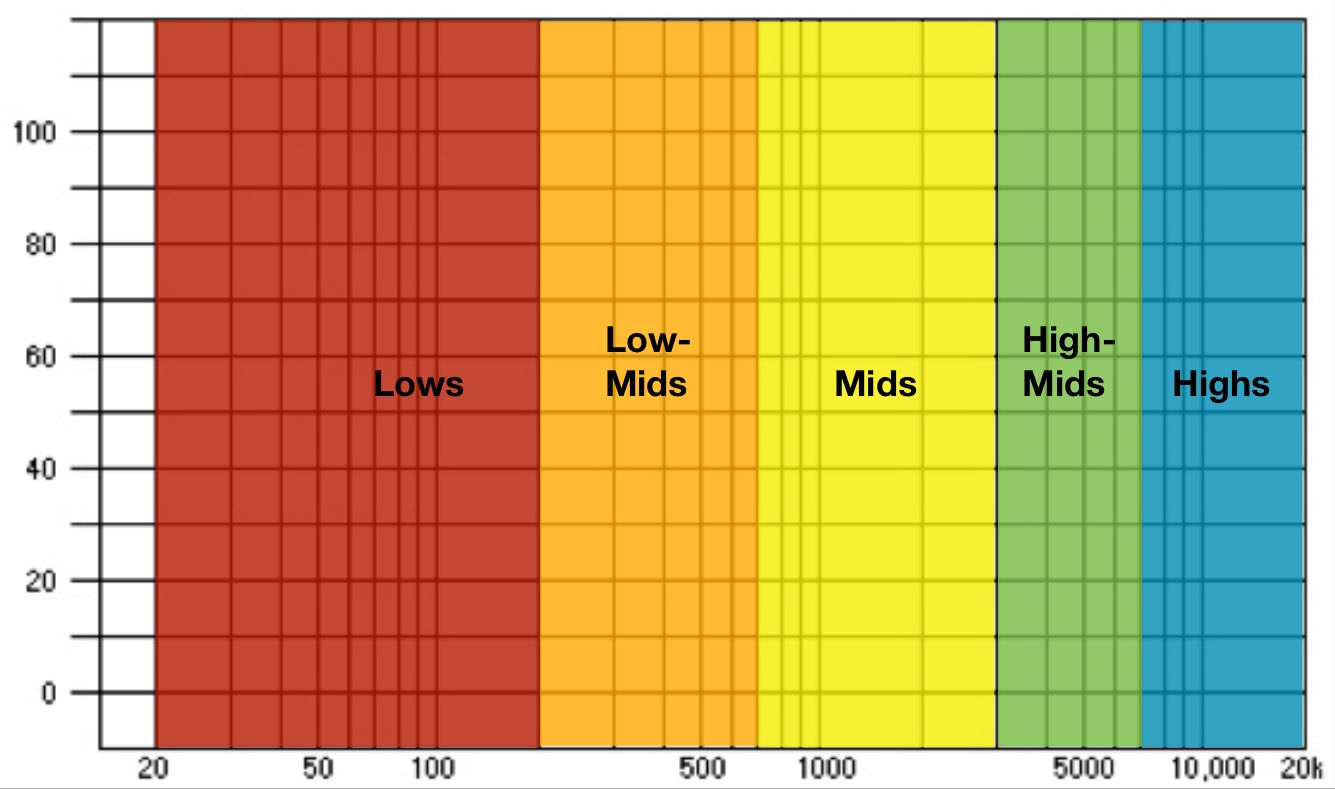
Typical descriptive terms for various frequency ranges.
And how do you get to that point? Well, it's like the old musicians' “how do you get to Carnegie Hall?” joke—practice! In this case, that means training your ears to recognize the unique tonality of the different frequency ranges, and work with EQs every chance you get, testing your ear's memory occasionally, until this tonal knowledge embeds itself in your brain. A good way to do this is to take a variety of signals (especially broadband signals like drums and piano) and go through the different frequency ranges, boosting and cutting, and taking mental note of the associated tonal changes.
Do this repeatedly, and eventually you'll come to recognize the specific quality of variations, like the nasal character of a signal with an excess of energy at around 2 kHz, or the boomy quality of a signal with an emphasis at 100-150 Hz. There are plenty of videos around that can help with this, including AskVideo's Audio Concepts course, but ultimately you'll need to train your ears through repetition. Fortunately, you don't need to make a big investment in gear—even free apps like GarageBand provide the tools you'll need to develop a professional engineer's ears, at least when it comes to EQ.
4 - EQ instruments on their Own, and in Context of the Mix
It's not uncommon to add a little EQ to almost every track in a mix (though it's certainly not necessary, and many mixers try to do as little processing as possible). This involves two deeply interrelated aspects—EQing individual tracks on their own (soloed), and EQing them in the context of the overall mix (with all tracks playing). Ultimately, the latter situation is the final test, but it's often good to start out by soloing each track and EQing it to sound good on it own, before re-tweaking the EQ to take the blending in of the other tracks into account.
For example, modern close-miked tracks often sound more midrangey than the tone would be if you were listening to the instrument at a more normal distance, so it's common to cut a little midrange energy to smooth things out. 1 kHz is the center of the mids, but the exact frequency you might cut on a certain track will depend on the particular instrument, the particular recording, and eventually, what other tracks are playing along with it. So I might solo, say, a piano, and cut a little at 1kHz, but then when I hear it in context of the whole mix, I might feel that a cut at 400–500 Hz instead would thin the piano out a little more, and make it not step on the voice or acoustic guitar as much.
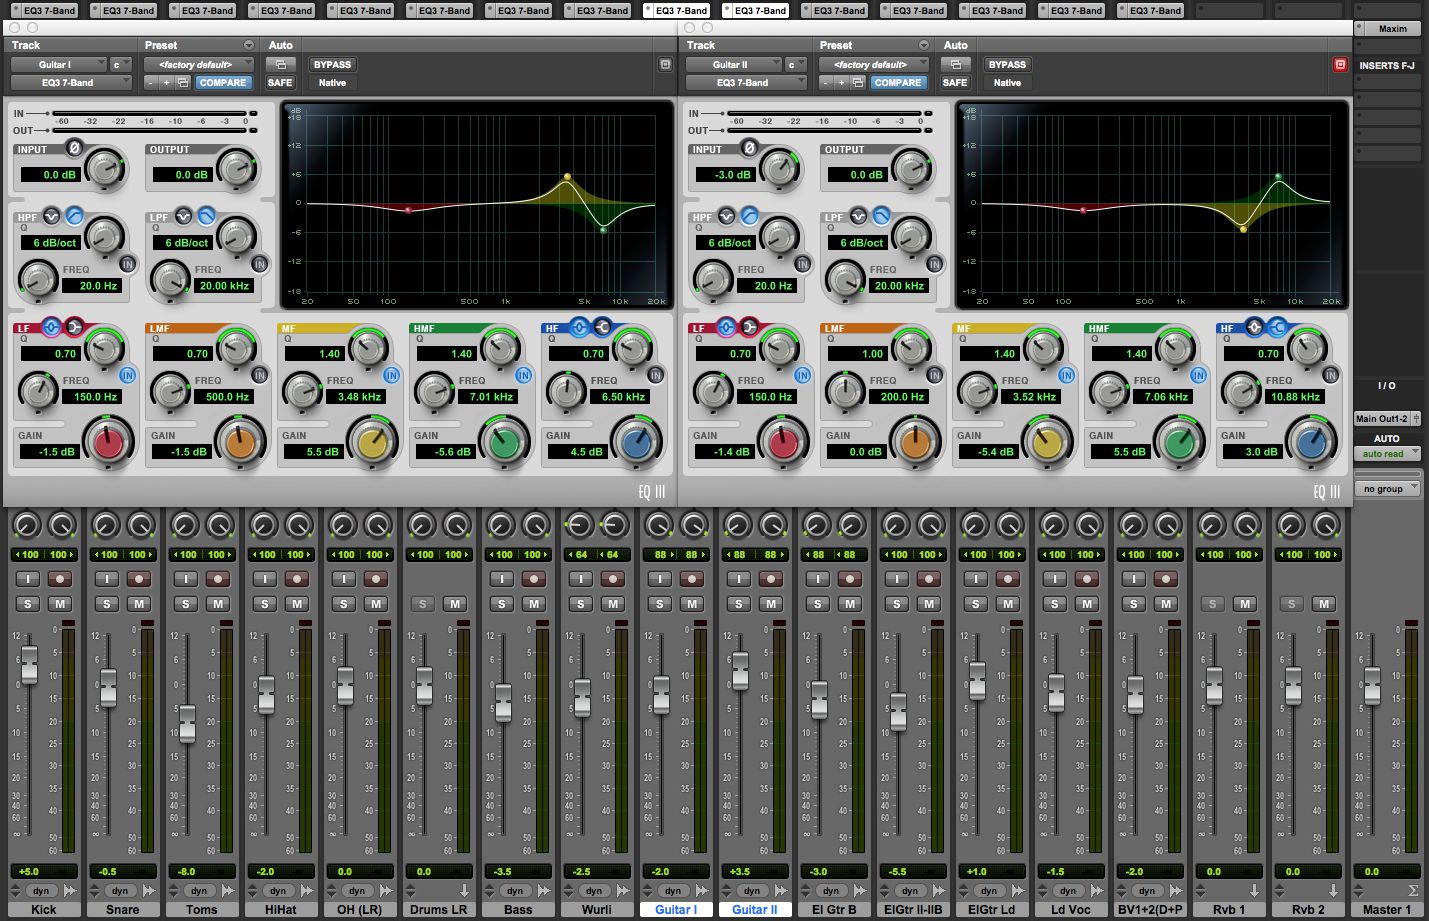
One common technique is to stagger the frequencies you choose to adjust. Again, for example, if you have two similar guitar tracks that your newly-trained(!) ears tell you both require a slight boost in the upper mids, for clarity, you could try boosting one at 6-8 kHz, and the other at 3–5 kHz. You could even slightly cut each track at the other track's boosted frequency. This can have the effect of carving out a particular frequency range for each instrument in the mix, and can help to avoid too much overall build-up (or attenuation) at certain specific frequencies.
Two Tracks With Complementary EQ.
But keep in mind that the frequencies chosen are also dependent on the tonal balance of the particular tracks in question! That's why there are no one-size-fits-all solutions when it comes to EQ—you can follow common guidelines, but the specific choices will always depend on the particulars of the current mix. Keep in mind, also, that, as you're tweaking each track, the other tracks in the mix are also being EQ'd, and so the mix is constantly changing, making the whole process a constant back and forth routine, until everything sounds the way you think it should. And how do you know when you're done?
5 - Reference Your Work Against Other Mixes
Well, anyone who's ever done any mixing can answer that one—you're never done! But at some point, you'll feel that the EQ choices you've made (along with the other processing you've applied to the mix) have it where you think it should be, and that's a good point to stop. You'll want to come back to it after giving your ears a rest, but hopefully only for very minor adjustments. The thing about EQ, though, is that as we use it to change the tonal balance of elements in a mix, ours ears become accustomed to the changes, and the leads to the tendency to make further changes, which your ears will also become accustomed to, and so on. Eventually, it's easy to get to a point where you've overdone the EQ, and everything sounds overly “processed”—a quality some engineers might describe as “canned”, meaning equalized to an unnatural, and probably overly harsh, degree. I know I certainly fell into that trap when I first started out, many (many!) years ago.
So how you can you avoid this? Well, one way is to take periodic breaks, to clear your head and ears. Another very good approach is to have several commercially produced reference tracks that you can occasionally compare your work to, just to make sure you're in the same ballpark as other professionally mixed (and mastered) recordings. Even different professional mixes can vary quite a bit in overall tonality—some are bright, others warm, etc.—but if you assemble a range of good examples, then you can periodically A-B your work against them. If you're applying too much (or not enough) EQ, and your mixes are much brighter, or duller, or bassier, than all the reference tracks, then it's a good bet you've gone a little too far, and might want to dial back, or re-think, your EQ choices. Don't try to match any one specific recording—you just want to be in the same ballpark as the average tonality of the various commercial references.
And on that note, I'll wrap this up. Of course, there's a lot more that could be said about EQ, but perhaps that'll be the subject of another article…



 © 2024 Ask.Audio
A NonLinear Educating Company
Discussion
Want to join the discussion?
Create an account or login to get started!