
Cubase is right up there with some of the best DAWs and it has just about every mixing tool in the book. If you are new to the app or new to production in general you might be looking for some pointers that will help you get the best results when mixing your tracks.
Here are five quick pointers to get you started and get your creative juices flowing...
1 - Linking Tracks
Most of you will know how to route tracks to auxiliary channels in Cubase. This process allows you to actually send several tracks into a group or bus. This is really useful for treating groups of similar instruments such as drums, vocals or guitars.
Although this is an extremely useful mixing tool there is in fact another kind of grouping that can be performed from within Cubase 6's mixer. By selecting multiple tracks (hold down Shift) you can actually 'Link Channels'. This has nothing to do with routing but instead enables you to control the level and other mixer functions of a number of channels at once.

Linking tracks in Cubase is extremely straightforward
This is ideal when working with a busy mix and you want to control multiple levels without creating a physical group. I often find it works well to temporarily link tracks to alter their levels without disturbing their relative mix. You can then unlink them to return to normal operation.
2 - Using The 'Meter Bridge' And Other Mixer Views
This may seem like an obvious one but by expanding the mixer you can view all sorts of data. You can choose to see all your inserts for example, every send level or even EQ settings.
One aspect of this feature I really love is the ability to see large level meters in a 'Meter Bridge' style display. It reminds me of working with large format consoles and can be great for getting instant feedback on recording levels and your overall mix. If you have large dual monitors this display can be left up permanently.

The large meter mode in Cubase 6's mixer.
3 - Saving And Loading Channel Strip Settings
When mixing a track you might find that you hit on a certain combination of processors and channel settings that just really works. It may be a fantastic vocal chain or a compressor and EQ setting that makes your drum group pop. Whatever it is you might feel that you want to call up this combo again in the future.
By selecting the channel in question you will see a pop-up menu. From here you can save the entire channel strip setting to any location. You can also load up previously saved set ups here, too. This is a great tool for speeding up the mixing process, you can even try saving and loading entire mixer set ups.

Saving a channel strip setting
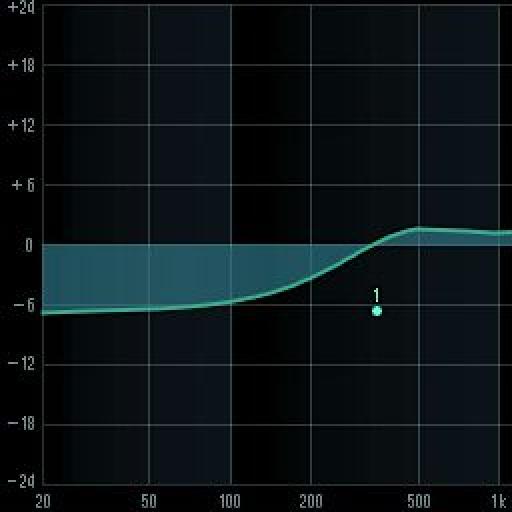
4 - Using The Bundled Channel Strip EQ
The Cubase bundled EQ is often overlooked and over the years this humble processor has really come of age. Its quality parallels that of many third party plug-ins and as it is designed to work with Cubase it is extremely processor efficient.
The main advantage of using the Cubase EQ is that it can be accessed directly within the channel strip. By simply hitting the on button you can activate the EQ and you instantly have excellent visual feedback thanks to the huge display area.

Cubase 6's excellent built in channel strip EQ
And remember: if you have a dedicated Cubase compatible control surface that you use with Cubase all of the included EQ's settings will be instantly mapped to its controls. About as close to using hardware as you'll get!
5 - Side Chain Routing
One thing I get asked about all the time is side chaining (regardless of the DAW involved). Just about all production apps now have this feature built-in and Cubase 6 is no exception. Thankfully it's also very easy to set up!
From within any used chain compatible plug-in, such as Cubase's own compressor, activate the side chain button in the upper section of the plug-ins interface. With this done move back to the channel strip.

Activating the Side Chain Mode
You can now select the side chain as a send for any of the send slots and send exactly the amount of side chain input to your channel and from any channel as well.

Sending level to the side chain
Easy as that and an extremely useful technique!

Discussion
Want to join the discussion?
Create an account or login to get started!