
It’s long been a sore point in Logic’s robust list of features; “can I process just a specific area with effects instead of the whole track?” The answer was always, “yes, as long as you move the slice/region to a new track (with a new set of effects on it).” Logic Pro version 10.3’s new “Selection-Based Processing” allows you to choose an area of audio (or a specific region) to process with any collection of effects. These effects are independent of the effects placed directly on your tracks. Below are three short tutorials on using this new game changing feature for Logic users, so read on.
Before you start
First let’s talk about what it can and cannot do. The “selection” is made by either clicking the entire region itself (audio only, currently), or by selecting an area to process with Logic’s Marquee tool. After making the selection, you have two columns/channel strips that you can populate with any combination of effects including third party AUs. You select either strip by clicking the corresponding A & B buttons. Audio can not yet “superimpose” itself over the unprocessed area to the right of the selection, in order to include the effect tail. This is not a deal breaker because you have several options when dealing with the processed area.
You can choose to “Split at Marquee Borders” after processing. When this is used in combination with the option “Add Effect Tail” you can easily pull the processed region’s bottom right corner out to reveal the full effect tail. Because the process of adding effects to a certain area can have an effect on the volume, there is also a Gain menu that gives you options to not change, add auto-gain, and more.
Processing a Beat
There’s so much creative possibility here… literally any selected area of an audio beat you’d like to process you can, and with any imaginable combination of effects. If you’re using an effect with a “tail” that lasts long after the selected area, you might want it to blend over the unprocessed signal to the right. In the steps below I’ll process a single house stab inside a beat, and give myself the option to either leave the effected area contained, or allow the area to blend out under the unprocessed area ahead.
Step 1: What Will You Effect
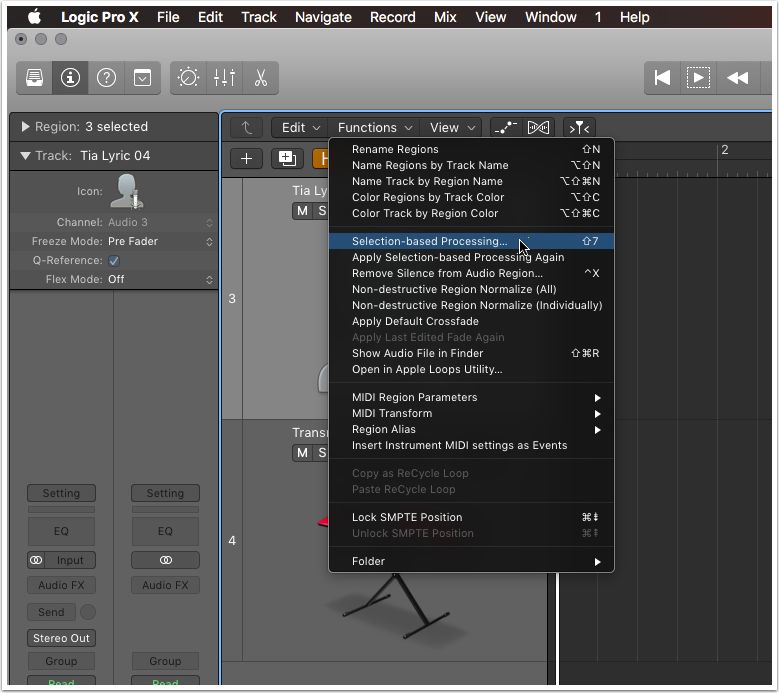
With the Marquee tool, I’ll select the area I want to process, then from the local menu bar (at the top of the track list) go to the Functions menu, then choose “Selection-Based Processing.” Tip: There’s an un-assigned key command to open/close SBP waiting to be given a custom command in the Key Commands window.
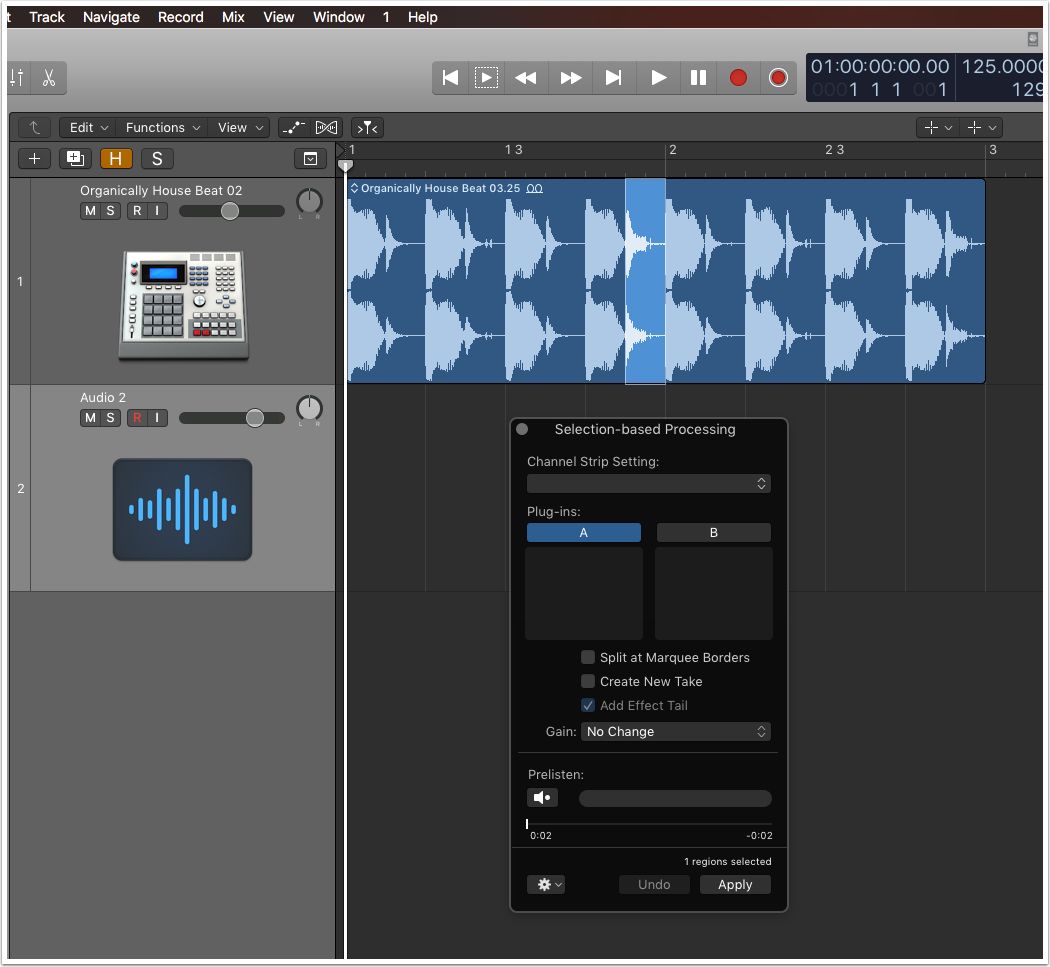
Step 2: Add Effects and Preview
I’ll place a reverb on the “A” channel strip. You can easily open the interface for the plug-ins you add by clicking on them as you usually would when directly on the channel. I’ve chosen a preset from the reverb, and can preview it by clicking the speaker icon below the “Pre-listen” area. When pre-listening I can choose whether or not to solo the section, and whether it loops. Since I’m applying the effect to only a small area, I’ll uncheck “Pre-listen Enables Cycle” from the small gear menu at bottom left otherwise it loops over and over.

Step 3: Choose if You Want “Effect Tail”
Before pressing Apply, I also want the buttons “Add Effect Tail” and “Split at Marquee Borders” enabled. After applying and listening I have a choice… do I like the way the effect sounds when it stops immediately after the processed area, or do want the effect to ring out? If I want the reverb tail, I’ll simply create a new empty audio channel below the beat and drag the slice down to it. Pull the bottom right corner of the region out and to the right to hear the slice’s effect tail!

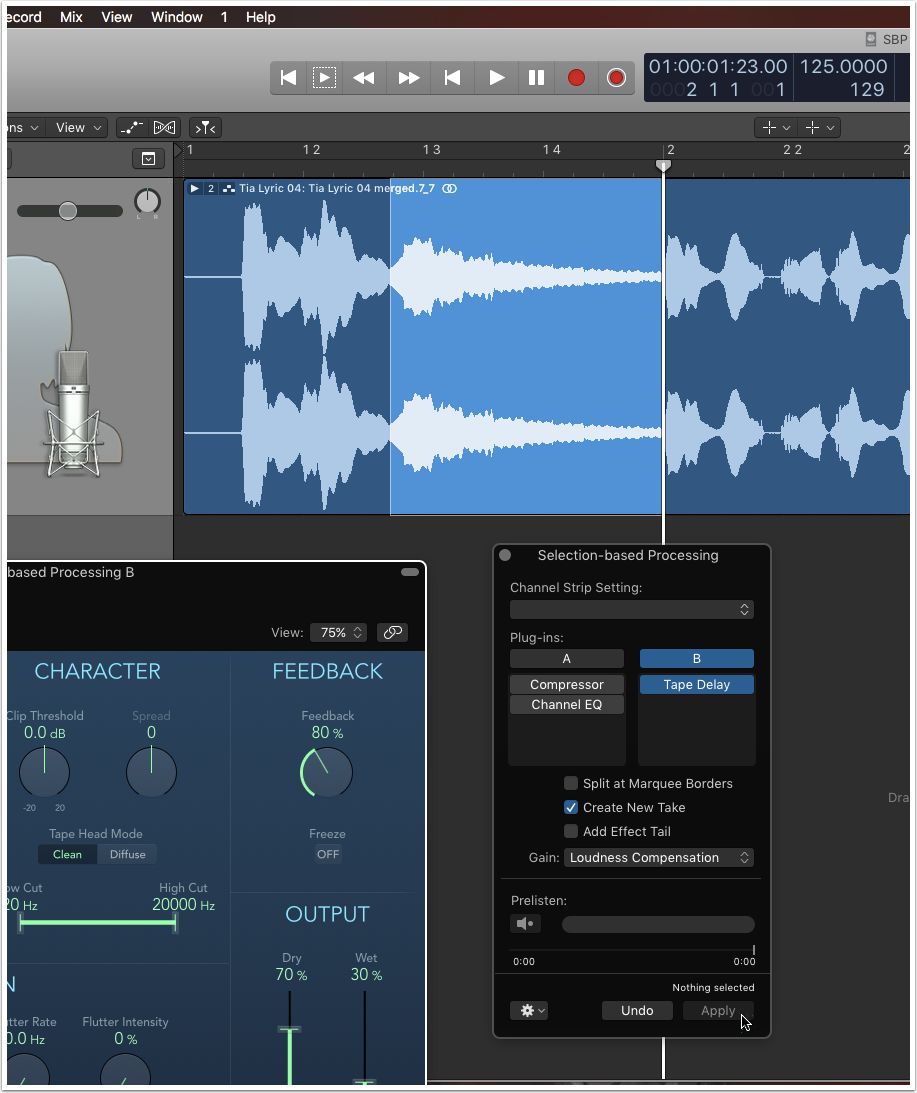
Processing a Vocal
To start, SBP can be used to fix vocal plosives, and sibilance by simply marquee selecting the area to process specifically. This is traditionally done by effecting the entire track which can have a negative effect on areas not in need of it. Remember to keep an unprocessed copy of your vocal in case you need to go back, or alternatively, SBP has an option to “Create New Take,” if you choose this and change your mind about the effect you can simply open the take folder and select your original unprocessed selection. In the steps below I use SBP’s built-in presets to correct plosives and sibilance, then move on to adding a delay on a chosen word/lyric.
Step 1: What Will You Effect
If the vocal you want to process is already chopped into regions, simply select the region. More likely than not, when processing vocals you’ll want to marquee selected single words, hooks, or even syllables within a region. I do this by zooming in to the vocal region, and using the marquee tool to first make the selection, then open Selection-Based Processing from the local “Functions” menu.
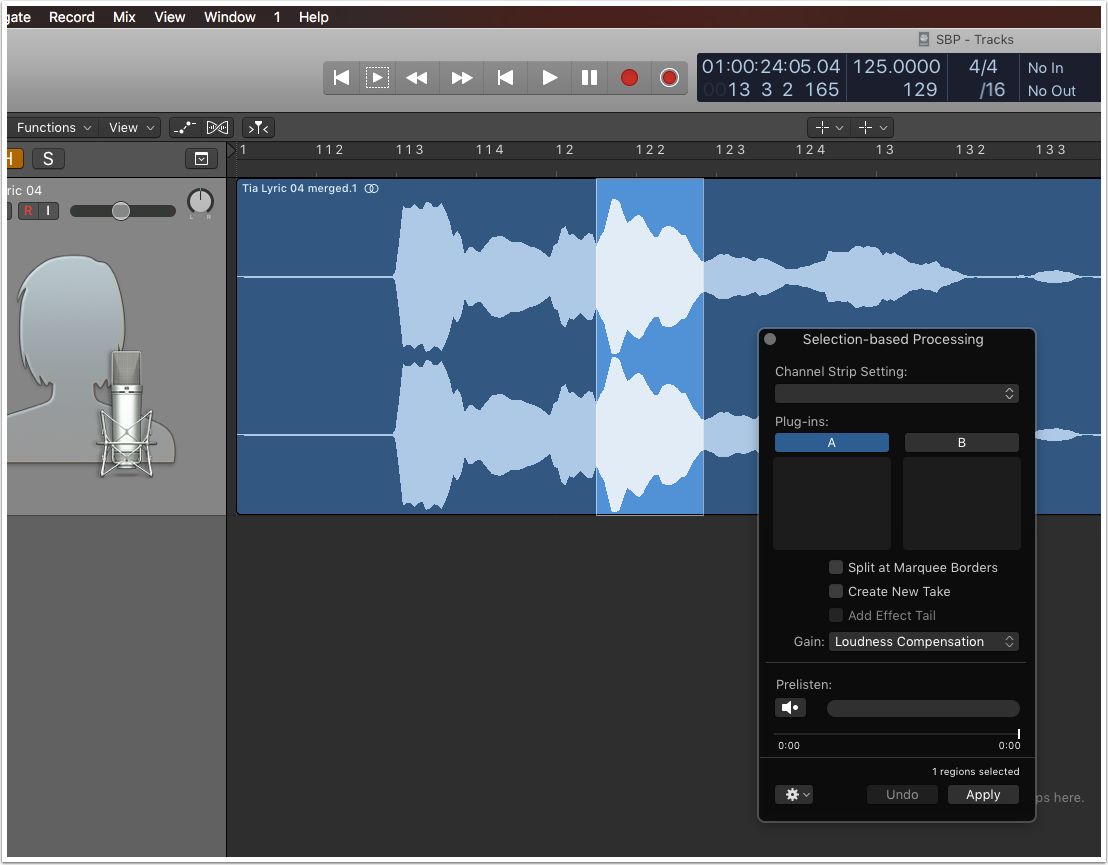
Step 2: Add Effects and Preview
On the left “A” column/channel strip I’ll choose a preset from SBP’s “Channel Strip Settings” menu. From the “Vocal Tools” menu I’ll choose one of the de-esser settings. On the right side “B” strip I’ll place an echo/delay effect. I can click the preview button to hear the effect in realtime. If I’m not satisfied with the result, I know I can either choose another preset setting from the menu or even open any of the effects directly on the strip to adjust.
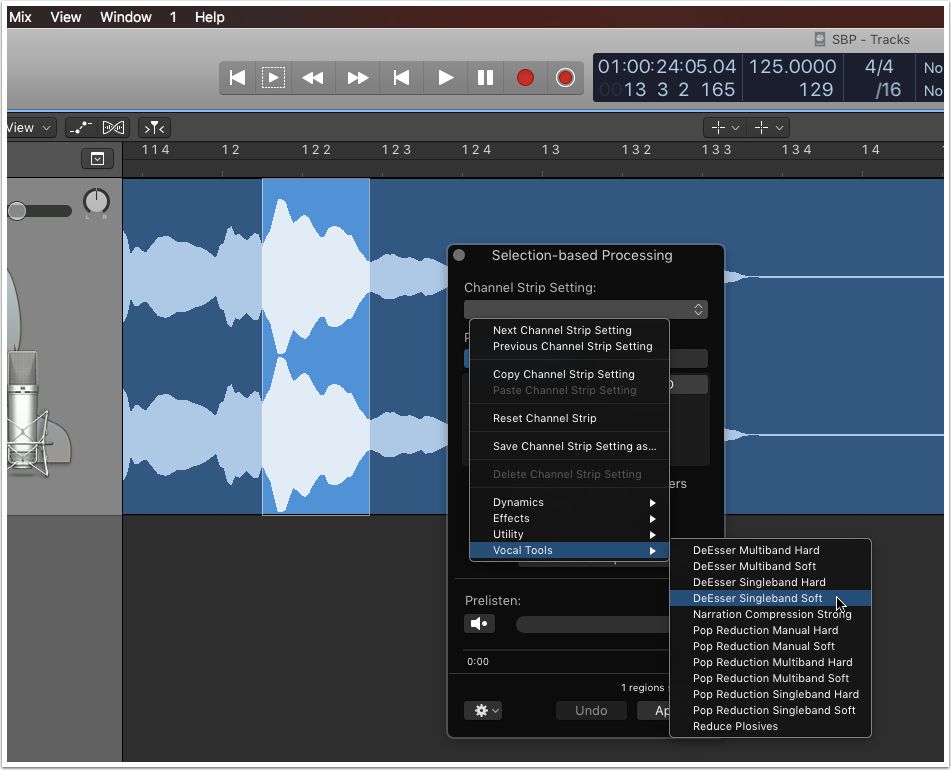
Step 3: Apply Multiple Effect Chains
Since effects for de-essing are on the left, and a delay effect on the right, I can easily move between them by selecting the letter A/B at the top of the each column/strip. I simply highlight each of the areas needing processing with the Marquee tool, choose either effect strip and press “Apply.” Since SBP is a “floating window” I can leave it up without worry while grabbing new selections.
Creating Audio Based Sound FX
Layering effects on recorded audio is a quick and simply way to build up powerful risers, downers, sweeps, and the weird and abstract. SBP is a fantastic tool for doing this in audio. So why not just add effects to the channel itself? The effects can come to a total dead stop at the changeover positions unlike when processing with blanket plugins. You can do things like blast reverb in at first, that is then captured by a looper effect, that later passes into a delay, then the whole sound collapses with a low pass filter. You can do all this and more by layering effects and having them open at different points in time. Since everything is captured as audio, the effect repeats perfectly, and can be easily moved by simply repositioning the region.
Step 1: What Will You Effect
When writing this article I used a simple metallic impact as the source for my sound effect, but any audio will do. I’ll make sure to enable the “Add Effect Tail” button. By doing this, an effect with a long release will be captured.
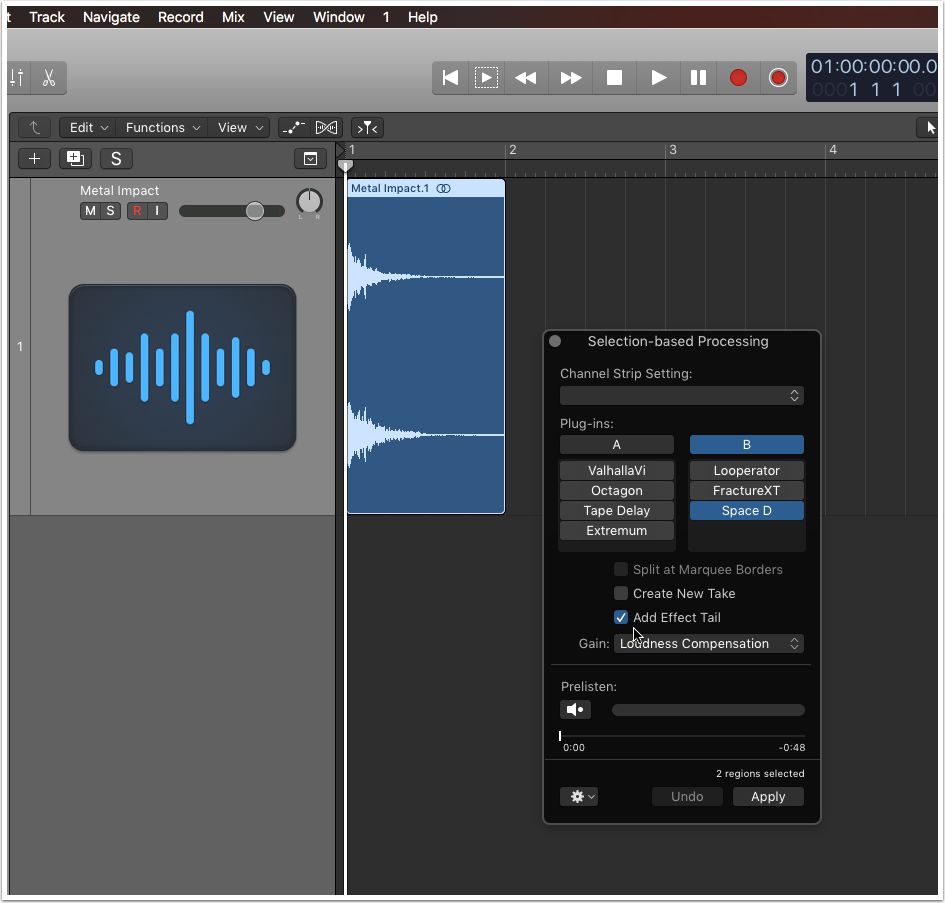
Step 2: Add Effects & Preview
Since I’ll be using many different types of effects like delays, reverbs, stutter effects, panners and more, I’ll simply fill up both “A” and “B” with various effects of my choosing. I can press the speaker icon to preview each effect after I bypass them all and try each one.

Step 3: Apply Various Effects at Different Times
Some of the effects I’ve chosen to apply over the entire length, but with others I choose a new start position (by re-selecting it with the Marquee tool) as the sound builds/evolves. After repeated processing I’ve turned a simple metal impact into a weird and evolving texture.


Discussion
Want to join the discussion?
Create an account or login to get started!