
Throughout my many years of teaching, I've observed that fully understanding the importance of stereo design in a mix is the hardest thing for my students to grasp. From analyzing the stereo content of reference material to understanding the myriad of techniques available to stereoize your own work, understanding how essential a dynamic stereo mix is in today's world is critical.
Ableton Live has many different tools for creating and controlling the stereo dimension of your mix. Almost all of the tips I'm sharing below are not part of Live's library as presets, so grab a brew and give this a good read to fully absorb some in-depth approaches to harness the stereo aspect of mixing in Live.
To make it as easy as possible to understand and explore these techniques in content I've created a Live project which everyone can access via the collaborative Splice platform.
I've applied all techniques covered to a short d&b intro and drop so feel free to play around with the ideas and I encourage you to save the devices I've used so these techniques are available in your own Live libraries when you next work.
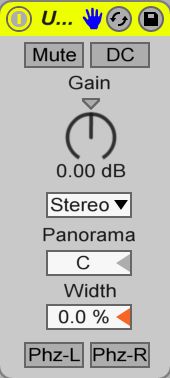
When exploring the techniques below, it's important to switch to mono playback as you tweak to ensure the best compatibility where possible. This can be easily done by adding a Utility device to the Master Track and setting Width to 0%. Then use Key Map Mode to assign the Device Activator switch to a key for quick access from anywhere within the project.
Mid and Side Balance
Whether your signal is stereo at source, or you've stereoized it using these techniques, a constant assessment must be made of the balance between the middle (mid) of the mix and all stereo information (sides). With a higher balance of mid, you'll bring the focus of a sound towards the center of your mix. A higher balance of sides will push sounds out from the center and at more extreme settings, leave the center free for other sounds to occupy in the mix.
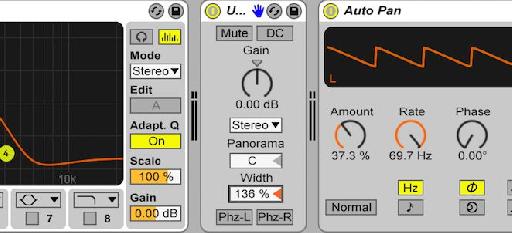
Live's Utility comes to the rescue again here as the Width parameter is purely the mid at 0% and only the sides at 200%. Be careful to not go too far towards 200% though as this information will disappear when playing your mix in mono.

I've used a Utility device in my project to push my pad sound out from the center of the mix towards the sides. This leaves more space for my drums and other mix elements to live.
Mid and Side EQ Shaping
Like the previous tip, this technique also requires a stereo sound to begin with. Then EQ Eight can be set to EQ the mid and side elements of the signal separately. Switch the Mode on the top right of EQ Eight from Stereo to M/S, then the Edit Switch can be used to EQ the M or S independently.
I like to boost the air content of the sides using a High Shelf EQ filter which then creates a wider, yet not too dominating stereo width in the mid-range. It's also worthwhile using a Low Cut in the sides as well to remove any lower-end energy that can quickly muddy the stereo content of your mixes.

On the track Break M/S EQ I've taken this technique a step further and EQ'd the mid and sides quite differently to give the breakbeat a unique placement in my mix for both mid and side elements.
Opposing Phase of Left and Right Channels
One of the wildest effects for creating an out of the speakers or inside your head effect for speakers and headphones respectively is to reverse the phase of the left or right channel. Stereo information requires information to be different in the left speaker to the right and always has some form of opposing phase information. This effect is an absolute opposition in phase so is quite extreme. Just enable Phz-L on Live's Utility device to oppose the phase on the left channel.
The down side of this approach is that the sound disappears 100% when summed to mono which means it must be used sparingly. But it's a cool way to add sounds that are kept secret from mono listeners or add some additional stereo width when applied to one part of a layered up sound.

This technique of opposing phase on one side holds little location information so I don't use it for any constant, dominant sounds in my mixes, but it's great for sporadic SFX sounds.
Haas Effect
Haas is a psycho-acoustic effect which tricks the brain into hearing a sense of space and directionality when one channel of a mono signal played in stereo is fractionally delayed behind the other. The brain can't discern these two signals as separate events as the delay is so short, it instead assumes it's ambient, directional information and processes the sound as having space around it.
The easiest way to create this effect is through Live's Simple Delay when you switch both Delay Modes from Sync to Time so you can use small measurements in milliseconds. With Dry/Wet set to 100%, set one channel to the lowest value of 1 ms for a minimal delay time and the right anywhere above up until around 40/50 ms. You'll hear how the sound's location and space is affected as you increase the second setting. Keep checking mono compatibility as this effect can produce strong comb-filtering in mono, so I tend to tweak between both stereo and mono playback to find a happy balance.

A lower delay time will create a tighter and more defined stereo effect and also avoids the detection of any flam being heard with transients in a sound.
Reverb for Stereo Spread
Though reverb is known as a tool to add ambience, I often use it to create a very slight sense of stereo with minimal decay time. By setting Live's Reverb to minimum Predelay, Decay Time, Shape and Diffuse values while increasing Stereo and Reflect to their maximum you will get a short and discrete stereo image to blend in with the original sound using Dry/Wet.
Settings can be explored further for tonal shaping but I generally start as above and also turn off all Input Processing, Spin, Diffusion and Chorus elements to get as clean a stereo sound as possible. The sound is tight enough with this approach that I can often use quite a wet balance setting without losing too much definition to the sound.

This tight reverb technique for stereoizing sounds can produce a bit of low-end muddiness in the side signal. For this reason I habitually add an EQ Eight to cut a lot of these problem frequencies which I've done on my main drum buss.
Haas with more control
The Haas technique mentioned earlier offers a quick and easy way to create a sense of stereo to a mono source but is limited by the fact it delays the full frequency spectrum of one channel. As already mentioned this can create a strong comb-filtering effect when summed to mono so I work around this by creating an adaption of the effect using Live's Filter Delay instead.
I first turn off the L+R channel so I'm left with independent left and right delay lines. Instead of leaving one side at 1 ms to try and have no delay on one side, I instead raise the Dry parameter to full so my original signal passes through unchanged. Then I can use the delay lines for two of the longer delay lines up to around 50 ms. The advantage here is each delay line can be filtered with a band-pass so a narrow set of frequencies is delayed per side. This minimises comb-filtering when summed to mono.

The band-pass filters allow you minimise the comb-filtering effect created from a normal Haas effect when summed to mono. They also allow you to focus on the none transient frequencies of percussive sounds to avoid any flam effect created by the delayed signals.
Frequency Shifter for Width
I seem to have a strong love affair with Live's Frequency Shifter these days and one reason for this is its Width switch which inverts the processed signal on the right channel to the left for a super wide effect that's highly mono compatible.
Enable Wide then lower or raise the Fine amount to hear a phasey stereo effect. The processing really starts to react when you alter the Dry/Wet balance to taste.

The timing of the Frequency Shifter effect cannot be sync'd to tempo so I often Freeze and Flatten a few passes to then edit the best parts into my work.
Modulation Effects
Live's Chorus, Flanger and Phaser devices are all brilliant tools for creating stereo information which also impart their own character onto your sounds. I find the best technique is to tune these effects to work musically with the source sound by exploring the X-Y Controller for a sweet spot. Then set the Dry/Wet balance for a stereo effect that doesn't overpower the character of the original.

The most subtle modulation effect is Chorus and helps to slightly soften the frequency content of a sound at the same time.
Layering and Panning
Unless a sound source is already stereo, most people tend to assume the best way to create a stereo signal is through processing. But stereo can also be achieved through the layering of sounds, much like the approach of panned and double tracked guitars in rock music.
This can be easily achieved through Instrument racks in Live or by layering audio clips alongside each other on different tracks. I often record found sounds with my portable recorder, edit different takes to be sequenced at the same time and then pan them around the stereo field. This creates a massive sound as the parts play in unison and because they're made from recordings including their own real ambience, they provide a good contrast to the more synthetic sounds the dominate my work.

My pad sound is made up of four different instrument layers which are panned to different positions in the stereo field.
Stereo Noise
If you're like me, the commercial abuse of the vocoder effect in the 1990s and 2000s will discourage you from using Live's own Vocoder device. But, this device is actually a very handy tool for creating a sense of stereo through its noise Carrier signal.
The Carrier is set to Noise by default, but you will need to increase Bands to 40 and Range 20 Hz to 18 kHz for the best noise fidelity as possible. Explore Depth at values lower than 100% and tweak the Release parameter to control how well the noise tracks the shape of your sound. Then use Formant to tune the pitch of the noise and draw into the Filter Bank to remove unwanted bottom-end from the signal and perhaps a little top-end too to avoid brittleness.
Now the Dry/Wet can be used to feed the tiniest amount of this signal in with the original for a very unique sense of stereo. When used sparingly, this can give a few mix elements a unique sense of separation to all other sounds.

I've added a little lower pitched noise to complement my breakbeat track and swept the Formant control until the tuning sounded musical with the general tuning of the break.
Autopanning
Live's Auto Pan is an obvious choice for adding stereo movement to a sound and it's often used for slower, musical panning sweeps between the left and right channels. When I use this approach I prefer a mild sense of stereo and am very shy with the Amount parameter so the pan effect is less obvious to the listener and keeps a stable image in the center of the mix.
When the Rate control is set to Hz over Sync, the higher rate amounts can be used to introduce a stereo flavour of amplitude distortion. Set the Amount to quite high and tune the Rate to sound musical with the source, then back off the Amount until the distortion sits discretely behind the original sound.

Amplitude distortion is possible through Live's Auto Pan and the tone of distortion can be further shaped by exploring the different LFO Waveform shapes at the bottom right of the device.
L/R M/S processing
This final and most powerful tip is my favourite as it allows you to split your signal into either left and right channels or mid and side components to then process independently. The processing of these separated elements is where the real creativity begins as there's no rules here and it's a fantastic approach for sound-design.
To begin, add a Utility device, then Group it from the Edit menu. You then need to reveal the Show the Chain List editor so you can duplicate the existing Chain. A Chain is an audio channel within a Rack and duplicating the first Chain creates to channels in parallel with a Utility device on each.
For Left and Right processing set the first Utility's Channel Mode to Left and the second to Right. Then pan the Chains to their respective sides so the channels are panned correctly at the Rack's output.
For mid and side processing, instead set the first Utility's Width to 0% and the second's to 200% respectively.

L/R and M/S processing can be highly experimental and creative but you do need to keep the balance of both elements in check. A lopsided L/R balance will only create the equivalent to a pan to one side or the other but too much side signal will mean a large chunk of your sound will disappear when summed to mono.
| Splice this project here: https://splice.com/AskAudio/askaudiomagcom--stereoize-and-control-your-mix-in-ableton-live |

Discussion
Want to join the discussion?
Create an account or login to get started!