I created this bassline in Sylenth1, but you can probably use any decent virtual analog synth with multiple oscillators, either software or hardware. While this is a big, wide and very rich bass pad, we still want it to have a strong core, so keep in mind that one of its elements should sit in the middle - in mono - so we keep both the wideness and a strong bass in the middle. If you prefer, you can create a separate track with a mono part only, but in our example we will do it within a single preset.
I tend to create sounds from the ground up, so I don't have to switch off all the "distractions", such as effects and specific modulations, one after another. So let's first initialize the Sylenth1. Choose Initialize from the presets menu.
Step 1
Sylenth1 has four oscillators, but let's rather think of them as two pairs of two oscillators, with independent filter, envelopes and modulation possibilities - we will want to use them here. So the first couple, A1 and A2, shall be rich, wide, unison saw sounds (Picture 1), and we will add another oscillator, B2, leaving it in a solid mono position (Picture 2). We can leave the volume of the B2 oscillator down for a while to focus on the others first.

2
Let's take a look what we did on Picture 1. First we've selected both oscillators to be sawtooth waveforms and lowered their pitch to -2 octaves, for it is a low bass sound. We adjusted an envelope so there is a significant release, allowing it not to stop abruptly, but gradually. We opened decay a lot, for it is a slow, long bass pad, but not fully, because we want our bass to decay slowly.
Now let's engage unison, adjusting oscillators A1 and A2 to 8 and 4 voices unison, and hear how the sound fattens. Next, you could guess we will detune the voice in the unison mode. Let's just put both to 12 o'clock for a start, well, that is about as much as it makes sense, sometimes it's even better to stay lower, it's a matter of taste and what you want to achieve. At this point we already have the core of the sound, so try it by playing the E2 key, which is the lowest tone of the bassline. But it's still far from what we want. Let's try another little trick.
Step 2
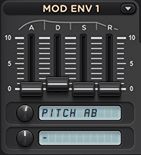
Notice a little lack of punch that is normal with unison and wide spread sounds. Please see Picture 3. We will insert Pitch AB into Mod Env slot 1, open Decay just a tiny bit and also open the level a bit. The quick pitch modulation actually helps to create a harder attack, which we want, as this is still a bass sound and must have some punch.
3
Step 3
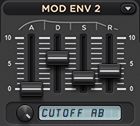
As you can hear, we don't only want volume to slowly decay, but also the frequency. So let's first select the 24 dB Low pass filter (Filter A) and close it about half way. Of course we cut off the highs this way, but only for a moment and we will bring them back in a controlled manner via the Envelope, which will modulate the filter. Select Cutoff A in Mod Env 2 slot and open the level fully. Now move its Decay slowly and notice how the bass line starts to change over time. Now we're getting closer! Adjust the sustain and release according to taste or as it is on Picture 4. Our goal is to get a combination of sound movement through modulation of both amplitude and filter modulation. You can also add some Drive to the filter, a nice filter overdrive, for the sound to become even more creamy. A value of 1.4 should do.
4
Step 4
Let's now activate the sine bass, turn its volume up, which will provide the solid middle. Keep things simple - just select the sine waveform and leave Voices at 1 voice only and the tune at -2 octaves. See Picture 5.

5
Nothing else is necessary here. Adjust the level of this B oscillator section in the Mixer so it fits your mix.
Step 5
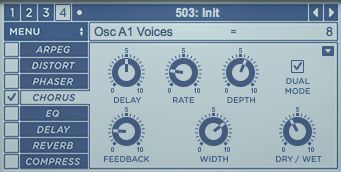
What is a good old creamy synth bass without some chorus? Without going into details, just copy the settings on Picture 6 and you're good to go, or adjust to your own taste.
6
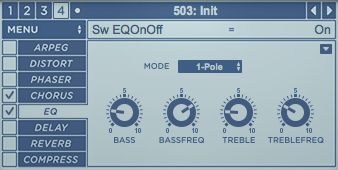
Without a doubt most of the sounds created get equalized and further processed at some point during production, but we can do some of it on Sylenth1 itself. Adjusting EQ according to the Picture 7 adds some more presence and creaminess to our bass pad.
7
And the same goes for compression. Adding some in Syletnth1 itself will bring everything together even more smoothly. Adjust according to Picture 8.
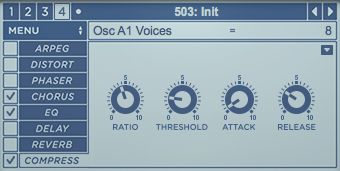
8
Step 6
Some reverb can sound nice with this bassline, but be careful adding it, it all depends on other factors in the mix and you don't want to drown the bass in the reverb too much. See the example on Picture 8. You might try some separate plate reverb plugin and adjust according to your taste, preferably via sends, so you can cut off some lows and leave them dry. If you have some sort of a stereo processor plugin, you could also insert it after Sylenth1 and filter all frequencies below 100 Hz or so to mono and treat the rest separately.
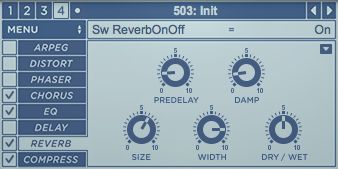
9
Step 7
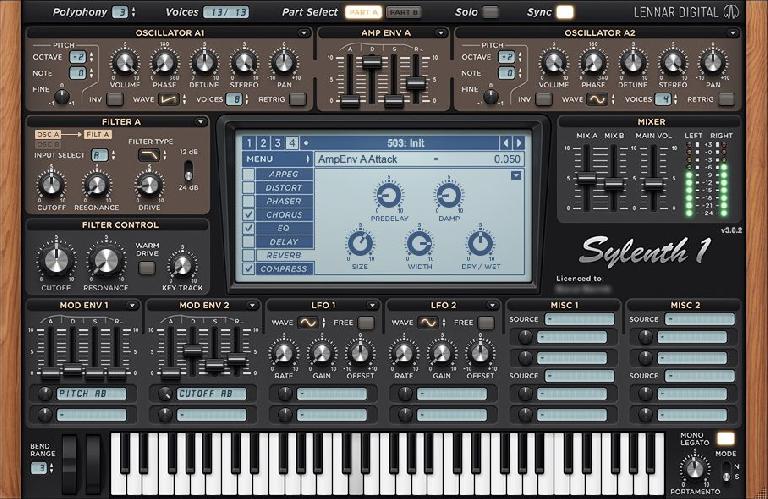
Lastly, here is the full Sylenth screen of the Saviour bass. As you can see in Picture 10, adding some portamento effect for smoother transition is also fine (bottom—righthand).
Step 8: Some Extra Tips
- The bassline is originally also triggered with a sidechain 4/4 kick, which adds to a bit of extra movement and groove.
- You can always use some extra modulation to make such a pad appear even more lively and give it some extra motion. To achieve that, you could try to fine-modulate pitch, phase or cutoff frequency.
- As such a wide pad is all chorusy and wide, this may bring some phase issues, so adjust your stereo width, detune the settings and chorus accordingly, so you're still okay with what will be lost if listened to in mono.


 © 2024 Ask.Audio
A NonLinear Educating Company
Discussion
Want to join the discussion?
Create an account or login to get started!